sauermann CT 110 Omaniku manuaal

Tüüp
Omaniku manuaal
1
2
3
4
5
Tachometer
USER MANUAL
Description of the device
1. OK key
2. Backlight key
3. Select key
4. On/Off/Esc key
5. Hold/min/max key
CT 110
Technical specications
Measuring elements Optical tachometry: optical detection (Phototransistor sighting distance max. 40 cm)
Contact tachometry: ETC adaptator for optical tachometry probe
Display
4 lines, LCD technology. Dimensions: 50 x 36 mm
2 lines of 5 digits with 7 segments (value)
2 lines of 5 digits with 16 segments (unit)
Connector Coiled, 0.45 m length, extension: 2.4 m
Housing ABS, protection IP54
Keypad 5 keys
European directives 2014/30/EU EMC; 2014/35/EU Low Voltage; 2011/65/EU RoHS II; 2012/19/EU WEEE
Power supply 4 batteries AAA LR03 1.5 V
Ambience Neutral gas
Conditions of use (°C, %RH, m) From 0 to +50 °C. In non condensing conditions. From 0 to 2000 m.
Storage temperature From -20 to +80 °C
Auto shut-off Adjustable from 0 to 120 min
Weight 190 g
General features
Parameters Measuring units Accuracy(1) Measuring range Resolution
Optical tachometer rpm
From 60 to 10 000 rpm:
±0.3% of reading ±1 rpm
From 10 001 to 60 000 rpm: ±30 tr/min
From 60 to 60 000 rpm 1 rpm
Contact tachometer rpm, m/min,
ft/min, in/min, m/s
From 30 to 3000 rpm:
±1% of reading ±1 rpm From 30 to 3000 rpm 1 rpm
(1) All the accuracies indicated in this technical datasheet were stated in laboratory conditions, and can be guaranteed for measurements carried out in the same conditions, or carried out with calibration compensation.
Once the measurements are frozen :
Press again on “Hold/min/max“.
The device displays the maximum value of velocity measured since the last questioning at the top of the screen and the
minimum value of velocity measured since the last questioning at the bottom of the screen.
Press again on “On/Off/Esc“ to return to the measurement display.
Display the minimum and the maximum
Turn on the device by pressing on “On/Off/Esc“.
The device displays its name “CT110“.
Put the probe to the required location.
The device displays the measured velocity.
Perform a measurement
During a measurement :
Press on “Hold/min/max“ to freeze the measurement.
“Hold“ displays on screen and the measurements are frozen.
Press on “On/Off/Esc“ to exit the hold function.
The device returns to the measurements display.
Freeze the measurement
Adjust the device
Device drop-down menu
If the type of selected probe is the contact probe, put the contact tip on the probe.
Select the probe type
It is possible to select the probe type: optic probe or contact probe.
Press on “Select“.
“PROBE“ blinks on screen.
Press on “OK“.
The probe type currently used blinks on the screen.
Press on “Select“ to select “OPTIC“ for the optic probe or “CONT“ for the contact probe.
Press on “OK“ to validate.
“PROBE“ blinks on screen.
Press on “On/Off/Esc“ to return to the measurement display.
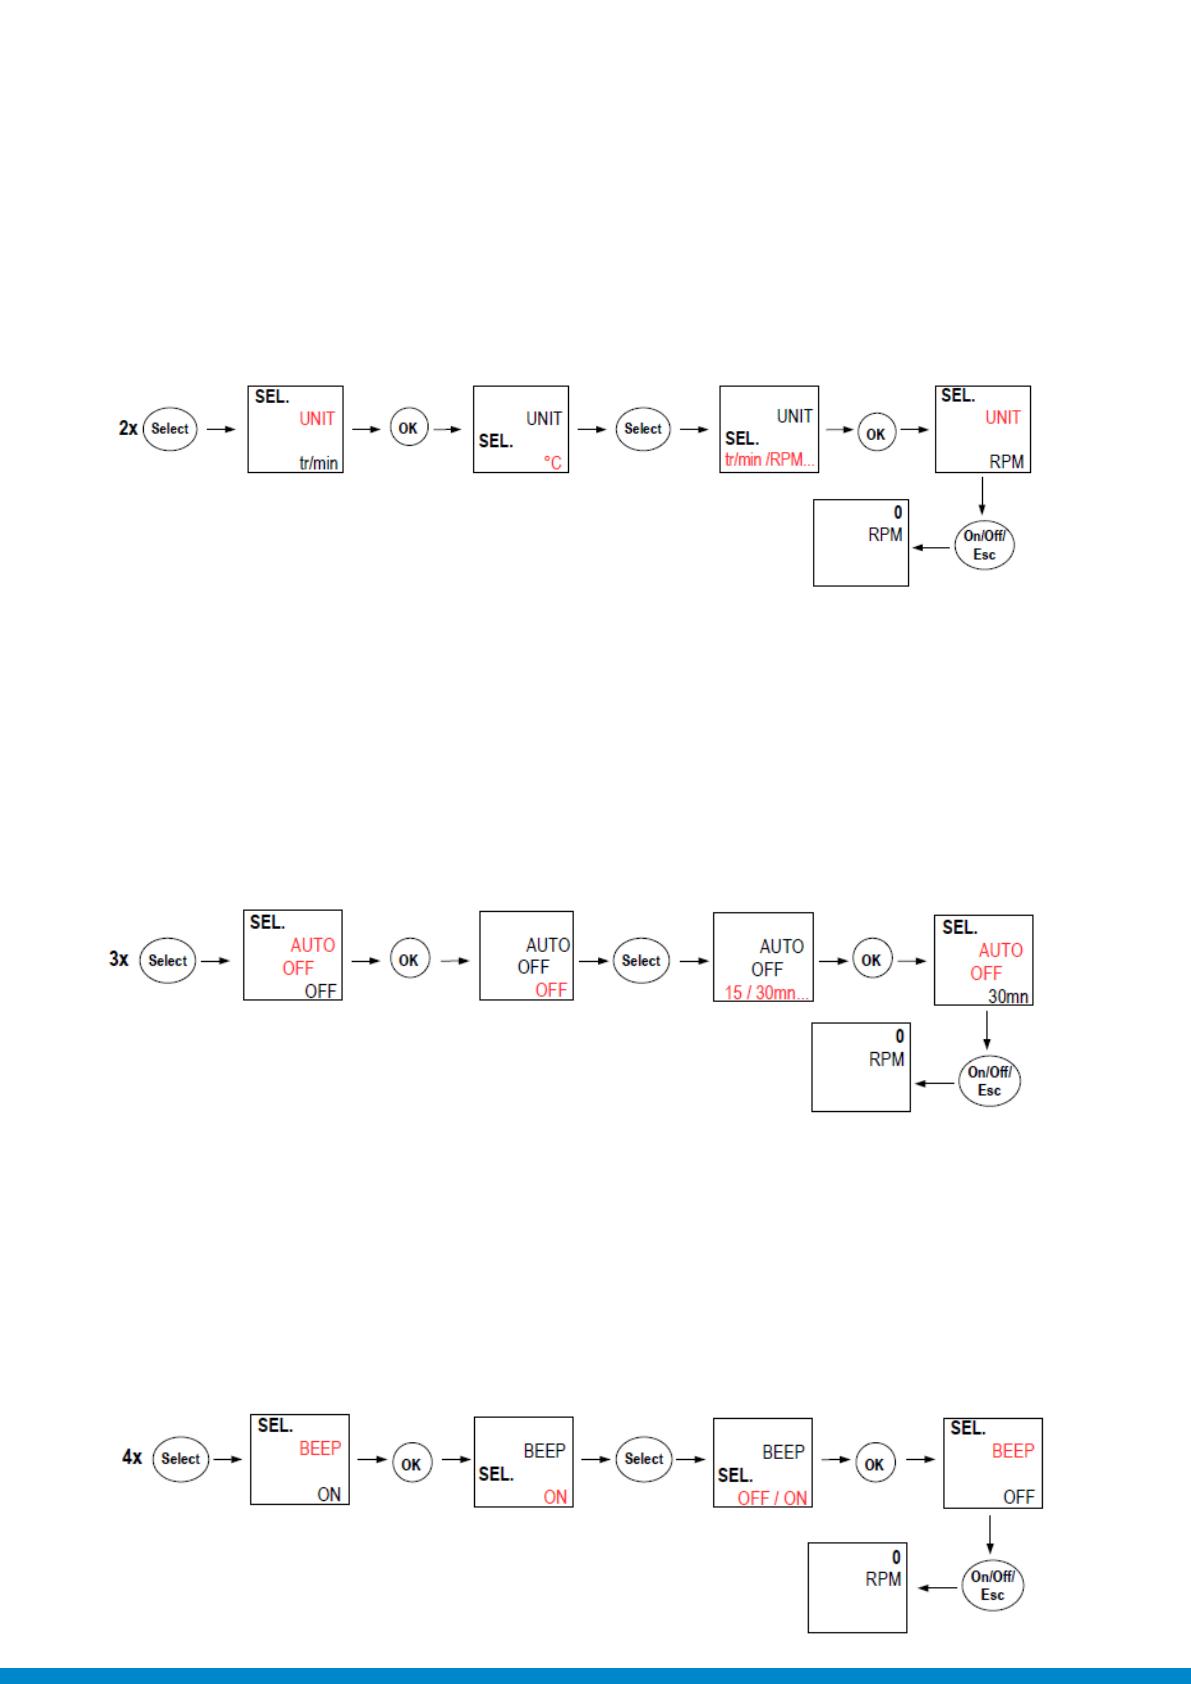
Adjust the auto shut-off
The device is on and displays the measurement.
Press on “Select“ until AUTO OFF“ blinks on screen.
Press on “OK“.
The time before device auto shut-off blinks at the bottom of the screen.
Press on “Select“ to select the time before device auto shut-off: 15, 30, 45, 60, 75, 90, 105, 120 or OFF.
Press on “OK“ to validate.
Press on “On/Off/Esc“ to return to the measurement display.
Activate or deactivate the keys beep
The device is on and displays the measurement.
Press on “Select“ until “BEEP“ blinks on screen.
Press on “OK“.
“OFF“ or “ON“ blinks on screen.
Press on “Select“ to activate the keys beep “ON“ or deactivate the keys beep “OFF“.
Press on “OK“ to validate.
“BEEP“ blinks on screen.
Press on “On/Off/Esc“ to return to the measurement display.
Select the measuring unit
The device is on and displays the measurement.
Press on “Select“ until “UNIT“ blinks on screen.
Press on “OK“, the unit currently used blinks on screen.
For the contact probe: press on “Select“ until the required unit appears: tr/min, rpm, m/min, in/min, ft/min or m/s.
For the optic probe: press on “Select“ until the required unit appears: tr/min or rpm.
Press on “OK“ to validate the unit selection.
“UNIT“ blinks on screen.
Press on “On/Off/Esc“ to return to the measurement display.
NT_EN – CT110 – 10/11/17– Non-contractual document – We reserve the right to modify the characteristics of our products without prior notice.
www.sauermanngroup.com
The device is on and displays the measurements.
Press on “Backlight“ to activate the backlight.
To deactivate it press again on “Backlight“.
Activate the backlight
Remove the front part at the back of the device.
Change the old batteries by AAA LR03 1.5V batteries.
Replace the front part.
Change the batteries
  • Page 1 1
  • Page 2 2
  • Page 3 3
  • Page 4 4

sauermann CT 110 Omaniku manuaal

Tüüp
Omaniku manuaal

teistes keeltes