ViewSonic IFP5550-2 Lühike juhend

Tüüp
Lühike juhend
ViewBoard IFP50 series
Commercial Touch Display
Quick Start Guide
1
Package Contents
● Power cable x 4
● Remote control
AAA battery x 2
● USB cable
AV cable
● Stylus pen x 2
● Quick start guide
● RS232 adapter
● Clamp x 5
● Plate
● Screw x 7
● Input compatible with HDMI
2
Wall Mount Kit Specifications (VESA)
inch VESA Spec. (A x B) Standard Screw (C x D) Quantity
IFP6550 - 65 600 x 400 mm M8 x 25 mm 4
IFP7550 - 75 800 x 400 mm M8 x 25 mm 4
IFP8650 - 86" 800 x 600 mm M8 x 25 mm 4
IFP5550 - 55 400 x 400 mm M8 x 25 mm 4
3
Control Panel Overview
USB USB USB
Terminal Interface Overview
4
Item Description
Press the key to turn on the device
Press the key to turn off/on the display backlight only
Press and hold the key to turn off the device
Back to Embedded player main interface
Return to Embedded player previous level
Call up function menu
Decrease volume
Increase volume
USB port for Embedded Player and internal PC
Receives signals from the remote control
Audio output to the external speaker
SPDIF output
Serial interface, used for mutual transfer of data between devices
Standard RJ45 (10M/100M/1G) Internet connection interface
(This network port is used for Embedded Player and Slot in PC)
AC power input
Power On / Off switch
Extend content out to another display device
USB port for Embedded Player
High-definition multimedia interface signal input, connect to PC with HDMI output, set-top box,
or other video device
HDMI 1, 2, 3 support up to 3840x2160@60Hz, HDCP 2.2
HDMI 1, 2 support HDMI CEC(One Touch Play, System Standby, partial Remote Control Pass Through)
Touch signal output to the external PC
Touch 1 for HDMI IN 2 and 3
Touch 2 for HDMI IN 1 and VGA IN
External computer image input
External computer audio input
Camera port for Embedded Player and Slot-in PC
Composite video and audio input
Item Description
Off
On
myViewBoard for Windows: Corporate
Off
myViewBoard for Windows: Corporate
Installation Environment Attention
Optional Slot in PC
Optional Wifi module
5
Remote Control Overview
Press to turn the display
ON/OFF
Mute / Unmute
Display information of the
current input source
Blank screen
Freeze screen
Numeric input button
Press to switch between
PC applications
Numeric input button
Close current PC window
Source selection button
Press to display Menu
Screen capture
PC ‘Tab’ button
Switch to slot in PC desktop
PC ‘Backspace’ button
PC ‘Windows’ button
PC ‘Menu’ button
Press to scroll up
Press to scroll down
Enter button. Press it to
select options.
Writing software startup
Shortcut button to exit
dialog boxes
Back
PC ‘Space’ button
CH+ : PC previous page
CH- : PC next page
Increase / Decrease volume
Windows F1 Function
Windows F2 Function
Windows F3 Function
Windows F4 Function
Windows F5 Function
Windows F6 Function
Windows F7 Function
Windows F8 Function
Windows F9 Function
Windows F10 Function
Windows F11 Function
Windows F12 Function
Press to scroll left
Press to scroll right
F1:
F2:
F3:
F4:
F5:
F6:
F7:
F8:
F9:
F10:
F11:
F12:
FREEZE
Connecting an External PC
6
7
RS232 Connections
When you use an RS232 serial port cable to connect your display
to an external computer, certain functions can be controlled by the
PC, including power on/off, volume adjustment and more.
1. To display video and sound from an external PC follow the instructions below:
Note: External PCs can also be connected to the display via HDMI cable.
Connect a VGA cable (15-pin) from your external PC to the VGA IN port on the
display.
Connect an audio cable from the AUDIO OUT port on your external PC to the
AUDIO IN port on the display.
2. Connect a USB cable to the external PC from the TOUCH OUT port of the display.
Note: For optimal results, select 1920x1080p as the external computer's input
resolution.
TOUCH 2
AUDIO IN VGA
TOUCH2
Serial Port Cable
Computer
8
Connecting USB Peripherals
9
HDMI Connections
General Setting
10
1. USB Peripherals: Plug the USB device cable into the USB IN port.
2. Networking and modem cables: Plug the router cable into the LAN IN port.
3. Microphone: Plug the microphone cable into the MIC port.
Input sources, Volume, Back light, and Flicker free
More OSD settings
11
Audio Setting Screen Setting
Display Setting Adjust Setting
Item Description Item Description
Click to launch annotation app
Click to show wireless screen sharing app
Click to switch to Slot-in PC source
Click to open web browser
Click to open cloud meeting
Click to pop up app list
USB equipment
USB cable
audio cable
Network cable
Router and other
network signal output
Network cable
HDMI cable
HDMI IN
12
Annotation(Overlay digital pens)
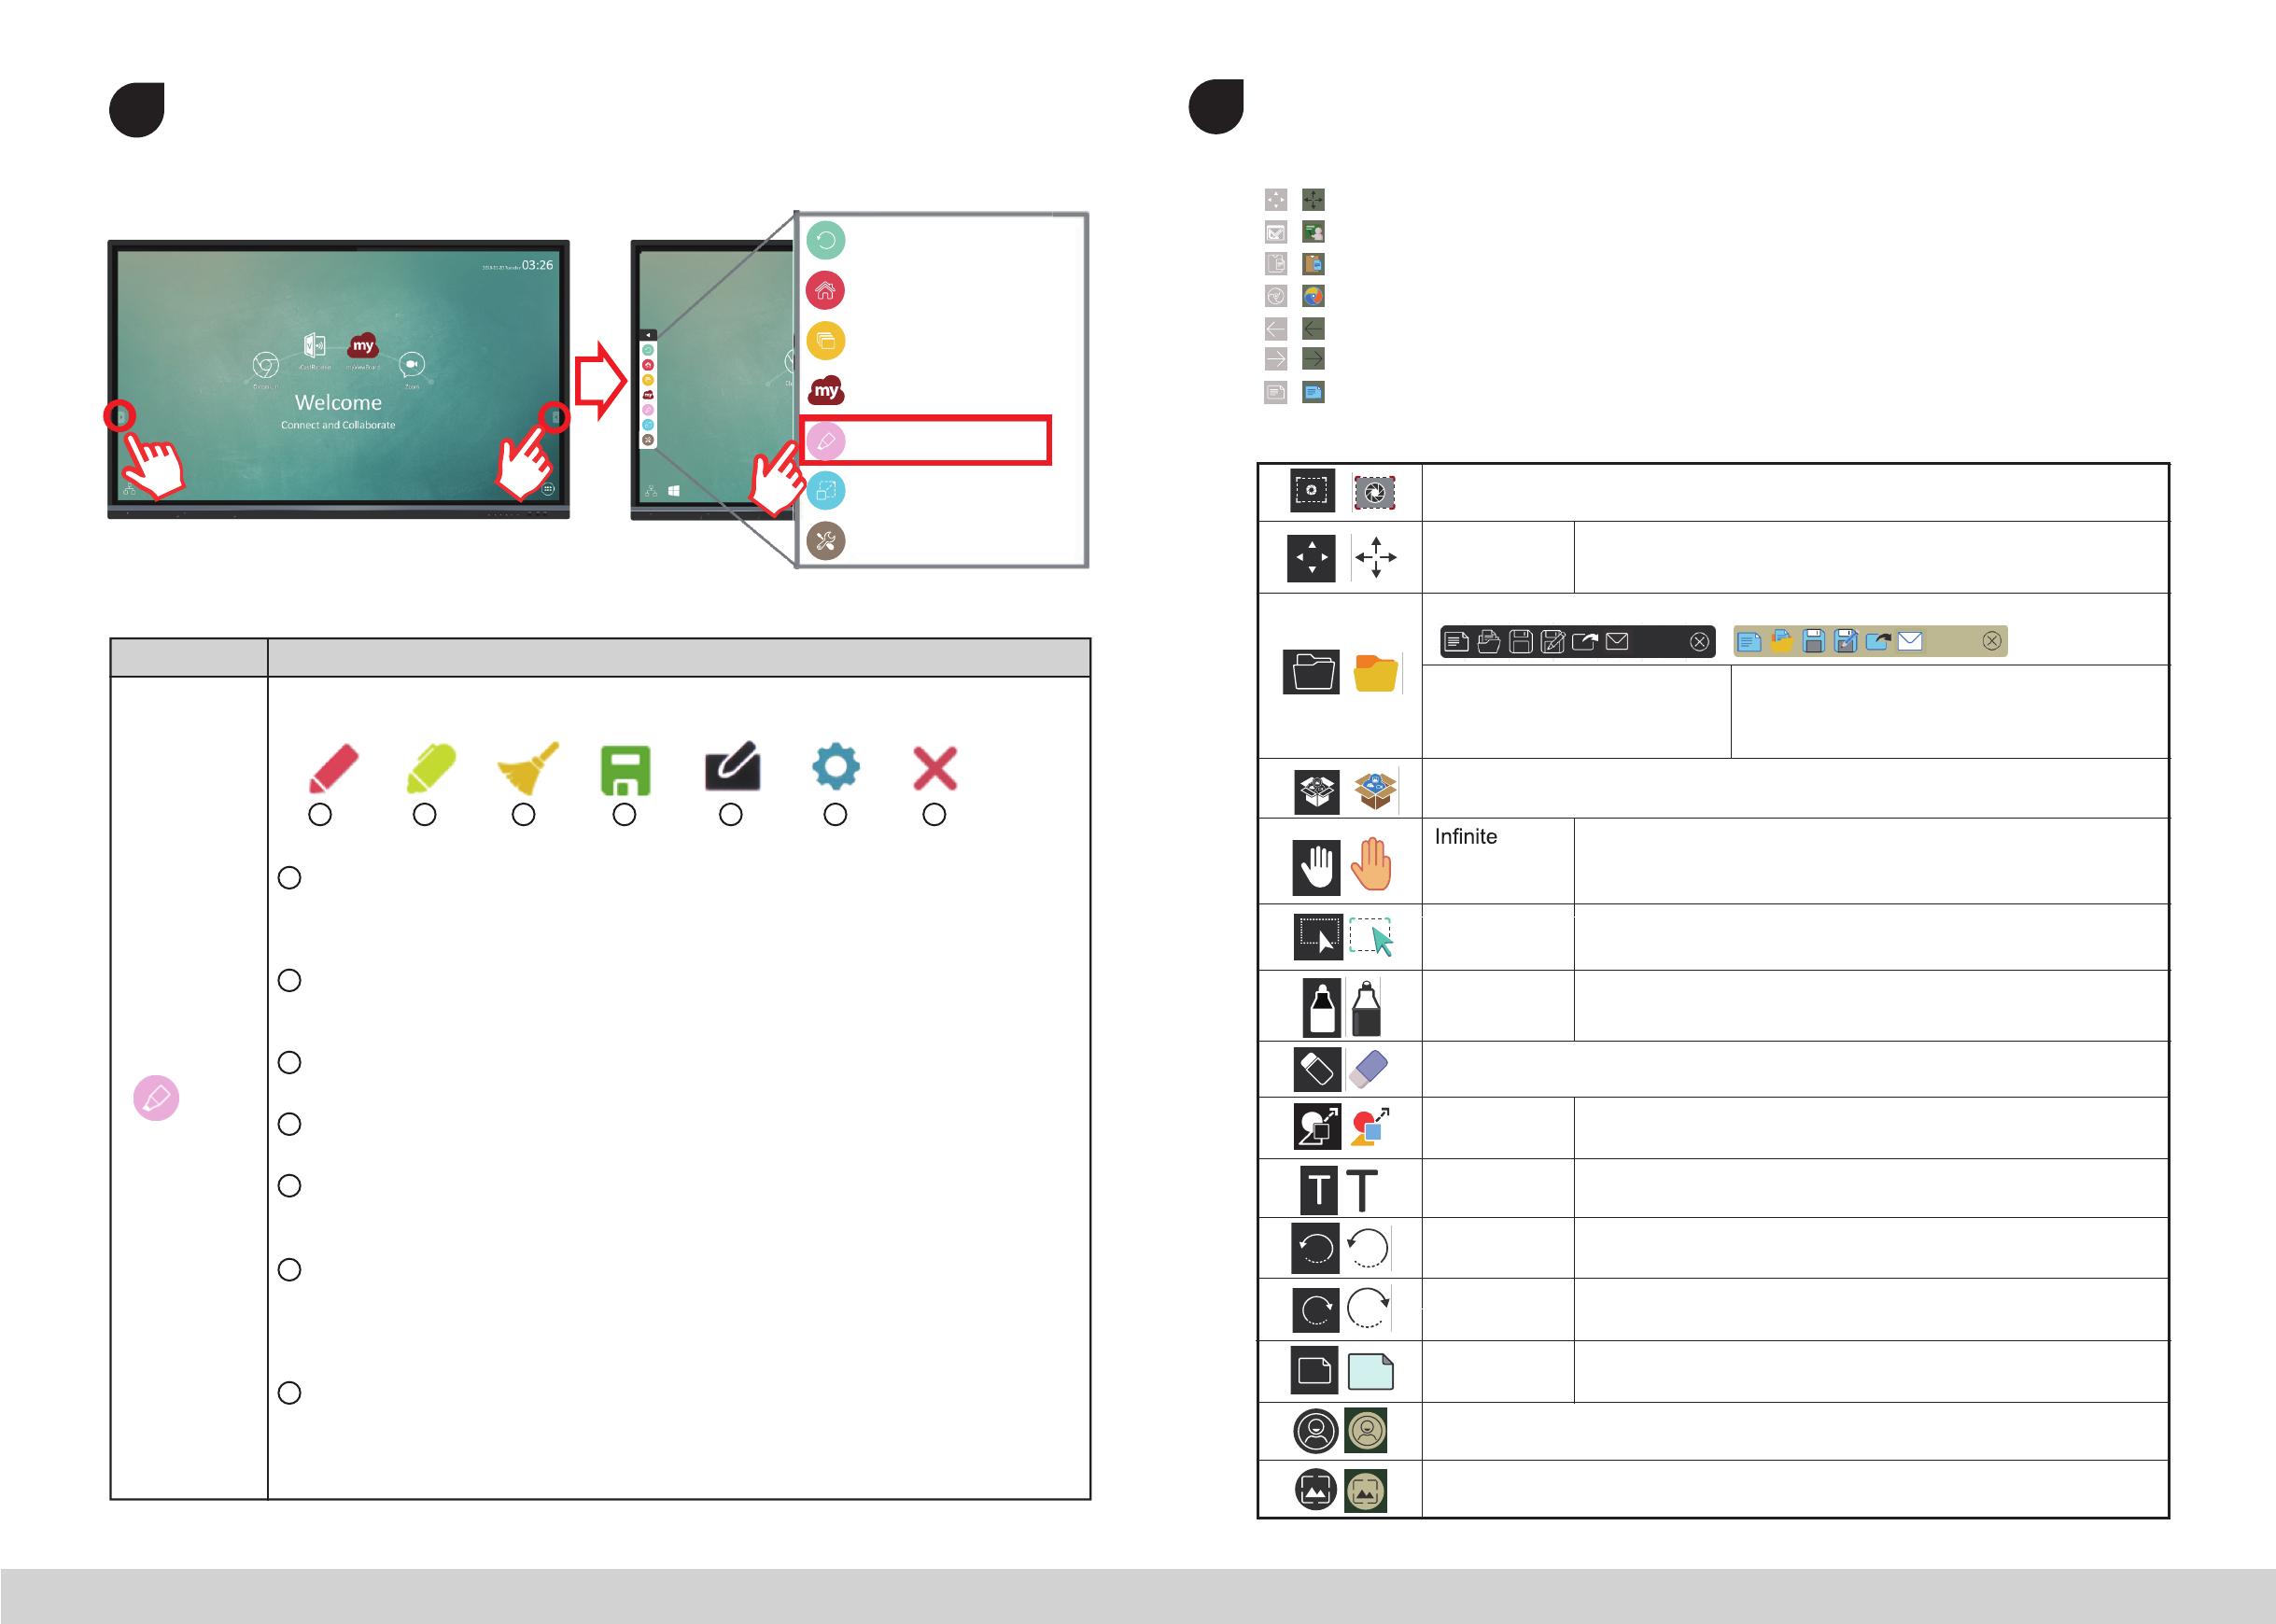
Tool bar tigger icons are on the edge of the ViewBoard laucher
13
myViewBoard Software
Item Description
Pen
Click the pen tool icon and pop up the “Pen, Clear, and Save option” tool bar
Digital pen
With four colors options in red, black, blue, and green (rotate in sequence), that can
annotate overlay any input source.
Note: the default setting of digital pen supports up to 10-point writing
Digital highlighter pen
With the transparency setting and four color options of yellow, orange, blue, and green
(rotate in sequence). The default setting is 10-point marking
Brush
Click the “brush icon” to clean all the digital inking on the screen
Save as
Click to save the on-screen image into internal storage
Writing mode
Transparent mode: Screen won’t be frozen, the screen resolution won’t be reduced to 1080P.
Opaque mode: Screen will be frozen, the screen resolution will be reduced to 1080P.
Picture save
Speed priority: Save the on-screen image to 1920x1080, the save speed is fast.
Quality priority: Save the on-screen image to 3840x2160, it will spend around 10 seconds
for saving.
Note: In opaque(non-transparent) mode, the user can’t select the Picture Save setting.
Close
Click to close the digital pen icon
1
2
3
4
5
6
7
1. New MyViewBoard File
2. Open File
3. Save File
Floating Bar
Move the Floating Bar.
Switch between presentation and preparation modes.
Paste from the clipboard onto the canvas.
Open the embedded browser.
Go to the previous page.
Go to the next page.
Add a new page.
1
Tool Bar
Off
On
Off
On
Whiteboard background management menu
myViewBoard for Windows: Corporate
Tool Bar
Off
On
Whiteboard background management menu
1
1
Tool Bar
Off
On
Off
On
Whiteboard background management menu
Tool Bar
Off
On
Off
On
Whiteboard background management menu
Pen Button
Writing tools, changing colors, transparency,
thickness, etc.
1
1
Tool Bar
Off
On
Off
On
Whiteboard background management menu
myViewBoard for Windows: Corporate
Tool Bar
Off
On
Off
On
Whiteboard background management menu
1
Tool Bar
Off
On
Off
On
Whiteboard background management menu
Full Screen Capture
1
1
Tool Bar
Off
On
Off
On
Whiteboard background management menu
myViewBoard for Windows: Corporate
Tool Bar
Off
On
Off
On
Whiteboard background management menu
1
1
Off
On
Tool Bar
Off
On
Off
On
Whiteboard background management menu
Toolbar Move
Button
Click/Touch and hold to move the toolbar to Left
side, Right side, or bottom of the screen.
1
1
Tool Bar
Off
On
Off
On
Whiteboard background management menu
myViewBoard for Windows: Corporate
Tool Bar
Off
On
Off
On
Whiteboard background management menu
Using eraser to erase objects or clean the page
1
1
Tool Bar
Off
On
Off
On
Whiteboard background management menu
myViewBoard for Windows: Corporate
Tool Bar
Off
On
Off
On
Whiteboard background management menu
1
1
Off
On
Tool Bar
Off
On
Off
On
Whiteboard background management menu
File Button
Shape/Line
Button
Create shapes, select shape colors, insert
arrows.
1. New MyViewBoard File
2. Open File
3. Save File
4. Save As File
5. Export
6. Email
1
Tool Bar
Off
On
Off
On
Whiteboard background management menu
myViewBoard for Windows: Corporate
Off
On
1
1
Tool Bar
Off
On
Off
On
Whiteboard background management menu
myViewBoard for Windows: Corporate
Tool Bar
Off
On
Off
On
Whiteboard background management menu
Textbox Creates a Textbox
1
1
Tool Bar
Off
On
Off
On
Whiteboard background management menu
myViewBoard for Windows: Corporate
Tool Bar
Off
On
Off
On
Whiteboard background management menu
1
1
Tool Bar
Off
On
Off
On
Whiteboard background management menu
Tool Bar
Off
On
Off
On
Whiteboard background management menu
Import resources (image, video, audio...) to the
whiteboard
1
Tool Bar
Off
On
Off
On
Whiteboard background management menu
myViewBoard for Windows: Corporate
Off
On
1
1
Tool Bar
Off
On
Off
On
Whiteboard background management menu
myViewBoard for Windows: Corporate
Tool Bar
Off
On
Off
On
Whiteboard background management menu
Undo Button Undo previous actions
1
1
Tool Bar
Off
On
Off
On
Whiteboard background management menu
myViewBoard for Windows: Corporate
Tool Bar
Off
On
Off
On
Whiteboard background management menu
1
1
Tool Bar
Off
On
Whiteboard background management menu
Tool Bar
Off
On
Off
On
Whiteboard background management menu
Canvas
Button
Click – Use two hands to zoom in/out on/of the working panel
1
Tool Bar
Off
On
Off
On
Whiteboard background management menu
myViewBoard for Windows: Corporate
Off
1
1
Tool Bar
Off
On
Off
On
Whiteboard background management menu
myViewBoard for Windows: Corporate
Tool Bar
Off
On
Off
On
Whiteboard background management menu
Redo Button Redo previous actions
1
1
Tool Bar
Off
On
Off
On
Whiteboard background management menu
myViewBoard for Windows: Corporate
Tool Bar
Off
On
Off
On
Whiteboard background management menu
1
1
Tool Bar
Off
On
Off
On
Whiteboard background management menu
Tool Bar
Off
On
Off
On
Whiteboard background management menu
Selection
Button
Select objects, text, and pictures to get other tools
1
Tool Bar
Off
On
Off
On
Whiteboard background management menu
myViewBoard for Windows: Corporate
1
1
Tool Bar
Off
On
Off
On
Whiteboard background management menu
myViewBoard for Windows: Corporate
Tool Bar
Off
On
Off
On
Whiteboard background management menu
Page Toggle
Button
Select pages, sort pages, delete pages
1
Tool Bar
Off
On
Off
Whiteboard background management menu
myViewBoard for Windows: Corporate
1
1
Tool Bar
Off
On
Off
On
Whiteboard background management menu
myViewBoard for Windows: Corporate
Tool Bar
Off
On
Off
On
Whiteboard background management menu
Showing or hiding the current host information.
1
Tool Bar
Off
On
Off
On
Whiteboard background management menu
myViewBoard for Windows: Corporate
1
1
Tool Bar
Off
On
Off
On
Whiteboard background management menu
myViewBoard for Windows: Corporate
Tool Bar
Off
On
Off
On
Whiteboard background management menu
Whiteboard background management menu.
1 2 3 4 5 6 7
Return icon
Home menu
Display all apps in use
Digital whiteboard
Frozen screen
More tools
Overlay digital pens
ViewBoard Cast
14
IFP50-2_QSG_Rev. 1a 12-04-18
Copyright © 2019 ViewSonic Corporation. All rights reserved.
Folders
15
Item Description
Click to exit.
Click to sort files.
Click to display files by thumbnail.
Click to display files by list.
Click to select file.
Click to add folder.
Click to copy file.
Click to paste file.
Click to cut file.
Click to delete file.
Click to rename file.
Click to show more functions.
Exit
Sort
Thumbnail
List
Select
Add folder
Copy
Paste
Cut
Delete
Rename
More
Whiteboard background management menu
Working with ViewBoard Cast software, the vCastReceiver app, will allow
ViewBoard to receive mobile users’ screens, photos, videos, annotations, and camera.
Network information
ViewBoard and mobile devices need to link to the same LAN network subnet.
Ports :
-
TCP 56789, 25123, 8121 & 8000
-
UDP 48689, 25123
Port for activation:
-
Port: 8001
®
®
®
vCastReceiver
1 / 1

teistes keeltes