Microlife BP A6 BT Kasutusjuhend

Kategooria
Vererõhu ühikud
Tüüp
Kasutusjuhend
Microlife BP A6 BT
Europe / Middle-East / Africa
Microlife AG
Espenstrasse 139
9443 Widnau / Switzerland
Tel. +41 / 71 727 70 30
Fax +41 / 71 727 70 39
www.microlife.com
Asia
Microlife Corporation.
9F, 431, RuiGang Road, NeiHu
Taipei, 11492, Taiwan, R.O.C.
Tel. +886 2 8797-1288
Fax +886 2 8797-1283
www.microlife.com
North / Central / South America
Microlife USA, Inc.
1617 Gulf to Bay Blvd., 2nd Floor Ste A
Clearwater, FL 33755 / USA
Tel. +1 727 442 5353
Fax +1 727 442 5377
www.microlife.com
IB BP A6 BT N-V10 1416
EN 1
SV 10
FI 18
DA 26
NO 34
LV 42
LT 50
EE 58
RU 66
IS 76
Microlife BP A6 BT BP A6 BT
A6 BT
Guarantee Card
Name of Purchaser / Inköparens namn /
Ostajan nimi / Forhandlers navn / Kjøpers navn /
Pircēja vārds / Pirkėjo pavardė / Ostja nimi /
Ф.И.О. покупателя / Nafn kaupanda
Serial Number / Sarjanumero / Serienummer /
Serienummer / Sērijas numurs / Serijos numeris /
Seerianumber / Серийный номер / Lotunúmer
Date of Purchase / Inköpsdatum /
Ostopäivämäärä / Købsdato / Kjøpsdato /
Iegādes datums / Pardavimo data /
Ostukuupäev / Дата покупки / Kaupdagur
Specialist Dealer / Återförsäljare / Alan kauppias /
Special-forhandler / Spesialist forhandler /
Speciālists - pārstāvis / Pardavusi įstaiga /
Ametlik müügiesindaja / Специализированный
дилер / Söluaðili
1BP A6 BT
EN
Display
Read the instructions carefully before using this device.
Type BF applied part
Dear Customer,
Your new Microlife blood pressure monitor is a reliable medical
device for taking measurements on the upper arm. It is simple to
use, accurate and comes highly recommended for blood pressure
monitoring in your home. This device was developed in collabora-
tion with physicians and clinical tests carried out prove its
measurement accuracy to be of a very high standard.*
Microlife AFIB detection is the world’s leading digital blood pres-
sure measurement technology for the detection of atrial fibrillation
(AFIB) and hypertension. These are the two top risk factors of
getting a stroke or heart disease in the future. It is important to
detect AFIB and hypertension at an early stage, even though you
may not experience any symptoms. Appropriate treatment will
reduce your risk of suffering a stroke. For this reason, it is recom-
mended that you visit your doctor when the device gives an AFIB
signal during your blood pressure measurement. The AFIB algo-
rithm of Microlife has been clinically investigated by several prom-
inent clinical investigators and showed that the device detects
patients with AFIB at a certainty of 97-100%.
1,2
Please read through these instructions carefully so that you under-
stand all functions and safety information. We want you to be happy
with your
Microlife
product. If you have any questions, problems or
want to order spare parts please contact your local
Microlife
-
Customer Service. Your dealer or pharmacy will be able to give you
the address of the
Microlife
dealer in your country. Alternatively, visit
the internet at
www.microlife.com
where you will find a wealth of
invaluable information on our products.
Stay healthy – Microlife AG!
* This device uses the same measuring technology as the award
winning «BP 3BTO-A» model tested according to the British
Hypertension Society (BHS) protocol.
1
Stergiou GS, Karpettas N, Protogerou A, Nasothimiou EG, &
Kyriakidis M. Diagnostic accuracy of a home blood pressure
monitor to detect atrial fibrillation. J Hum Hyperten 2009; 1-5.
2
Wiesel J, Fitzig L, Herschman Y, & Messineo FC Detection of
Atrial Fibrillation Using a Modified Microlife Blood Pressure
Monitor. Am J Hypertens 2009; 848-852.
Microlife BP A6 BT
EN
1
START/STOP Button
2
Display
3
Cuff Socket
4
Mains Adapter Socket
5
Battery Compartment
6
Cuff
7
Cuff Connector
8
AFIB/MAM Switch
9
Time Button
AT
M-button (memory)
AK
- «Backward» Button
AL
+ «Forward» Button
AM
Lock Switch
AN
USB Port
AO
Date/Time
AP
Systolic Value
AQ
Diastolic Value
AR
Pulse Rate
AS
Battery Display
BT
Traffic Light Indicator
BK
Stored Value
BL
Pulse Indicator
BM
Cuff Check Indicator
BN
Atrial Fibrillation Indicator (AFIB)
BO
AFIB/MAM Mode
BP
Arm Movement Indicator
BQ
MAM Interval Time
Keep dry
2
Table of Contents
1. Important Facts about Blood Pressure and Self-Measurement
How do I evaluate my blood pressure?
2. Important Facts about Atrial Fibrillation (AFIB)
What is Atrial Fibrillation (AFIB)?
How does AFIB impact my family or me?
Microlife AFIB detection provides a convenient way to
screen for AFIB (only in AFIB/MAM mode)
Risk factors you can control
3. Using the Device for the First Time
Inserting the batteries
Setting the date and time
Selecting the correct cuff
Select the measuring mode: standard or AFIB/MAM mode
AFIB/MAM mode (highly recommended)
4. Taking a Blood Pressure Measurement using this Device
How not to store a reading
5. Appearance of the Atrial Fibrillation Indicator for early
Detection (only in AFIB/MAM mode)
6. Traffic Light Indicator in the Display
7. Bluetooth
®
Function
Connecting the «Microlife Connected Health» App
8. PC-Link Functions
Installation and data transmission
9. Data Memory
Viewing the stored values
Memory full
Clearing all values
10. Battery Indicator and Battery change
Low battery
Flat battery – replacement
Which batteries and which procedure?
Using rechargeable batteries
11. Using a Mains Adapter
12. Error Messages
13. Safety, Care, Accuracy Test and Disposal
Safety and protection
Device care
Cleaning the cuff
Accuracy test
Disposal
14. Guarantee
15. Technical Specifications
Guarantee Card (see Back Cover)
1. Important Facts about Blood Pressure and Self-
Measurement
Blood pressure is the pressure of the blood flowing in the
arteries generated by the pumping of the heart. Two values, the
systolic (upper) value and the diastolic (lower) value, are
always measured.
The device indicates the pulse rate (the number of times the
heart beats in a minute).
Permanently high blood pressure values can damage your
health and must be treated by your doctor!
Always discuss your values with your doctor and tell him/her if
you have noticed anything unusual or feel unsure. Never rely
on single blood pressure readings.
There are several causes of excessively high blood pressure
values. Your doctor will explain them in more detail and offer
treatment where appropriate. Besides medication, weight loss
and exercise can also lower your blood pressure.
Under no circumstances should you alter the dosages of
any drugs prescribed by your doctor!
Depending on physical exertion and condition, blood pressure
is subject to wide fluctuations as the day progresses. You
should therefore take your measurements in the same
quiet conditions and when you feel relaxed! Take at least
two readings every time (in the morning and in the evening) and
average the measurements.
It is quite normal for two measurements taken in quick succes-
sion to produce significantly different results. Therefore we
recommend using the MAM technology.
Deviations between measurements taken by your doctor or in
the pharmacy and those taken at home are quite normal, as
these situations are completely different.
Several measurements
provide much more reliable information
about your blood pressure than just one single measurement.
Therefore we recommend using the MAM technology.
Leave a small break of at least 15 seconds between two
measurements.
If you suffer from an irregular heartbeat, measurements taken
with this device should be evaluated with your doctor.
3BP A6 BT
EN
The pulse display is not suitable for checking the
frequency of heart pacemakers!
If you are pregnant, you should monitor your blood pressure
very closely as it can change drastically during this time!
This monitor is specially tested for use in pregnancy and
pre-eclampsia. When you detect unusual high readings in
pregnancy, you should measure again after 4 hours. If the
reading is still too high, consult your doctor or gynecologist.
How do I evaluate my blood pressure?
The higher value is the one that determines the evaluation.
Example: a blood pressure value of 140/80 mmHg or a value of
130/90 mmHg indicates «blood pressure too high».
2. Important Facts about Atrial Fibrillation (AFIB)
What is Atrial Fibrillation (AFIB)?
Normally, your heart contracts and relaxes to a regular beat.
Certain cells in your heart produce electrical signals that cause the
heart to contract and pump blood. Atrial fibrillation occurs when
rapid, disorganized electrical signals are present in the heart’s two
upper chambers, called the atria; causing them to contract irregu-
larly (this is called fibrillation). Atrial fibrillation is the most common
form of heart arrhythmia or irregular heart beat. It often causes no
symptoms, yet it significantly increases your risk of stroke. You’ll
need a doctor to help you control the problem.
How does AFIB impact my family or me?
People with AFIB have a five-fold higher risk of getting stroke.
Since the chance of having a stroke increases with age, AFIB
screening is recommended for people over 65 years and older.
However, for people from the age of 50 years with high blood pres-
sure (hypertension), diabetes, coronary heart failure or have had a
previous stroke AFIB screening is also recommended. Early diag-
nosis of AFIB followed by adequate treatment can significantly
reduce the risk of getting stroke.
In young people AFIB screening is not recommended as it could
generate false positive results and unnecessary anxiety. In addi-
tion, young individuals with AFIB have a relatively low risk of
getting stroke as compared to elder people.
For more information please visit our website: www.microlife.com.
Microlife AFIB detection provides a convenient way to screen
for AFIB (only in AFIB/MAM mode)
Knowing your blood pressure and knowing whether you or your
family members have AFIB can help reduce the risk of stroke.
Microlife AFIB detection provides a convenient way to screen for
AFIB whilst taking your blood pressure.
Risk factors you can control
High blood pressure and AFIB are both considered «controllable»
risk factors for strokes. Knowing your blood pressure and knowing
whether you have AFIB is the first step in proactive stroke prevention.
3. Using the Device for the First Time
Inserting the batteries
Switch the lock switch AM to «unlock» position. The battery
compartment 5 is on the bottom of the device. Insert the batteries
(4 x 1.5 V, size AAA), thereby observing the indicated polarity.
Setting the date and time
1. After the new batteries are fitted, the year number flashes in the
display. You can set the year by pressing either the «+» AL or
the «-» AK button. To confirm and then set the month, press the
time button 9.
2. Press the «+» AL or the «-» AK button to set the month. Press
the time button 9 to confirm and then set the day.
3. Follow the instructions above to set the day, hour and minutes.
4. Once you have set the minutes and pressed the time button, the
date and time are set and the time is displayed.
5. If you want to change the date and time, press and hold the time
button down for approx. 3 seconds until the year number starts
to flash. Now you can enter the new values as described above.
Selecting the correct cuff
Microlife offers different cuff sizes. Select the cuff size to match the
circumference of your upper arms (measured by close fitting in the
centre of the upper arm).
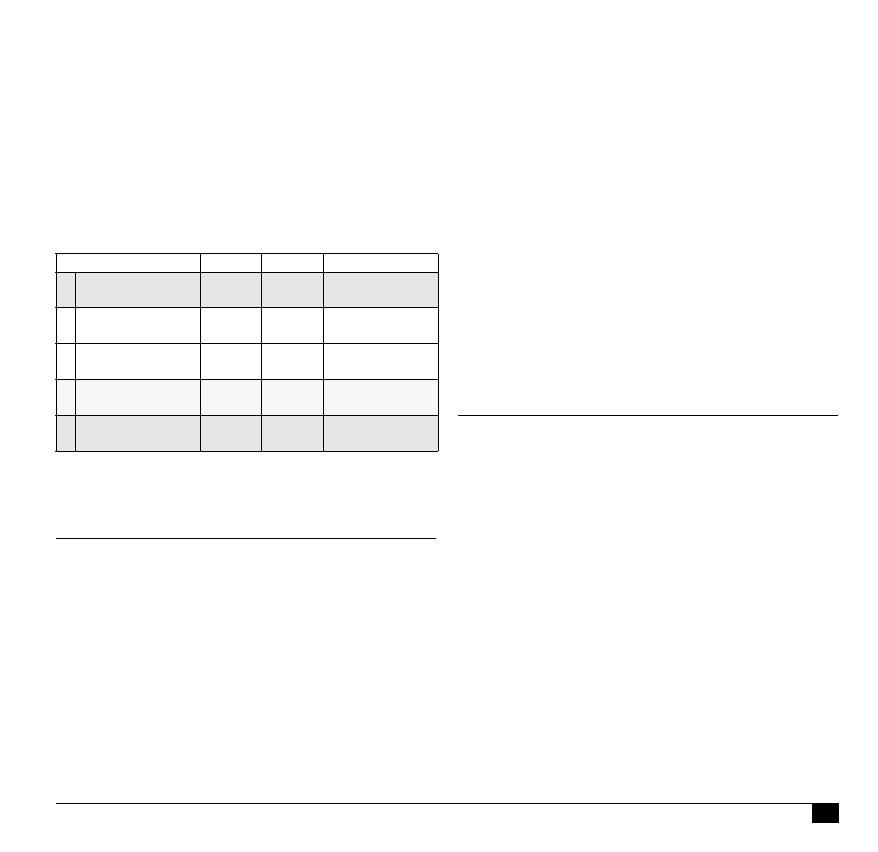
Table for classifying home blood pressure values in adults in
accordance with the international Guidelines (ESH, AHA, JSH).
Data in mmHg.
Range Systolic Diastolic Recommendation
blood pressure too
low
100 60 Consult your
doctor
1. blood pressure
optimum
100 - 130 60 - 80 Self-check
2. blood pressure
elevated
130 - 135 80 - 85 Self-check
3. blood pressure too
high
135 - 160 85 - 100 Seek medical
advice
4. blood pressure
dangerously high
160 100 Urgently seek
medical advice!
4
Only use Microlife cuffs.
Contact your local Microlife Service if the enclosed cuff 6 does
not fit.
Connect the cuff to the device by inserting the cuff connector 7
into the cuff socket 3 as far as it will go.
Select the measuring mode: standard or AFIB/MAM mode
This device enables you to select either standard (standard single
measurement) or AFIB/MAM mode (automatic triple measure-
ment). To select standard mode, slide the AFIB/MAM switch 8 on
the side of the device downwards to position «1» and to select
AFIB/MAM mode, slide this switch upwards to position «3».
AFIB/MAM mode (highly recommended)
In
AFIB/MAM
mode, 3 measurements are automatically taken in
succession and the result is then automatically analysed and
displayed. Because blood pressure constantly fluctuates, a result
determined in this way is more reliable than one produced by a single
measurement. AFIB detection is only activated in
AFIB/MAM
mode.
When you select the 3 measurements, the MAM-symbol BO
appears in the display.
The bottom, right hand section of the display shows a 1, 2 or 3 to
indicate which of the 3 measurements is currently being taken.
There is a break of 15 seconds between the measurements
(15 seconds are adequate according to «Blood Pressure Moni-
toring, 2001, 6:145-147» for oscillometric instruments). A count
down indicates the remaining time.
The individual results are not displayed. Your blood pressure
will only be displayed after all 3 measurements are taken.
Do not remove the cuff between measurements.
If one of the individual measurements was questionable, a
fourth one is automatically taken.
4. Taking a Blood Pressure Measurement using this
Device
Checklist for taking a reliable measurement
1. Avoid activity, eating or smoking immediately before the
measurement.
2. Sit down for at least 5 minutes before the measurement and relax.
3. Always measure on the same arm (normally left). It is recom-
mended that doctors perform double arm measurements on a
patients first visit in order to determine which arm to measure in
the future. The arm with the higher blood pressure should be
measured.
4. Remove close-fitting garments from the upper arm. To avoid
constriction, shirt sleeves should not be rolled up - they do not
interfere with the cuff if they are laid flat.
5. Always ensure that the correct cuff size is used (marking on the
cuff).
Fit the cuff closely, but not too tight.
Make sure that the cuff is positioned 2 cm above the elbow.
The artery mark located on the cuff (ca. 3 cm long bar) must
lie over the artery which runs down the inner side of the arm.
Support your arm so it is relaxed.
Ensure that the cuff is at the same height as your heart.
6. Slide the lock switch AM down to the «unlock» position. Press
the START/STOP button 1 to start measuring.
7. The cuff will now pump up automatically. Relax, do not move
and do not tense your arm muscles until the measurement
result is displayed. Breathe normally and do not talk.
8. When the correct pressure is reached, the pumping stops and the
pressure falls gradually. If the required pressure was not reached,
the device will automatically pump some more air into the cuff.
9. During the measurement, the pulse indicator BL flashes in the
display.
10.The result, comprising the systolic AP and the diastolic AQ
blood pressure and the pulse rate AR is displayed. Note also the
explanations on further display symbols in this booklet.
11.When the device has finished measuring, remove the cuff.
12.Switch off the device. (The monitor does switch off automati-
cally after approx. 1 min.).
How not to store a reading
As soon as the reading is displayed press and hold the START/
STOP button 1 until «M» BK is flashing. Confirm to delete the
reading by pressing the M-button AT.
You can stop the measurement at any time by pressing the
START/STOP button (e.g. if you feel uneasy or an
unpleasant pressure sensation).
If the systolic blood pressure is known to be very high,
it can be an advantage to set the pressure individually.
Cuff size for circumference of upper arm
S 17 - 22 cm
M 22 - 32 cm
M - L 22 - 42 cm
L 32 - 42 cm
L - XL 32 - 52 cm
5BP A6 BT
EN
Press the START/STOP button after the monitor has been
pumped up to a level of approx. 30 mmHg (shown on the
display). Keep the button pressed until the pressure is
about 40 mmHg above the expected systolic value – then
release the button.
5. Appearance of the Atrial Fibrillation Indicator for
early Detection (only in AFIB/MAM mode)
This device is able to detect atrial fibrillation (AFIB). This symbol
BN
indicates that atrial fibrillation was detected during the measurement.
If the AFIB symbol appears after having performed a full blood pres-
sure measurement episode (triplicate measurements), you are
advised to wait for one hour and perform another measurement
episode (triplicate measurements). If the AFIB symbol appears
again, then you are advised to visit your doctor. If after repeated
measurement the AFIB symbol is no longer displayed there is no
cause for concern. In such case it is recommended to measure again
the next day.
Keep the arm still during measuring to avoid false readings.
This device may not detect atrial fibrillation in people with
pacemakers or defibrillators.
6. Traffic Light Indicator in the Display
The bars on the left-hand edge of the display BT show you the
range within which the indicated blood pressure value lies.
Depending on the height of the bar, the readout value is either
within the optimum (green), elevated (yellow), too high (orange) or
dangerously high (red) range. The classification corresponds to
the 4 ranges in the table as defined by the international guidelines
(ESH, AHA, JSH), as described in «Section 1.».
7. Bluetooth
®
Function
This device can be used in conjunction with a smartphone running the
«Microlife Connected Health» App. The memory data can be trans-
ferred to the smartphone by connecting the device via Bluetooth
®
.
Connecting the «Microlife Connected Health» App
1. Activate Bluetooth
®
on your smartphone.
2. Activate the Bluetooth
®
function on the device. Press the «+»
button AL while the device is in stand-by mode. The icon «bt»
starts flashing on the display.
3. Open the «Microlife Connected Health» App on your smartphone.
iOS:
Go to «Setting» and select «Pair Device». The confirmation
«Device Pairing Successful» is shown, when the connection is
established. Go back to the main menu.
Android™:
The Bluetooth
®
connection is established automatically.
4. Download the data by selecting «Download data». The icon
«Cn» starts flashing on the display.
If «FL» flashes on the display, the device failed to establish a
connection with your smartphone. Make sure that Bluetooth
®
is
activated and repeat the procedure.
Download the «Microlife Connected Health» App. The app is
available on App Store (iOS) and Google Play™ (Android).
Date and time settings of your smartphone will automatically
be synchronized to your device.
The device is delivered with a pre-set User-ID (factory
setting). Overwrite the User-ID by creating a new User-ID in
the «Microlife Connected Health» App. «Id» flashes on the
display, if the User-ID has successfully changed.
For detailed information about How to Use the «Microlife
Connected Health» App on your smartphone, review the
app tutorial. Go to «Setting» and select «Tutorial».
8. PC-Link Functions
This device can be used in conjunction with a personal computer
(PC) running the Microlife Blood Pressure Analyser (BPA) software.
The memory data can be transferred to the PC by connecting the
monitor via a cable.
If no CD and cable is included download the BPA software from
www.microlife.com and use a USB cable with a Mini-B 5 pin
connector.
Information for the doctor on frequent appearance of the
atrial fibrillation indicator
This device is an oscillometric blood pressure monitor that also
analyses pulse irregularity during measurement. The device is
clinically tested.
The AFIB symbol is displayed after the measurement, if atrial
fibrillation occurred during measuring. If the AFIB symbol
appears after having performed a full blood pressure measure-
ment episode (triplicate measurements), the patient is advised to
wait for one hour and perform another measurement episode
(triplicate measurements). If the AFIB symbol appears again, we
recommend the patient to seek medical advice.
The device does not replace a cardiac examination, but serves
to detect atrial fibrillation that often remains undiagnosed until
stroke occurs.
6
Installation and data transmission
1. Insert CD into the CD ROM drive of your PC. The installation
will start automatically. If not, please click on «SETUP.EXE».
2. Connect the monitor via the cable to the PC; there is no need to
switch the device on. 3 horizontal bars will appear on the
display and last for 3 seconds.
3. The bars will then flash to indicate that the connection between
PC and device is successful. As long as the cable is plugged in,
the bars will keep flashing and the buttons are disabled.
During the connection, the device is completely controlled
by the computer. Please refer to the «help» file for software
instructions.
9. Data Memory
This device automatically stores the last 99 measurement values.
Viewing the stored values
Switch the lock switch
AM
to «unlock» position. Press the M-button
AT
briefly. The display first shows «
M
»
BK
and an average value. The
device then switches to the last stored value.
Pressing the «+»
AL
or the «
AK
button repeatedly enables you to
move from one stored value to another. Press the M-button again to
exit the memory mode.
Memory full
Pay attention that the maximum memory capacity of 99
memories is not exceeded.
When the 99 memory is full, the
oldest value is automatically overwritten with the 100th
value.
Values should be evaluated by a doctor before the
memory capacity is reached – otherwise data will be lost.
Clearing all values
If you are sure that you want to permanently remove all stored
values, hold down the M-button (the device must have been
switched off beforehand) until «CL» appears and then release the
button. To permanently clear the memory, press the M-button
while «CL» is flashing. Individual values cannot be cleared.
Cancel deletion:
press START/STOP button
1
while «
CL
»
is flashing.
10.Battery Indicator and Battery change
Low battery
When the batteries are approximately ¾ empty the battery symbol
AS
will flash as soon as the device is switched on (partly filled battery
displayed). Although the device will continue to measure reliably, you
should obtain replacement batteries.
Flat battery – replacement
When the batteries are flat, the battery symbol AS will flash as soon
as the device is switched on (flat battery displayed). You cannot
take any further measurements and must replace the batteries.
1. Open the battery compartment 5 on the bottom of the device.
2. Replace the batteries – ensure correct polarity as shown by the
symbols in the compartment.
3. To set date and time, follow the procedure described in
«Section 3.».
The memory retains all values although date and time must
be reset – the year number therefore flashes automatically
after the batteries are replaced.
Which batteries and which procedure?
Use 4 new, long-life 1.5 V, size AAA alkaline batteries.
Do not use batteries beyond their date of expiry.
Remove batteries if the device is not going to be used for a
prolonged period.
Using rechargeable batteries
You can also operate this device using rechargeable batteries.
Only use «NiMH» type reusable batteries.
Batteries must be removed and recharged when the flat
battery symbol appears. They should not remain inside the
device as they may become damaged (total discharge as a
result of low use of the device, even when switched off).
Always remove the rechargeable batteries if you do not
intend to use the device for a week or more.
Batteries cannot be charged in the blood pressure monitor.
Recharge batteries in an external charger and observe the
information regarding charging, care and durability.
11.Using a Mains Adapter
You can operate this device using the Microlife mains adapter
(DC 6V, 600 mA).
Only use the
Microlife
mains adapter available as an original
accessory appropriate for your supply voltage.
Ensure that neither the mains adapter nor the cable are
damaged.
1. Plug the adapter cable into the mains adapter socket 4 in the
blood pressure monitor.
2. Plug the adapter plug into the wall socket.
7BP A6 BT
EN
When the mains adapter is connected, no battery current is
consumed.
12.Error Messages
If an error occurs during the measurement, the measurement is
interrupted and an error message, e.g. «ERR 3», is displayed.
* Please consult your doctor, if this or any other problem occurs
repeatedly.
If you think the results are unusual, please read through the
information in «Section 1.» carefully.
13.Safety, Care, Accuracy Test and Disposal
Safety and protection
This device may only be used for the purposes described in
these instructions. The manufacturer cannot be held liable for
damage caused by incorrect application.
This device comprises sensitive components and must be
treated with caution. Observe the storage and operating condi-
tions described in the «Technical Specifications» section.
Protect it from:
- water and moisture
- extreme temperatures
- impact and dropping
- contamination and dust
- direct sunlight
- heat and cold
The cuffs are sensitive and must be handled with care.
Do not exchange or use any other kind of cuff or cuff connector
for measuring with this device.
Only pump up the cuff once fitted.
The function of this device may be compromised when used
close to strong electromagnetic fields such as mobile phones or
radio installations and we recommend a distance of at least
1 m. In cases where you suspect this to be unavoidable, please
verify if the device is working properly before use.
Do not use this device if you think it is damaged or notice
anything unusual.
Never open this device.
If the device is not going to be used for a prolonged period the
batteries should be removed.
Read the additional safety information provided within the indi-
vidual sections of this instruction manual.
Ensure that children do not use this device unsupervised;
some parts are small enough to be swallowed. Be aware of
the risk of strangulation in case this device is supplied with
cables or tubes.
Device care
Clean the device only with a soft, dry cloth.
Error Description Potential cause and remedy
«ERR 1» Signal too
weak
The pulse signals on the cuff are too
weak. Re-position the cuff and repeat the
measurement.*
«ERR 2»
BP
Error signal During the measurement, error signals
were detected by the cuff, caused for
instance by movement or muscle
tension. Repeat the measurement,
keeping your arm still.
«ERR 3»
BM
No pressure
in the cuff
An adequate pressure cannot be gener-
ated in the cuff. A leak may have
occurred. Check that the cuff is correctly
connected and is not too loose. Replace
the batteries if necessary. Repeat the
measurement.
«ERR 5» Abnormal
result
The measuring signals are inaccurate
and no result can therefore be displayed.
Read through the checklist for
performing reliable measurements and
then repeat the measurement.*
«ERR 6»AFIB/MAM
Mode
There were too many errors during the
measurement in AFIB/MAM mode,
making it impossible to obtain a final
result. Read through the checklist for
performing reliable measurements and
then repeat the measurement.*
«HI» Pulse or cuff
pressure
too high
The pressure in the cuff is too high (over
300 mmHg) OR the pulse is too high
(over 200 beats per minute). Relax for 5
minutes and repeat the measurement.*
«LO» Pulse too
low
The pulse is too low (less than 40 beats
per minute). Repeat the measurement.*
8
Cleaning the cuff
Carefully remove spots on the cuff with a damp cloth and soapsuds.
WARNING: Do not wash the cuff in a washing machine or
dishwasher!
Accuracy test
We recommend this device is tested for accuracy every 2 years or
after mechanical impact (e.g. being dropped). Please contact your
local Microlife-Service to arrange the test (see foreword).
Disposal
Batteries and electronic devices must be disposed of in
accordance with the locally applicable regulations, not with
domestic waste.
14.Guarantee
This device is covered by a 5 year guarantee from the date of
purchase. The guarantee is valid only on presentation of the guar-
antee card completed by the dealer (see back) confirming date of
purchase or the receipt.
Batteries and parts that become worn with use are not included.
Opening or altering the device invalidates the guarantee.
The guarantee does not cover damage caused by improper
handling, discharged batteries, accidents or non-compliance
with the operating instructions.
The cuff has a functional guarantee (bladder tightness) for 2 years.
Please contact your local Microlife-Service (see foreword).
15.Technical Specifications
This device complies with the requirements of the Medical Device
Directive 93/42/EEC.
Technical alterations reserved.
The Bluetooth
®
word mark and logos are registered trademarks
owned by Bluetooth SIG, Inc. and any use of such marks by Microlife
Corp. is under license. Other trademarks and trade names are those
of their respective owners.
Operating conditions:
10 - 40 °C / 50 - 104 °F
15 - 95
% relative maximum humidity
Storage conditions:
-20 - +55 °C / -4 - +131 °F
15 - 95
% relative maximum humidity
Weight:
354
g (including batteries)
Dimensions:
160 x 80 x 32
mm
Measuring procedure:
oscillometric, corresponding to Korotkoff
method: Phase I systolic, Phase V diastolic
Measurement range:
20 - 280
mmHg – blood pressure
40 - 200 beats per minute – pulse
Cuff pressure display
range:
0 - 299 mmHg
Resolution:
1 mmHg
Static accuracy:
pressure within ± 3 mmHg
Pulse accuracy:
± 5 % of the readout value
Communication:
Bluetooth
®
Smart
Compatibility: iOS: iOS 8.0 or newer
Android: Android 4.4.2 or newer
Voltage source:
4 x 1.5 V alkaline batteries; size AAA
Mains adapter DC 6V, 600 mA (optional)
Battery lifetime: approx. 400 measurements
(using new batteries)
IP Class: IP20
Reference to
standards:
EN 1060-1 /-3 /-4; IEC 60601-1;
IEC 60601-1-2 (EMC); IEC 60601-1-11
Expected service life: Device: 5 years or 10000 measurements
Accessories: 2 years
9BP A6 BT
EN
10
Display
Läs dessa instruktioner noga innan du använder instrumentet.
Tillämplighetsklass BF
Bäste kund
Din nya
Microlife
blodtrycksmätare är ett säkert medicinskt instru-
ment för mätningar på överarmen. Instrumentet är enkelt att använda,
noggrant och rekommenderas för blodtrycksmätning i hemmet.
Instrumentet är utvecklat i samarbete med läkare och kliniska tester
bevisar att dess mätnoggrannhet är mycket hög.*
Microlifes AFIB indikation är en världsledande teknik bland digitala
blodtrycksmätare för tidig upptäckt av förmaksflimmer (AFIB) och
hypertoni (högt blodtryck). Dessa är de två största riskfaktorerna
för att få hjärtsjukdom och stroke i framtiden. Det är viktigt att
upptäcka förmaksflimmer och hypertoni på ett tidigt stadium, även
om du ännu inte upplever några symptom. Lämplig behandling
tidigt kan minska risken för bland annat stroke. Därför rekommen-
derar vi att du besöker din läkare om instrumentets AFIB-indikator
visas när du mäter ditt blodtryck. Microlifes AFIB-algoritm har
undersökts kliniskt av flera framstående fackpersoner och under-
sökningarna har visat att utrustningen upptäcker patienter som
lider av förmaksflimmer med 97-100 procents säkerhet.
1,2
Läs instruktionerna noggrant så att du förstår samtliga funktioner
samt säkerhetsinformationen. Vi hoppas att du blir nöjd med ditt
Microlife-instrument. Om du har frågor, problem eller vill beställa
reservdelar ber vi dig kontakta lokal Microlifes kundservice. Din
återförsäljare eller ditt apotek kan ge dig kontaktuppgifter till en
Microlife-representant i ditt land. Alternativt kan du besöka
adressen www.microlife.com där du finner värdefull information
om våra produkter.
Med önskan om ett hälsosamt liv – Microlife AG!
* Detta instrument använder samma mätningsteknik som den pris-
belönta modellen «BP 3BTO-A», vilken testats enligt föreskrifterna
från British Hypertension Society (BHS).
1
Stergiou GS, Karpettas N, Protogerou A, Nasothimiou EG, &
Kyriakidis M. Diagnostic accuracy of a home blood pressure
monitor to detect atrial fibrillation. J Hum Hyperten 2009; 1-5.
2
Wiesel J, Fitzig L, Herschman Y, & Messineo FC Detection of
Atrial Fibrillation Using a Modified Microlife Blood Pressure
Monitor. Am J Hypertens 2009; 848-852.
Microlife BP A6 BT
SV
1
START/STOP knapp
2
Bildskärm (display)
3
Manschettuttag
4
Adapteranslutning, uttag
5
Batterifack
6
Manschett
7
Manschettkontakt
8
AFIB/MAM-knapp
9
Tidsknapp
AT
M-knapp (minne)
AK
- «Bakåt» knapp
AL
+ «Framåt» knapp
AM
Avstängningsknapp
AN
USB-uttag
AO
Datum/Tid
AP
Systoliskt värde
AQ
Diastoliskt värde
AR
Pulsslag
AS
Batteridisplay
BT
Trafikljusindikator
BK
Sparat värde
BL
Puls indikator
BM
Kontroll indikator för manschett
BN
AFIB-indikator för förmaksflimmer
BO
AFIB/MAM-läge
BP
Indikering av armrörelse under mätning
BQ
MAM-intervall
Behåll torr
11BP A6 BT
SV
Innehållsförteckning
1. Viktiga fakta om blodtryck och blodtrycksmätning hemma
Hur bedömer jag mitt blodtryck?
2. Viktiga fakta om förmaksflimmer (AFIB)
Vad är förmaksflimmer (AFIB)?
Hur påverkar förmaksflimmer mig och min familj?
Microlifes AFIB indikation är ett praktiskt sätt att upptäcka
förmaksflimmer på (endast AFIB/MAM-läge)
Riskfaktorer du kan kontrollera
3. Användning av instrumentet första gången
Lägga i batterier
Inställning av tid och datum
Välj rätt manschett
Välj mätläge: Standard eller AFIB/MAM-läge
AFIB/MAM-läge (rekommenderas starkt)
4. Att göra en blodtrycksmätning med instrumentet
Att inte lagra ett mätvärde
5. Om indikatorn för förmaksflimmer visas (endast i AFIB/
MAM-läge)
6. Trafikljusindikering i displayen
7. Bluetooth
®
funktion
Anslut «Microlife Connected Health» App
8. Datorfunktioner
Installation och dataöverföring
9. Dataminne
Hämta sparade värden
Minnet fullt
Radering av alla värden
10. Indikatorer på att batteriet håller på att ta slut och batteribyte
Då batteriet är nästan slut
Tomma batterier – utbyte
Hurudana batterier och hur skall de bytas ut?
Användning av laddningsbara batterier
11. Användning av nät adapter
12. Felmeddelanden
13. Säkerhet, underhåll, noggrannhetstest och avfallshantering
Säkerhet och skydd
Instrumentunderhåll
Rengöring av manschett
Nogrannhetstest
Avfallshantering
14. Garanti
15. Tekniska data
Garantikort (se baksida)
1. Viktiga fakta om blodtryck och blodtrycksmätning
hemma
Blodtryck är trycket med vilket blodet passerar genom artä-
rerna när hjärtat pumpar. Två värden, det systoliska (övre)
värdet och det diastoliska (lägre) värdet mäts alltid.
Instrumentet visar även pulsslag (antalet hjärtslag per minut).
Ständigt höga blodtrycksvärden kan skada din hälsa och
måste behandlas av läkare.
Diskutera alltid dina värden med din läkare och tala om för
honom/henne om du upptäcker något onormalt eller känner dig
osäker. Lita aldrig på enstaka blodtrycksmätningar.
Det finns många orsaker till mycket höga blodtrycksvärden.
Din läkare kan förklara ytterligare detaljer och erbjuda behand-
ling om nödvändigt. Förutom medicinering kan blodtrycket
minskas genom viktminskning och fysisk träning.
Ändra under inga omständigheter doseringen av läkemedel
som din läkare ordinerat.
Beroende på fysisk ansträngning och kondition, förändras blod-
trycket under dagen. Du bör därför alltid mäta blodtrycket
vid samma tidpunkt och under lugna förhållanden, när du
är avslappnad! Gör minst två mätningar vid varje mättillfälle
och notera snittvärdet. Mät gärna morgon och kväll.
Det är normalt att två mätningar som görs direkt efter varandra
kan ge olika resultat. Därför rekommendera vi att man
använder MAM tekniken.
Det är normalt att det förekommer skillnader mellan mätningar
som utförts av din läkare eller på apoteket och dem du tar
hemma, eftersom mätningssituationen är annorlunda.
Flera mätningar ger säkrare information om Ditt blodtryck än
enstaka mätningar. Därför rekommendera vi att man använder
MAM tekniken.
Vänta en stund, minst 15 sekunder mellan två mätningar.
Om du lider av oregelbunden hjärtrytm, mätningar gjorda
med detta instrument skall utvärderas av Din läkare.
Pulsindikeringen är inte lämplig för att kontrollera frekvensen
hos en pacemaker.
Om du är gravid, bör du kontrollera ditt blodtryck noga eftersom
det kan ändras drastiskt under denna tid.
12
Denna blodtrycksmätare är speciellt testad för användning
under graviditet. Om Du notera ovanligt högt blodtryck
under graviditeten, mät igen efter 4 timmar. Om trycket fort-
farande är högt kontakta läkare eller gynekolog.
Hur bedömer jag mitt blodtryck?
Det högre värdet bestämmer bedömningen. T.ex.: ett blodtryck på
140/80 mmHg eller ett värde på 130/90 mmHg anger «för högt
blodtryck».
2. Viktiga fakta om förmaksflimmer (AFIB)
Vad är förmaksflimmer (AFIB)?
Vid normal hjärtrytm drar sig hjärtmuskeln regelbundet samman för
att därefter slappna av. Vissa celler i kroppen framkallar elektriska
signaler som får hjärtat att dra sig samman och pumpa runt blodet.
Förmaksflimmer uppstår då snabba, oregelbundna elektriska
signaler påverkar hjärtats två övre hålrum, de så kallade förmaken,
och får dem att dra sig samman snabbt och oregelbundet (så kallat
flimmer eller fibrillering). Förmaksflimmer är den vanligaste formen
av hjärtarytmi, det vill säga oregelbunden hjärtrytm. Det orsakar ofta
inga symtom, men det ökar betydligt risken för stroke. Du behöver
hjälp av en läkare för att hålla problemet under kontroll.
Hur påverkar förmaksflimmer mig och min familj?
Personer med AFIB/hjärtflimmer löper 5 gånger högre risk att få
stroke. Risken att få stroke ökar med åldern, förmaksflimmer
mätning rekommenderas för personer över 65 år. Förmaksflimmer
mätning rekommenderas också för personer över 50 år om de har
högt blodtryck (hypertoni), diabetes, koronar hjärtsvikt eller haft
stroke. Tidig upptäckt av hjärtflimmer och adekvat behandling kan
minska risken för stroke.
För unga personer rekommenderas ej hjärtflimmer mätning då det
kan ge felaktigt positivt resultat och orsaka onödig oro. Ytterligare,
yngre personer med hjärtflimmer löper relativt låg risk för stroke
jämfört med äldre personer.
För mer information besök vår website: www.microlife.com.
Microlifes AFIB indikation är ett praktiskt sätt att upptäcka
förmaksflimmer på (endast AFIB/MAM-läge)
Att känna till ditt blodtryck och veta om du eller någon av dina
familjemedlemmar lider av förmaksflimmer kan minska risken för
stroke. Microlifes AFIB indikation är ett praktiskt sätt att upptäcka
förmaksflimmer på i samband med att du tar ditt blodtryck.
Riskfaktorer du kan kontrollera
Högt blodtryck och förmaksflimmer anses båda vara riskfaktorer
för stroke som går att kontrollera. Att känna till ditt blodtryck och
veta om du lider av förmaksflimmer eller inte är det första steget för
att aktivt kunna förebygga stroke.
3. Användning av instrumentet första gången
Lägga i batterier
Ställ avstängsknappen AM i läge «unlock». Batterifacket 5 finns
på instrumentets undersida. Lägg i batterierna (4 x 1.5 V batterier,
storlek AAA), se till att polerna placeras korrekt.
Inställning av tid och datum
1. Årssiffran blinkar i displayen när nya batterier är inlagda. Du
kan ställa in året genom att trycka på antingen den «+» AL eller
the «-» AK-knappen. Tryck på tidsknappen 9 för att bekräfta
och sedan ställa in månad.
2. Tryck på den «+»
AL
eller «-»
AK
-knappen för att ställa in månad.
Tryck tidsknappen
9
för att bekräfta och ställ sedan in dag.
3. Följ ovanstående instruktioner för att ställa in dag, timme och
minuter.
4. När du har ställt in minuterna, tryck in tidsknappen och håll den
intryckt, datum och tid sparas och tiden visas.
5. Om du vill ändra på datum och tid, tryck in tidsknappen och håll
den intryckt i ca. 3 sekunder till årssiffran börjar blinka. Du kan
nu ange nya värden enligt instruktionerna ovan.
Välj rätt manschett
Microlife erbjuder olika manschettstorlekar. Välj den manschett
som passar din överarm (manschetten skall ligga ordentligt runt
överarmens mitt).
Tabellen nedan visar en klassificering av blodtrycksvärden enligt
internationella rekommendationer (
ESH, AHA, JSH
). Data i mmHg.
Intervall Systoliskt Diastoliskt Rekommendation
För lågt blodtryck 100 60 Konsultera din
läkare
1.
Optimalt blodtryck
100 - 130 60 - 80 Självkontroll
2. Förhöjt blodtryck 130 - 135 80 - 85 Självkontroll
3.
För högt blodtryck
135 - 160 85 - 100 Sök medicinsk
rådgivning
4. Mycket för högt
blodtryck
160 100 Sök läkarhjälp
omedelbart.
13BP A6 BT
SV
Använd endast Microlife-manschetter.
Kontakta Microlife lokala service om bifogade manschett 6 ej
passar.
Anslut manschetten till instrumentet, skjut in manschettkon-
takten 7 i manschettuttaget 3 i botten.
Välj mätläge: Standard eller AFIB/MAM-läge
Detta instrument kan mäta i valt läge, antingen standard (en
enstaka mätning) eller AFIB/MAM-läge (automatisk tredubbel
mätning). För att välja standardläge, skjut AFIB/MAM-knappen 8
på instrumentets sida nedåt till läge «1» och för att välja AFIB/
MAM-läge, skjut samma knapp uppåt till läge «3».
AFIB/MAM-läge (rekommenderas starkt)
I AFIB/MAM-läge, görs 3 mätningar automatiskt efter varandra och
resultatet analyseras och visas automatiskt. Eftersom blodtrycket
ständigt varierar, är denna metod att mäta blodtrycket mycket
säkrare än att mäta endast med en enstaka mätning. AFIB indika-
tion är aktiverad i AFIB/MAM-läge.
När Du väljer 3 mätningar, MAM symbolen BO visas i displayen.
I displayens högra hörn visas siffran 1, 2 eller 3 för att indikera
vilken av de 3 mätningarna som utförs.
En paus på 15 sekunder finns mellan mätningarna (15
sekunder är tillräckligt enligt «Blood Pressure Monitoring, 2001,
6:145-147» för oscillometriska instrument). En nedräkning indi-
kerar den återstående tiden.
De individuella resultaten visas inte. Ditt blodtryck visas först
efter samtliga 3 mätningar.
Ta inte bort manschetten mellan mätningarna.
Om en av mätningarna är osäker, utförs en fjärde mätning auto-
matiskt.
4. Att göra en blodtrycksmätning med instrumentet
Checklista för säker mätning
1. Undvik fysisk aktivitet, måltid eller rökning direkt före mätning.
2. Sätt dig ner minst 5 minuter innan mätning och slappna av.
3. Mät alltid på samma arm (vanligen vänster arm). Det rekom-
menderas att en läkare utför mätningar på båda armarna för att
bestämma vilken arm som visar högst blodtryck. Mät sedan på
den arm som visar högst blodtryck.
4. Avlägsna åtsittande klädesplagg på överarmen. Rulla inte upp
skjortärmen för att undvika blockering av blodcirkulationen.
Ärmen stör inte manschetten om du viker den försiktigt.
5. Se alltid till att rätt manschettstorlek används (markering på
manschetten).
Sätt fast manschetten ordentligt, inte för hårt.
Kontrollera att manschetten är placerad 2 cm ovanför
armbågsvecket.
Pulsåder-markeringen
på manschetten (ca.
3
cm lång stapel)
måste ligga över pulsådern som går ned längs insidan av armen.
Placera armen så att den är avslappnad.
Kontrollera att manschetten sitter på samma höjd som ditt
hjärta.
6. Dra omkopplare AM till «unlock» läge. Tryck START/STOP-
knappen 1 för att starta mätningen.
7. Manschetten pumpas upp automatiskt. Slappna av, rör dig inte
och spänn inte armmusklerna tills mätningsresultet visas.
Andas normalt och tala inte.
8. När korrekt tryck är uppnått, slutar instrumentet att pumpa och
trycket faller. Om önskat tryck inte uppnås, pumpar instrumentet
ytterligare luft till manschetten.
9. Under mätningen blinkar puls indikatorn BL i displayen.
10.Resultatet med systoliskt AP och diastoliskt AQ blodtryck och
pulsslag AR visas. Observera även förklaringarna för de övriga
displayerna i detta häfte.
11.Då mätningen har utförts, avlägsna manschetten.
12.Stäng av instrumentet. (Displayen stängs av automatiskt efter
ca. 1 minut).
Att inte lagra ett mätvärde
När mätvärdet visas i (displayen)/fönstret tryck ned och håll START/
STOP-knappen
1
ned trycket tills «
M
»
BK
blinkar. Bekräfta rade-
ringen av mätvärdet genom att trycka ned M-knappen
AT
.
Du kan stoppa mätningen när som helst genom att trycka
START/STOP-knappen (om du t.ex. inte mår bra eller
trycket känns obekvämt).
Om det systoliska blodtrycket brukar vara mycket högt
kan det vara fördelaktigt att ställa in trycket individuellt.
Tryck på START/STOP-knappen när monitorn har pumpats
upp till en nivå på cirka 30 mmHg (visas i displayen). Håll
knappen intryckt tills trycket ligger cirka 40 mmHg över det
förväntade, systoliska värdet - släpp sedan knappen.
Storlek Överarmens omkrets
S 17 - 22 cm
M 22 - 32 cm
M - L 22 - 42 cm
L 32 - 42 cm
L - XL 32 - 52 cm
14
5. Om indikatorn för förmaksflimmer visas (endast i
AFIB/MAM-läge)
Instrumentet kan upptäcka AFIB, förmaksflimmer. Den här
symbolen BN, indikerar att förmaksflimmer har upptäckts vid blod-
trycksmätningent. Om symbolen «AFIB» för förmaksflimmer visas
efter en blodtrycksmätning i «MAM-läge» (3 mätningar), vänta
cirka en timma och gör om mätningen i «MAM-läge». Om
symbolen «AFIB» för förmaksflimmer visas igen rekommenderas
en läkare kontakt. Om den andra mätningen ej indikera hjärt-
flimmer är det ingen anledning till oro. I detta fall rekommenderas
att man göra en ny mätning inom något dygn.
Håll armen stilla under hela mätningen för att undvika felak-
tigt mätvärde.
Instrumentet kan inte med säkerhet upptäcka förmaks-
flimmer hos personer med pacemaker eller defibrillator.
6. Trafikljusindikering i displayen
Staplarnas höjd och färg på vänster sida av displayen BT visar
inom vilket område blodtrycksvärdena ligger. Optimalt (grön),
förhöjt (gul), alltför högt (orange), mycket för högt (röd). Klassifice-
ringen motsvarar 4 nivå i tabellen som definieras av de internatio-
nella riktlinjerna (ESH, AHA, JSH), som beskrivs i «avsnitt 1.»
7. Bluetooth
®
funktion
Denna utrustning kan användas i samband med en smart telefon
som använder «Microlife Connected Health» App (Microlife
anslutna hälso App). Minnesdata kan överföras till smart telefonen
genom anslutning via Bluetooth
®
.
Anslut «Microlife Connected Health» App
1. Aktivera Bluetooth
®
på din smart telefon.
2. Aktivera Bluetooth
®
funktionen på din utrustning. Tryck ned «+»
knappen AL när utrustningen är i stand-by läge. Ikonen «bt»
börja blinka på displayen.
3. Öppna «Microlife Connected Health» App App på Din smart
telefon.
iOS: Gå till «Setting» och välj «Pair Device». En bekräftelse
«Device Pairing Successful» visas, när anslutningen är
etablerad. Gå tillbaks till huvudmenyn.
Android™: Bluetooth
®
anslutningen görs automatiskt.
4. Ladda ner data genom att välja «Download data». Ikonen «Cn»
börja blinka på displayen.
Om «FL» blinka på displayen,har utrustningen ej att etablera
kontakt med Din smart telefon. Säkerställ att Bluetooth
®
är akti-
verad och repetera proceduren.
Ladda ner «Microlife Connected Health» App. Appen är till-
gänglig på App Store (iOS) och Google Play™ (Android).
Datum och tid inställningar på Din smart telefon kommer
automatiskt att synkroniseras till Din utrustning.
Utrustningen levereras med förinställt användnings ID (fabriks
inställning). Ändra användnings ID genom att skapa ett nytt
användar ID i «Microlife Connected Health» App. «
Id
» blinkar
på displayen om använder ID har ändrats framgångsrikt.
För detaljerad information om hur «Microlife Connected
Health» App skall användas på Din smart telefon. Gå till
«Setting» och välj «Tutorial» (totorival).
8. Datorfunktioner
Instrumentet kan användas tillsammans med en dator (PC) med
programmet Microlife Blood Pressure Analyser (BPA) installerat.
Genom att ansluta instrumentet till en dator kan minnesdata föras
över till datorn via en kabel.
Om en CD och kabel inte är inkluderade kan du ladda ner BPA-
programmet fån www.microlife.com och använda en USB-kabel
med Mini-B 5 pin -kopplingsstycke.
Installation och dataöverföring
1. Sätt i CD-skivan i datorns CD-ROM-läsare. Installationen startar
automatiskt. Om den inte startar klickar du på «
SETUP.EXE
».
2. Anslut blodtrycksmätarens kabel till datorn. Du behöver inte
sätta på instrumentet. 3 vågräta linjer visas på displayen i
omkring 3 sekunder.
Information till läkare vid upprepad visning av indikatorn för
förmaksflimmer
Detta instrument är en oscillometrisk blodtrycksmätare som
också registrera oregelbunden puls/hjärtslag under mätningen
(arytmi). Instrumentet har genomgått kliniska tester.
Om förmaksflimmer förekommer vid blodtrycksmätning visas
symbolen för arytmi efter mätningen. Om symbolen «AFIB» för
förmaksflimmer visas efter en blodtrycksmätning i «MAM-läge»
(3 mätningar), rekommenderas patienten att vänta i en timme
och utföra en annan mätning (3 mätningar). Om symbolen
«AFIB» visas igen, rekommenderar vi patienten att söka läkare.
Instrumentet kan inte ersätta en grundlig hjärtundersökning,
men kan ge tidiga signaler om förmaksflimmer förmaksflimmer
som förblir odiagnosticerad tills en personen får en stroke.
15BP A6 BT
SV
3. Därefter blinkar linjerna för att indikera att en anslutning har
upprättats med datorn. Så länge kabeln är ansluten blinkar
linjerna och instrumentets knappar är inaktiverade.
Vid anslutningen styrs instrumentet helt och hållet via
datorn. Ytterligare instruktioner för programvaran finns i
programmets Hjälp-avsnitt «help».
9. Dataminne
Detta instrument sparar automatiskt de senaste 99 mätvärdena.
Hämta sparade värden
Dra omkopplare AM till «unlock» läge. Tryck kort M-knappen AT.
Displayen visar först «M» BK och ett medelvärdet. Utrustningen
visar sedan det sist uppmätta och lagrade värdet.
Tryck «+» AL eller «-» AK-knappen upprepade gånger för att gå
från ett lagrat värde till ett annat. Tryck M-knapper igen för att gå
ur minnes läget.
Minnet fullt
Var noga med att den maximala 99 minneskapaciteten inte
överskrids. När 99 minnet är fullt, ersätts det äldsta
värdet automatiskt med värdet 100. En läkare bör utvär-
dera värden innan minneskapaciteten är fullt utnyttjad –
annars kommer data att förloras.
Radering av alla värden
Om du är säker på att du vill radera alla sparade värden, tryck ner
M-knappen (instrumentet måste vara avstängt) tills «CL» visas,
släpp sedan knappen. Tryck M-knappen när «CL» blinkar för att
radera minnet helt. Individuella värden kan inte raderas.
Återskapa raderade värden: Tryck START/STOP-
knappen 1 när «CL» blinkar.
10.Indikatorer på att batteriet håller på att ta slut och
batteribyte
Då batteriet är nästan slut
När batterienergin är förbrukad till ca ¾ blinkar batterisymbolen AS
när instrumentet startas (ett delvis fyllt batteri visas). Även om
instrumentet fortfarande kan mäta, bör du skaffa nya batterier.
Tomma batterier – utbyte
När batterierna är helt tomma blinkar batterisymbolen AS när
instrumentet startas (tomt batteri visas). Du kan inte göra flera
mätningar utan att ersätta batterierna.
1. Öppna batterifacket 5 på instrumentets undersida.
2. Ersätt batterierna – kontrollera att polerna placeras åt rätt håll
enligt symbolerna i facket.
3. Upprepa stegen i «avsnitt 3.» för att ställa in datum och tid.
Minnet innehåller alla värden men datum och tid måste
anges igen – årssiffran blinkar därför automatiskt när batte-
rierna har ersatts.
Hurudana batterier och hur skall de bytas ut?
Använda 4 nya, lång livslängd alkaliska batterier med 1.5V,
storlek AAA.
Använd inte batterier som passerat bäst-före-datum.
Avlägsna batterierna om instrumentet inte skall användas
under en längre tid.
Användning av laddningsbara batterier
Du kan även använda instrumentet med laddningsbara batterier.
Använd endast återladdningsbara batterier av typ «NiMH»
batterier.
Batterierna måste tas ut och laddas om batterisymbolen
(tomt batteri) visas. Batterierna får inte lämnas inne i instru-
mentet eftersom de kan skadas av detta (urladdadas på
grund av oregelbunden användning även om instrumentet
är avstängt).
Avlägsna de laddningsbara batterierna om du inte kommer
att använda instrumentet inom en vecka.
Batterierna kan inte laddas medan de är inne i blodtrycks-
mätaren. Ladda batterierna i en extern laddare och ta i
beaktande information angående laddning, hantering och
livslängd.
11.Användning av nät adapter
Du kan använda instrumentet med en Microlife adapteranslutning
(DC 6V, 600 mA).
Använd endast Microlife's adapter som är anpassad till
denna utrustning. Den skall finnas som tillbehör.
Kontrollera att varken nät adaptern eller kabeln är skadade.
1. Stoppa in adapterkabeln i adapteranslutningens uttag 4 i blod-
trycksmätaren.
2. Anslut adaperkontakten till vägguttaget.
När adapteranslutningen är ansluten, förbrukas ingen batterienergi.
16
12.Felmeddelanden
Om ett fel uppstår under mätningen, avbryts denna och ett felmed-
delande, t.ex. «ERR 3» visas.
* Konsultera din läkare om dessa eller andra problem upprepas
regelbundet.
Om du tycker att resultaten avviker från det normala, läs
noga igenom informationen i «avsnitt 1.».
13.Säkerhet, underhåll, noggrannhetstest och
avfallshantering
Säkerhet och skydd
Detta instrument får endast användas för de ändamål som
beskrivs i detta häfte. Tillverkaren ansvarar inte för skador som
uppstått på grund av felaktig användning.
Instrumentet innehåller känsliga komponenter och skall
hanteras varsamt. Följ förvarings- och användningsinstruktio-
nerna i avsnittet «Tekniska data».
Skydda instrumentet mot:
- Vatten och fukt
- Extremt hög temperatur
- Stötar och fall
- Smuts och damm
- Direkt solljus
- Värme och kyla
Manschetterna är ömtåliga och måste hanteras omsorgsfullt.
Använd enbart medföljande original manschett och original
manschett anslutning.
Pumpa endast upp manschetten när den sitter på armen.
Funktionen av denna apparat äventyras när den användes nära
starka magnetiska fält, så som mobiltelefoner och radioinstalla-
tioner. Vi rekommendera ett avstånd på minst
1
meter. I de fall
detta ej går kontrollera att apparaten fungera innan användning.
Använd inte instrumentet om du tror att det är skadat eller inte
fungerar normalt.
Öppna aldrig instrumentet.
Ta ur batterierna om instrumentet inte skall användas under
längre tid.
Läs även ytterligare säkerhetsföreskrifter som finns i enskilda
avsnitt i detta häfte.
Se till att instrumentet inte hanteras av små barn. Vissa
delar är tillräckligt små för att kunna sväljas. Var medveten
om risken för strypning I det fall detta instrument är utrustad
med kablar och slangar.
Instrumentunderhåll
Rengör instrumentet med en mjuk torr duk.
Rengöring av manschett
Rengör manschetten försiktigt med fuktig duk.
VARNING: Tvätta ej manschetten i en tvättmaskin eller i en
diskmaskin!
Fel Beskrivning Möjlig orsak och åtgärd
«ERR 1» För svag
signal
Pulssignalerna i manschetten är för
svaga. Flytta på manschetten och
upprepa mätningen.*
«ERR 2»
BP
Fel signal Felsignaler har uppstått under
mätningen, antagligen till följd av
rörelse eller muskelspänning. Upprepa
mätningen och håll armen stilla.
«ERR 3»
BM
Inget tryck i
manschetten
Trycket kan inte genereras i
manschetten. Möjlig läcka. Kontrollera
att manschetten är ordentligt ansluten
och inte för lös. Ersätt batterierna vid
behov. Upprepa mätningen.
«ERR 5» Onormalt
resultat
Mätsignalerna är inte tillräckligt
noggranna och kan inte ge resultat. Läs
igenom checklistan för säkra mätningar
och upprepa mätningen.*
«ERR 6» AFIB/MAM
Läge
För många fel har uppstått under
mätningen i AFIB/MAM-läge vilket gör
det omöjligt att fastställa ett resultat. Läs
igenom checklistan för säkra mätningar
och upprepa mätningen.*
«HI» För hög puls
eller
manschet-
tryck
Trycket i manschetten är för högt (över
300 mmHg) ELLER pulsen är för hög
(över 200 slag per minut). Slappna av i
5 minuter och upprepa mätningen.*
«LO» För låg puls Pulsen är r låg (mindre än 40 slag per
minut). Upprepa mätningen.*
17BP A6 BT
SV
Nogrannhetstest
Vi rekommenderar att instrumentet kontrolleras vartannat år eller
efter mekanisk skada (t.ex. om man tappat instrumentet i golvet).
Vänligen kontakta lokal Microlife service för kontroll (se förord).
Avfallshantering
Batterier och elektroniska instrument skall avfallshanteras
enligt gällande miljölagstiftning. Släng inte i hushållssoporna.
14.Garanti
Detta instrument har
5 års garanti
från inköpsdatum. Garantin gäller
endast om garantibeviset, ifyllt av återförsäljaren (se baksidan)
uppvisas tillsammans med inköpskvitto eller bevis för inköpsdatum.
Batterier och slitagedelar omfattas inte av garantin.
Garantin gäller inte om instrumentet öppnats eller modifierats.
Garantin omfattar inte skador som uppkommit p.g.a. felhantering,
tomma batterier, olycksfall eller försummelse av bruksanvisning.
Manschetten har en funktionell garanti (blåsans täthet) för
täthet under 2 år.
Vänligen kontakta lokal Microlife service (se förord).
15.Tekniska data
Instrumentet uppfyller de krav som ställs i EU:s direktiv 93/42/EEC.
Med förbehåll för eventuella tekniska förändringar.
Bluetooth
®
ord och logos är registrerade varumärke som ägs av
Bluetooth SIG, Inc och all användning av dessa av Microlife Corp.
är under licens. Andra varumärken och handels namn tillhör
respektive ägare.
Driftsförhållanden: 10 - 40 °C / 50 - 104 °F
15 - 95 % maximal relativ luftfuktighet
Förvarings-
förhållanden:
-20 - +55 °C / -4 - +131 °F
15 - 95 % maximal relativ luftfuktighet
Vikt: 354g (med batterier)
Dimensioner: 160 x 80 x 32 mm
Mätprocedur Oscillometrisk, enligt Korotkoff-metoden:
Fas I systoliskt, fas V diastoliskt
Mätområde: 20 - 280 mmHg – blodtryck
40 - 200 slag per minut – puls
Indikationer för
manschettrycket: 0 - 299 mmHg
Upplösning: 1 mmHg
Statisk
noggrannhetstest: Tryck mellan ± 3 mmHg
Pulsnoggrannhet: ±5 % av uppmätt värde
Kommunikation:
Bluetooth
®
Smart
Kompatibilitet: iOS: iOS 8.0 eller nyare
Android: Android 4.4.2 eller nyare
Strömkälla:
4 x 1.5 V alkaliska batterier; storlek AAA
Adapteranslutning DC 6V, 600 mA (tillbehör)
Batteriets
livslängd: ca. 400 mätningar (använd nya batterier)
IP Klass: IP20
Uppfyllda normer: EN 1060-1 /-3 /-4; IEC 60601-1;
IEC 60601-1-2 (EMC); IEC 60601-1-11
Förväntad
användningstid:
Instrumentet: 5 år eller 10000 mätningar
Tillbehör: 2 år
18
Näyttö
Lue ohjeet huolellisesti ennen kuin käytät laitetta.
Soveltuvuusluokka BF
Hyvä asiakas,
Uusi Microlife-verenpainemittarisi on luotettava lääketieteellinen
laite, jolla voit suorittaa mittauksia käsivarren yläosasta. Se on
helppokäyttöinen, tarkka ja suositeltava väline verenpaineen
mittaukseen kotona. Laite on kehitetty yhdessä lääkäreiden
kanssa ja kliiniset testit osoittavat sen mittaustarkkuuden olevan
hyvin korkealaatuinen.*
Microlife
n eteisvärinän ilmaisin on maailman johtava digitaalinen
verenpainemittausteknologia eteisvärinän ja korkean verenpaineen
havaitsemiseen. Nämä ovat kaksi suurinta riskitekijää aivohalva-
uksen tai sydänsairauden saamiseen tulevaisuudessa. Eteisvä-
rinän ja korkean verenpaineen havaitseminen ajoissa on tärkeää,
vaikkei mitään oireita olisikaan. Asianmukainen hoito voi vähentää
aivohalvauksen riskiä. Siksi on suositeltavaa käydä lääkärillä, kun
laite ilmoittaa eteisvärinästä verenpainetta mitatessa. Useat
tunnetut kliiniset tutkijat ovat testanneet
Microlife
n eteisvärinäalgo-
ritmin ja todenneet, että laite tunnistaa eteisvärinäpotilaat 97-100 %
tarkkuudella.
1,2
Lue nämä ohjeet läpi huolellisesti, jotta ymmärrät kaikki toiminnot
ja turvallisuutta koskevat tiedot. Tahdomme sinun olevan tyyty-
väinen Microlife-tuotteeseesi. Jos sinulla on kysyttävää, ongelmia
tai, jos tarvitset varaosia, ota yhteys paikalliseen Microlife-asiakas-
palveluusi. Saat paikallisen Microlife-jälleenmyyjän osoitteen
kauppiaaltasi tai apteekistasi. Voit vaihtoehtoisesti käydä
www.microlife.fi-sivustollamme, josta löydät paljon tuotteitamme
koskevia tärkeitä tietoja.
Pysy terveenä – Microlife AG!
* Tämä laite käyttää samaa mittaustekniikkaa kuin palkittu
«BP 3BTO-A» -malli, joka on testattu British Hypertension Society
(BHS) -järjestön sääntöjen mukaan.
1
Stergiou GS, Karpettas N, Protogerou A, Nasothimiou EG, &
Kyriakidis M. Diagnostic accuracy of a home blood pressure
monitor to detect atrial fibrillation. J Hum Hyperten 2009; 1-5.
2
Wiesel J, Fitzig L, Herschman Y, & Messineo FC Detection of
Atrial Fibrillation Using a Modified Microlife Blood Pressure
Monitor. Am J Hypertens 2009; 848-852.
Microlife BP A6 BT
FI
1
START/STOP-painike (Käynnistys)
2
Näyttö
3
Mansetin liitoskohta
4
Verkkoadapterin liitoskohta
5
Paristolokero
6
Mansetti
7
Mansetin liitin
8
AFIB/MAM-valitsin
9
Aika-painike
AT
M-painike (muisti)
AK
- «Takaisin» painike
AL
+ «Eteenpäin» painike
AM
Lukitusvalitsin
AN
USB-portti
AO
Päivämäärä/kellonaika
AP
Systolinen arvo
AQ
Diastolinen arvo
AR
Pulssin taajuus
AS
Pariston näyt
BT
Liikennevalo ilmaisin
BK
Tallennettu arvo
BL
Pulssin ilmaisin
BM
Mansetin tarkastuksen ilmaisin
BN
Eteisvärinän ilmaisin
BO
AFIB/MAM-tila
BP
Käsivarren liikkeen ilmaisin
BQ
MAM-intervalliaika
Säilytä kuivassa
1 / 1

Microlife BP A6 BT Kasutusjuhend

Kategooria
Vererõhu ühikud
Tüüp
Kasutusjuhend