Deltaco DELO-0310 Kasutusjuhend

Kategooria
Hiired
Tüüp
Kasutusjuhend
A N O R D I C B R A N D
ENG User manual
SPA Manual del usuario
SWE Användarmanual
FIN Käyttöopas
DAN Brugermanual
HUN Felhasználói kézikönyv
NOR Brukermanual
LIT Naudojimo instrukcija
LAV Lietošanas pamācība
EST Kasutusjuhend
DEU Benutzerhandbuchl
FRA Manuel d’utilisation
POL Instrukcja obsługi
NLD Gebruiksaanwijzing
O F F I C E
WIRELESS MOUSE
DELO-0310
A N O R D I C B R A N D
2
DAN
1. Tilbage knap
2. Fremad knap
3. Venstre museknap
4. Højre museknap
5. Scroll Wheel og knap
6. DPI knap
Tilslutning
Tilslut USB modtageren til en USB-port på din computer. Driverne installeres automatisk. Plug and Musen forbinder
automatisk til USB modtageren.
DPI
Brug DPI knappen for at ændre DPI imellem 800/1200/1600/2000/2400.
Batteri
Åben batteriklappen I indsæt 2 x AAA batterier. Luk herefter klappen.
Bland ikke nye og gamle batterier, og bland ikke forskellige batterimærker.
Garanti
Besøg www.deltaco.eu for garanti information.
Support
Mere information om produktet kan ndes på: www.deltaco.dk.
Contact us by e-mail: [email protected].
A N O R D I C B R A N D
3
DEU
1. Zurück-Taste
2. Forward-Taste
3. Linke Maustaste
4. Rechte Maustaste
5. Mausrad und Taste
6. DPI-Taste
Anschluss
Schließen Sie den USB-Empfänger an einen USB-Anschluss Ihres Computers an. Treiber werden automatisch geladen.
Es ist keine Treiberinstallation erforderlich.
Die Maus wird automatisch mit dem USB-Empfänger verbunden.
DPI
Verwenden Sie die DPI-Taste, um die DPI zwischen 800/1200/1600/2000/2400 zu ändern.
Batterie
Öffnen Sie das Batteriefach und legen Sie 2 x AAA-Batterien ein. Schließen Sie das Batteriefach.
Mischen Sie keine alten und neuen Batterien und keine Batterien verschiedener Marken.
Garantie
Informationen zur Garantie nden Sie unter www.deltaco.eu.
Unterstützung
Weitere Produktinformationen nden Sie unter www.deltaco.eu.
Kontaktieren Sie uns per E-Mail: [email protected].
A N O R D I C B R A N D
4
ENG
1. Backward button
2. Forward button
3. Left mouse button
4. Right mouse button
5. Mouse wheel and button
6. DPI button
Connect
Connect the USB receiver to a USB port on your computer. Drivers will be loaded automatically. No driver installation is
needed.
The mouse connects automatically to the USB receiver.
DPI
Use the DPI button to change the DPI between 800/1200/1600/2000/2400.
Battery
Open the battery compartment and insert 2 x AAA batteries. Close the battery compartment.
Do not mix old and new batteries and not mix batteries with different brands.
Warranty
Please, see www.deltaco.eu for warranty information.
Support
More product information can be found at www.deltaco.eu.
Contact us by e-mail: [email protected].
A N O R D I C B R A N D
5
EST
1. Tagasi nupp
2. Edasi nupp
3. Vasakpoolne hiirenupp
4. Parempoolne hiirenupp
5. Hiireratas ja nupp
6. DPI nupp
Ühendamine
Ühendage USB-vastuvõtja oma arvuti USB-pordiga. Draiverid laaditakse automaatselt. Draiverite paigaldamine pole
vajalik.
Hiir ühendub automaatselt USB-vastuvõtjaga.
DPI
Kasutage DPI nuppu DPI muutmiseks 800/1200/1600/2000/2400 vahel.
Patarei
Avage patareikamber ja sisestage 2 x AAA patareid. Sulgege patareikamber.
Ärge kasutage uusi ja vanu patareisid ega erinevate kaubamärkidega patareisid segamini.
Garantii
Garantiiteabe kohta vaadake palun www.deltaco.eu.
Tugi
Täiendavat tooteteavet leiate aadressil www.deltaco.eu.
Võtke meiega ühendust e-posti teel: [email protected].
A N O R D I C B R A N D
6
FIN
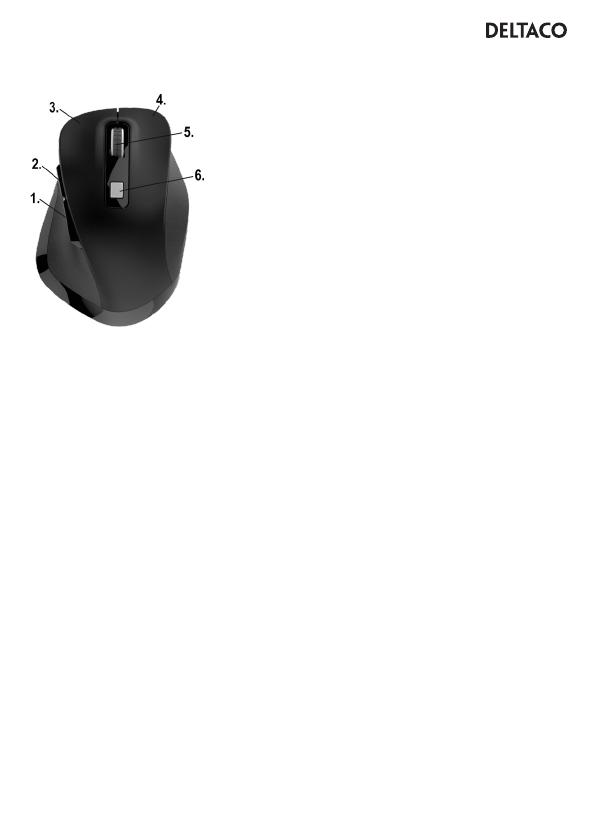
1. Taaksepäin-painike
2. Eteenpäin-painike
3. Vasemmanpuoleinen painike
4. Oikeanpuoleinen painike
5. Rullan painike
6. DPI-painike
Kytkentöjen tekeminen
Kytke USB-vastaanotin tietokoneeseen. Ajurit asentuvat automaattisesti, eikä niitä tarvitse ladata erikseen. Hiiri ja
vastaanotin muodostavat samalla yhteyden toisiinsa.
DPI-painike
Painikkeella voi vaihtaa hiiren tarkkuutta. Vaihtoehtoina ovat 800, 1200, 1600, 2000 ja 2400 DPI.
Paristot
Avaa paristolokero ja aseta sinne kaksi AAA-paristoa. Sulje lopuksi lokero.
Älä käytä uusia ja vanhoja paristoja samanaikaisesti. Älä myöskään laita lokeroon paristoja, jotka ovat keskenään
erimerkkisiä.
Takuu
Takuuehdot voi lukea osoitteesta www.deltaco.eu.
Tuotetuki
Tuotteesta on lisätietoja osoitteessa www.deltaco.eu.
Tukipalvelun sähköpostiosoite on info@deltaco..
A N O R D I C B R A N D
7
FRA
1. Bouton arrière
2. Bouton avant
3. Bouton gauche de la souris
4. Bouton droit de la souris
5. Molette et bouton de la souris
6. Bouton DPI
Connecter
Connectez le récepteur USB à un port USB de votre ordinateur. Les pilotes seront chargés automatiquement. Aucune
installation de pilote n’est nécessaire.
La souris se connecte automatiquement au récepteur USB.
DPI
Utilisez le bouton DPI pour modier le DPI entre 800 / 1 200 / 1 600 / 2 000 / 2 400.
Piles
Ouvrez le compartiment à piles et insérez 2 piles AAA. Fermez le compartiment à piles.
Ne mélangez pas des piles anciennes et neuves et ne mélangez pas des piles de marques différentes.
Garantie
Veuillez consulter www.deltaco.eu pour les informations sur la garantie.
Assistance
Plus d’information sur le produit est disponible sur le site www.deltaco.eu.
Contactez-nous par e-mail : [email protected].
A N O R D I C B R A N D
8
HUN
1. Hátra gomb
2. Előre gomb
3. Bal egérgomb
4. Jobb egérgomb
5. Görgetőgomb és nyomógomb
6. DPI-gomb
Csatlakoztatás
Csatlakoztassa az USB-vevőegységet a számítógépén lévő egyik USB-porthoz. Az illesztőprogramok betöltésére
automatikusan sor kerül. Nincs szükség illesztőprogram telepítésére.
Az egér automatikusan csatlakozik az USB-vevőhöz.
DPI
A DPI gombbal tudja a DPI-t módosítani 800/1200/1600/2000/2400 között.
Elemek
Nyissa fel az elemtartó rekeszt, és helyezzen be 2 db AAA elemet. Zárja be az elemtartó rekeszt.
Ne keverje a régi és az új, valamint az eltérő márkájú elemeket.
Garancia
A garanciális információkat lásd a www.deltaco.eu webhelyen.
Támogatás
A www.deltaco.eu webhelyen további információkat talál a termékről.
A következő e-mail-címen keresztül léphet velünk kapcsolatba: [email protected].
A N O R D I C B R A N D
9
LAV
1. “Atpakaļ” poga
2. ”Uz priekšu” poga
3. Peles kreisā poga
4. Peles labā poga
5. Peles ritenītis un poga
6. DPI poga:
Savienošana
Pievienojiet USB uztvērēju pie sava datora USB pieslēgvietas. Draiveri tiks ielādēti automātiski. Draiveru instalēšana
nav vajadzīga.
Pele automātiski savienojas ar USB uztvērēju.
DPI
Izmantojiet DPI pogu, lai mainītu DPI starp 800/1200/1600/2000/2400.
Baterija
Atveriet bateriju nodalījumu un ievietojiet 2 AAA baterijas. Aizveriet bateriju nodalījumu.
Nelietojiet kopā vecas un jaunas baterijas, un nelietojiet kopā dažādu zīmolu baterijas.
Garantija
Lūdzu, apmeklējiet www.deltaco.eu, lai uzzinātu par garantiju.
Atbalsts
Vairāk informācijas par precēm atrodama tīmekļa vietnē www.deltaco.eu.
Sazinieties ar mums, izmantojot e-pastu: [email protected].
A N O R D I C B R A N D
10
LIT
1. Mygtukas „atgal“
2. Mygtukas „pirmyn“
3. Kairysis pelės mygtukas
4. Dešinysis pelės mygtukas
5. Pelės ratukas ir mygtukas
6. DPI mygtukas
Prijungimas
Prijunkite USB imtuvą prie savo kompiuteryje esančios USB jungties. Tvarkyklės bus įdiegtos automatiškai. Jų diegti
patiems nereikia.
Pelė automatiškai prisijungs prie USB imtuvo.
DPI
Naudokite DPI mygtuką, kad keistumėte DPI vertes tarp 800/1200/1600/2000/2400.
Baterija
Atidarykite baterijų skyrelį ir įdėkite 2 AAA tipo baterijas. Uždarykite baterijų skyrelį.
Nemaišykite senų ir naujų baterijų, nemaišykite skirtingų gamintojų baterijų.
Garantija
Norėdami sužinoti daugiau informacijos apie garantiją, apsilankykite adresu www.deltaco.eu.
Pagalba
Daugiau informacijos apie gaminį galite rasti adresu www.deltaco.eu.
Susisiekite su mumis elektroniniu paštu: [email protected].
A N O R D I C B R A N D
11
NLD
1. Achteruitknop
2. Vooruitknop
3. Linkermuisknop
4. Rechtermuisknop
5. Muiswielknop
6. DPI-knop
Aansluiten
Sluit de USB-ontvanger op een USB-poort van uw computer aan. De stuurprogramma’s worden automatisch geladen. Er
is geen installatie van stuurprogramma nodig.
De muis maakt automatisch verbinding met de USB-ontvanger.
DPI
Gebruik de DPI-knop om de DPI te wijzigen tussen 800/1200/1600/2000/2400.
Batterij
Open het batterijvak en plaats 2 x AAA-batterijen. Sluit het batterijvak.
Meng geen nieuwe met oude of met ander type batterijen.
Garantie
Zie www.deltaco.eu voor garantie-informatie.
Ondersteuning
Meer informatie over het product is te vinden op www.deltaco.eu.
Neem contact met ons op: [email protected].
A N O R D I C B R A N D
12
NOR
1. Bakover-knapp
2. Fremover-knapp
3. Venstre musknapp
4. Høyre musknapp
5. Musehjul og knapp
6. DPI-knapp
Tilkobling
Koble USB-mottakeren til en USB-port på PCen. Drivere lastes automatisk. Ingen installasjon av drivere trengs.
Musen kobles automatisk til USB-mottakeren.
DPI
Bruk DPI-knappen for å endre DPI mellom 800/1200/1600/2000/2400.
Batteri
Åpne batterirommet og sett inn 2 x AAA-batterier. Steng batterirommet.
Bland ikke gamle og nye batterier og bland ikke batterier av ulike merker.
Garanti
Vennligst se www.deltaco.eu for garantiinformasjon.
Support
Mer produktinformasjon nner du på www.deltaco.eu.
Kontakt oss via e-post: [email protected].
A N O R D I C B R A N D
13
POL
1. Przycisk wstecz
2. Przycisk dalej
3. Lewy przycisk myszy
4. Prawy przycisk myszy
5. Przycisk i kółko przewijania
6. Przycisk DPI
Łączenie
Podłącz odbiornik USB do portu USB-A w komputerze. Sterowniki zostaną zainstalowane automatycznie. Instalacja
sterowników nie jest wymagana.
Mysz łączy się automatycznie z odbiornikiem USB.
DPI
Użyj przycisku DPI, aby zmieniać DPI pomiędzy 800/1200/1600/2000/2400.
Bateria
Otwórz przegrodę na baterie i włóż 2 x baterie AAA. Zamknij przegrodę na baterie.
Nie łącz starych i nowych baterii i nie mieszaj baterii różnych marek.
Gwarancja
Zajrzyj na stronę www.deltaco.eu w celu uzyskania informacji dotyczących gwarancji.
Pomoc
Więcej informacji o produkcie można znaleźć na stroniewww.deltaco.eu.
Skontaktuj się z nami poprzez e-mail: [email protected].
A N O R D I C B R A N D
14
SPA
1. Botón de atrás
2. Botón de delante
3. Botón izquierdo del ratón
4. Botón derecho del ratón
5. Botón y rueda de desplazamiento del ratón
6. Botón DPI
Conexión
Conecte el receptor USB a un puerto USB de su ordenador. Los controladores se cargarán automáticamente. No es
necesario instalar los controladores.
El ratón se conecta al receptor USB de forma automática.
DPI
Utilice el botón DPI para cambiar el DPI entre 800/1200/1600/2000/2400.
Batería
Abra el compartimento de baterías e inserte 2 baterías AAA. Cierre el compartimento de baterías.
No mezcle baterías nuevas y usadas y no mezcle baterías de diferentes marcas.
Garantía
Más información sobre la garantía obtendrá en la página web www.deltaco.eu.
Servicio técnico
Más información sobre el producto puede encontrar en www.deltaco.eu.
Correo electrónico: [email protected].
A N O R D I C B R A N D
15
SWE
1. Bakåtknapp
2. Framåtknapp
3. Vänster musknapp
4. Höger musknapp
5. Mushjul och knapp
6. DPI-knapp
Anslut
Anslut USB-mottagaren till en USB-port på datorn. Drivrutiner laddas automatiskt. Ingen installation av drivrutiner
behövs.
Musen ansluts automatiskt till USB-mottagaren.
DPI
Använd DPI-knappen för att ändra DPI mellan 800/1200/1600/2000/2400.
Batteri
Öppna batterifacket och sätt i 2 x AAA-batterier. Stäng batterifacket.
Blanda inte gamla och nya batterier och blanda inte batterier med olika varumärken.
Garanti
Vänligen, se www.deltaco.eu för garantiinformation.
Support
Mer produktinformation hittar du på www.deltaco.eu.
Kontakta oss via e-post: [email protected].
A N O R D I C B R A N D
SweDeltaco AB, Glasbergatan 8, 125 45 Älvsjö, Sweden
  • Page 1 1
  • Page 2 2
  • Page 3 3
  • Page 4 4
  • Page 5 5
  • Page 6 6
  • Page 7 7
  • Page 8 8
  • Page 9 9
  • Page 10 10
  • Page 11 11
  • Page 12 12
  • Page 13 13
  • Page 14 14
  • Page 15 15
  • Page 16 16

Deltaco DELO-0310 Kasutusjuhend

Kategooria
Hiired
Tüüp
Kasutusjuhend