Boneco F100 AIR SHOWER Omaniku manuaal

Tüüp
Omaniku manuaal
F100
MANUAL
READ AND SAVE THESE INSTRUCTIONS
Gebrauchsanweisung 3
Instructions for use 11
Mode d’emploi 19
Istruzioni per l’uso 27
Gebruiksaanwijzing 35
Instrucciones de uso 43
Használati útmutató 51
Instrukcja obsługi 59
Bruksanvisning 67
Käyttöohjeet 75
Brugsanvisning 83
Bruksanvisning 91
Upute za uporabu 99
Lietošanas instrukcija 107
Naudojimo instrukcijos 115
Kasutusjuhend 123
Návod kpouži 131
Návod na používanie 139
Navodila za uporabo 147
Руководство по эксплуатации 155
取扱説明書 163
󻕻󻭸󽴔󻗳󺽔󻗫 171
3
de
GEBRAUCHSANWEISUNG
BONECO F100
4
de
INHALTSVERZEICHNIS
Technische Daten 5
Einleitung 6
Lieferumfang 6
Übersicht und Benennung der Teile 7
Inbetriebnahme 8
Tipps zur Positionierung 9
Standort 9
Hinweise zur Leistung 9
Klimaanlage 9
Frischluft 9
Reinigung 10
Sicherheitshinweise 10
Gehäuse reinigen 10
Lüfterflügel reinigen 10
5
de
Technische Daten*
Typ BONECO F100
Netzspannung 220 – 240V ~ 50 Hz
Leistungsaufnahme 20 W (max. Stufe)
Betriebsgeräusch 55 dB(A) (max. Stufe)
Luftstrom 610 m
3
/ h
Luftgeschwindigkeit 4.1 m / sec.
Abmessungen L×B×H
202 × 207 × 238 mm
Leergewicht
1.6 kg
TECHNISCHE DATEN
* Änderungen vorbehalten
6
de
LIEFERUMFANG
BONECO F100
Air Shower System
mit Netzkabel
Anleitung Sicherheits hinweise
GESCHÄTZTER KUNDE
Wir gratulieren Ihnen zum Kauf des BONECO F100 Air
Shower Ventilators. Dieses leistungsfähige Gerät passt
sich nahtlos an Ihre Bedürfnisse an. An heissen Tagen
sorgt es auf den unteren Leistungsstufen für eine an-
genehme Brise in Ihrem Heim. Wenn Sie hingegen eine
Klima anlage einsetzen, verteilt das kraftvolle Gebläse die
Luft im ganzen Raum, um eine gleichmässige Temperatur
zu gewährleisten.
Bei der Entwicklung des BONECO F100 standen der war-
tungsarme Betrieb und die Langlebig keit im Vordergrund.
Die einzigartig geformten Lüfterflügel erzeugen einen
gleichmässigen Luftstrom bei minimalem Energiebedarf,
was auch der Umwelt zugutekommt. Das elegante De-
sign harmoniert ausserdem mit jedem Wohnstil, sodass
Sie Ihren BONECO F100 das ganze Jahr über einsetzen
können.
Wir wünschen Ihnen viel Freude mit Ihrem neuen
BONECO F100!
EINLEITUNG
1 Anschluss für Netzkabel
2 Anzeige der Leistungsstufe
3 Touch-Bedienfeld
7
de
ÜBERSICHT UND BENENNUNG DER TEILE
1
2
3
8
de
2
INBETRIEBNAHME
1
3
4
Verbinden Sie das mitgelieferte Netzkabel mit dem
Gerät.
Verbinden Sie das Netzkabel mit der Steckdose. Aktivieren Sie den BONECO F100 durch ein Tippen auf
das Bedienfeld.
Tippen Sie erneut auf das Bedienfeld, um die Leistung
zu steuern.
9
de
STANDORT
Um ein angenehmens Klima zu schaffen, sollten Sie das
Gerät nicht direkt auf Ihr Gesicht oder Ihren Körper rich-
ten.
HINWEISE ZUR LEISTUNG
Der BONECO F100 ist mit einem Hochleistungsgebläse
ausgestattet, das grosse Luftmengen bewegen kann.
Nutzen Sie dieses Potenzial: Treiben Sie die Luft ge-
zielt in eine bestimmte Richtung, um ein ausge glichenes
Raumklima zu schaffen. Die folgenden Beispiele dienen
als Inspiration.
TIPPS ZUR POSITIONIERUNG
KLIMAANLAGE
Eine Klimaanlage verteilt die Temperaturen unterschied-
lich. Verwenden Sie Ihren BONECO F100, um die warme
Luft zur Klimaanlage zu bewegen. Das kann direkt ge-
schehen, oder indem Sie die Luft zirkulieren lassen, so
wie in dieser Abbildung.
FRISCHLUFT
Ihr BONECO F100 hilft Ihnen, Räume besser zu lüften.
Wenn sich kein Durchzug aufbaut, leiten Sie die frische
Luft direkt vom Fenster in den gewünschten Raum.
10
de
REINIGUNG
SICHERHEITSHINWEISE
Trennen Sie den BONECO F100 immer vom Strom-
netz, bevor Sie mit der Reinigung beginnen! Nicht-
beachtung kann zu Stromschlägen führen und Leben
gefährden!
Verwenden Sie für die Reinigung keinen Alkohol und
keine aggressiven Reinigungsmittel.
GEHÄUSE REINIGEN
Der BONECO F100 ist für den wartungsarmen Betrieb
konzipiert – auch bei jahrelangem Einsatz. Meistens
reicht für die Reinigung ein trockenes Tuch.
Bei hartnäckigem Schmutz reinigen Sie das Gehäuse mit
einem feuchten Tuch. Geben Sie dem Wasser ein wenig
Geschirrspülmittel bei.
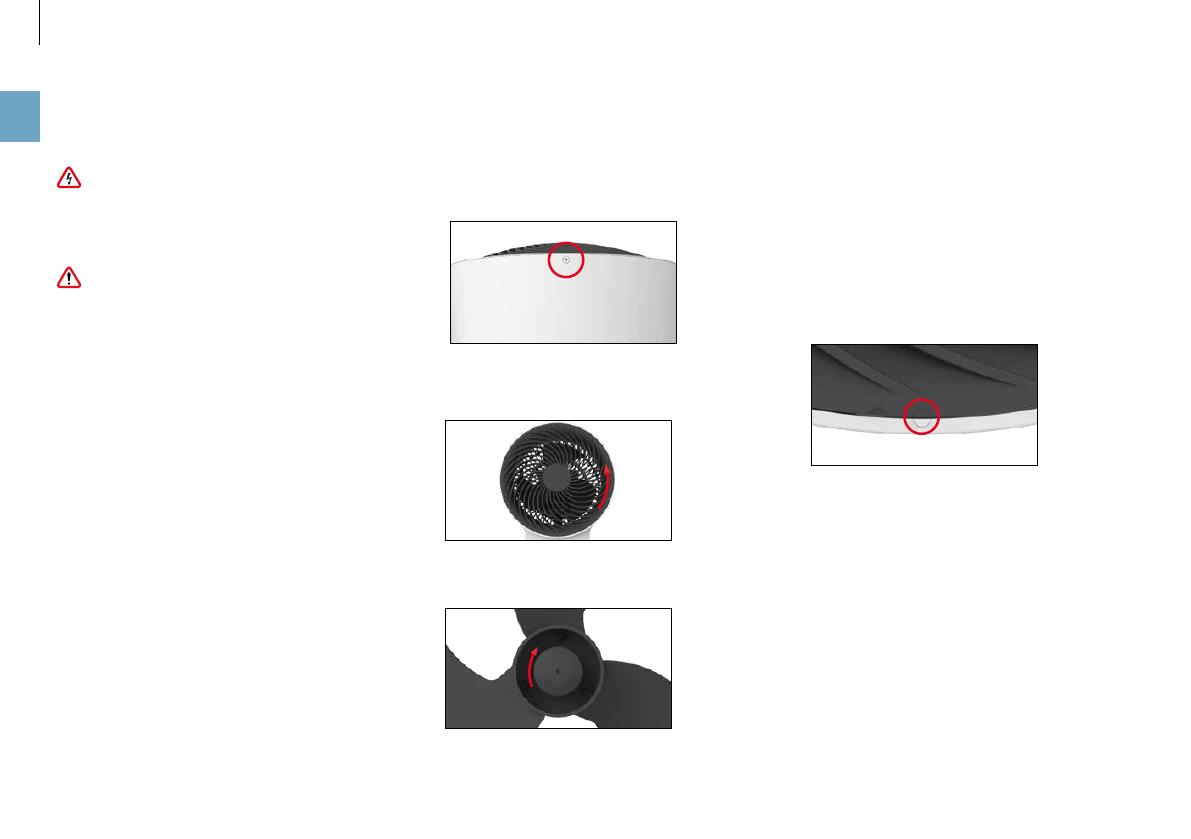
LÜFTERFLÜGEL REINIGEN
1. sen Sie die Sicherungsschraube an der Unterseite
des Gehäuses.
2. Entfernen Sie das Frontgitter, indem Sie es ein wenig
gegen den Uhrzeigersinn drehen.
3. sen Sie die Sicherungsschraube in der Mitte im
Uhrzeigersinn.
4. Entfernen Sie die Lüfterflügel und reinigen Sie diese
mit einem feuchten Tuch.
5. Bauen Sie das Gerät in der umge kehrten Reihenfolge
zusammen.
6. Fixieren Sie das Frontgitter mit der Sicherungs-
schraube. Achten Sie dabei auf die Position der
Schraube am Frontgitter.
11
en
INSTRUCTIONS FOR USE
BONECO F100
12
en
TABLE OF CONTENTS
Technical data 13
Introduction 14
Items included 14
Overview and part names 15
Start-up 16
Positioning tips 17
Location 17
Notes on performance 17
Air-conditioning System (AC) 17
Fresh air 17
Cleaning 18
Safety instructions 18
Cleaning the housing 18
Cleaning the fan blades 18
13
en
Technical data*
Model BONECO F100
Power supply voltage 220 – 240V ~ 50 Hz
Power consumption 20 W (max. level)
Operation noise level 55 dB(A) (max. level)
Air flow 610 m
3
/ h
Air-speed 4.1 m / sec
Dimensions L×W×H
202 × 207 × 238 mm
Weight
1.6 kg
TECHNICAL DATA
* Subject to change
14
en
ITEMS INCLUDED
BONECO F100
Air Shower System
with power cord
Manual Safety instructions
DEAR CUSTOMER,
Congratulations on your purchase of the BONECO F100
Air Shower Fan. This high-performance unit seamlessly
adapts to meet your needs. When set to the lower out-
put levels, it provides a pleasant breeze in your home
on hot days. On the other hand, if you use an air-con-
ditioning system, the unit's powerful fan distributes the
air throughout the room ensuring a uniform temperature.
In developing the BONECO F100, low-maintenance oper-
ation and durability were of primary importance. The fan
blade's one-of-a-kind shape creates a uniform air flow
using minimal energy, which is also good for the environ-
ment. The elegant design harmonizes with any decorative
style so that you can use your BONECO F100 throughout
the entire year.
We hope you enjoy your new BONECO F100!
INTRODUCTION
1 Power cord connection
2 Output level display
3 Touch control panel
15
en
OVERVIEW AND PART NAMES
1
2
3
16
en
2
START-UP
1
3
4
Connect the included power cord to the unit. Plug the power cord into a power outlet. Activate the BONECO F100 by tapping on the control
panel.
Tap on the control panel again to control the output.
17
en
LOCATION
In order to create a comfortable climate, you should not
point the unit directly at your face or your body.
NOTES ON PERFORMANCE
The BONECO F100 is equipped with a high-performance
fan that can move large amounts of air. Making use of this
feature: Guide the air in a specific direction to achieve a
uniform room climate. The following examples illustrate
how to do this.
POSITIONING TIPS
AIR-CONDITIONING SYSTEM (AC)
An air conditioner distributes the temperature in vari-
ous ways. Use the BONECO F100 to move the warm air
towards the air-conditioning system. This can be done
directly or indirectly via air circulation, as shown in this
image.
FRESH AIR
The BONECO F100 helps you achieve better ventilation
indoors. If cross-ventilation is not created, guide fresh air
directly from the window into the desired room.
18
en
CLEANING
SAFETY INSTRUCTIONS
Always unplug the BONECO F100 before you begin
cleaning! Failure to do so can result in electric shock
and fatal injury!
Do not use alcohol or corrosive cleaning agents for
cleaning.
CLEANING THE HOUSING
The BONECO F100 is designed for low-maintenance op-
eration, even after years of use. In most cases, a dry cloth
can be used for cleaning.
If stubborn dirt is present, clean the housing using a damp
cloth. Add a small amount of dishwashing detergent to
the water.
CLEANING THE FAN BLADES
1. Unscrew the safety screw on the underside of the
housing.
2. Remove the front grill by turning counterclockwise
slightly.
3. Unscrew the safety screw in the middle by turning it
clockwise.
4. Remove the fan blade and clean it with a damp cloth.
5. Put the unit back together by following the steps in
reverse order.
6. Attach the front grill with the safety screw. When
doing so, pay attention to the position of the screw
on the front grill.
19
fr
MODE D’EMPLOI
BONECO F100
20
fr
SOMMAIRE
Caractéristiques techniques 21
Introduction 22
Contenu de la livraison 22
Vue d’ensemble et désignation des pièces 23
Mise en service 24
Conseils pour le positionnement 25
Emplacement 25
Informations sur les performances 25
Système de climatisation 25
Air frais 25
Nettoyage 26
Consignes de sécurité 26
Nettoyage du btier 26
Nettoyage des pales du ventilateur 26
  • Page 1 1
  • Page 2 2
  • Page 3 3
  • Page 4 4
  • Page 5 5
  • Page 6 6
  • Page 7 7
  • Page 8 8
  • Page 9 9
  • Page 10 10
  • Page 11 11
  • Page 12 12
  • Page 13 13
  • Page 14 14
  • Page 15 15
  • Page 16 16
  • Page 17 17
  • Page 18 18
  • Page 19 19
  • Page 20 20
  • Page 21 21
  • Page 22 22
  • Page 23 23
  • Page 24 24
  • Page 25 25
  • Page 26 26
  • Page 27 27
  • Page 28 28
  • Page 29 29
  • Page 30 30
  • Page 31 31
  • Page 32 32
  • Page 33 33
  • Page 34 34
  • Page 35 35
  • Page 36 36
  • Page 37 37
  • Page 38 38
  • Page 39 39
  • Page 40 40
  • Page 41 41
  • Page 42 42
  • Page 43 43
  • Page 44 44
  • Page 45 45
  • Page 46 46
  • Page 47 47
  • Page 48 48
  • Page 49 49
  • Page 50 50
  • Page 51 51
  • Page 52 52
  • Page 53 53
  • Page 54 54
  • Page 55 55
  • Page 56 56
  • Page 57 57
  • Page 58 58
  • Page 59 59
  • Page 60 60
  • Page 61 61
  • Page 62 62
  • Page 63 63
  • Page 64 64
  • Page 65 65
  • Page 66 66
  • Page 67 67
  • Page 68 68
  • Page 69 69
  • Page 70 70
  • Page 71 71
  • Page 72 72
  • Page 73 73
  • Page 74 74
  • Page 75 75
  • Page 76 76
  • Page 77 77
  • Page 78 78
  • Page 79 79
  • Page 80 80
  • Page 81 81
  • Page 82 82
  • Page 83 83
  • Page 84 84
  • Page 85 85
  • Page 86 86
  • Page 87 87
  • Page 88 88
  • Page 89 89
  • Page 90 90
  • Page 91 91
  • Page 92 92
  • Page 93 93
  • Page 94 94
  • Page 95 95
  • Page 96 96
  • Page 97 97
  • Page 98 98
  • Page 99 99
  • Page 100 100
  • Page 101 101
  • Page 102 102
  • Page 103 103
  • Page 104 104
  • Page 105 105
  • Page 106 106
  • Page 107 107
  • Page 108 108
  • Page 109 109
  • Page 110 110
  • Page 111 111
  • Page 112 112
  • Page 113 113
  • Page 114 114
  • Page 115 115
  • Page 116 116
  • Page 117 117
  • Page 118 118
  • Page 119 119
  • Page 120 120
  • Page 121 121
  • Page 122 122
  • Page 123 123
  • Page 124 124
  • Page 125 125
  • Page 126 126
  • Page 127 127
  • Page 128 128
  • Page 129 129
  • Page 130 130
  • Page 131 131
  • Page 132 132
  • Page 133 133
  • Page 134 134
  • Page 135 135
  • Page 136 136
  • Page 137 137
  • Page 138 138
  • Page 139 139
  • Page 140 140
  • Page 141 141
  • Page 142 142
  • Page 143 143
  • Page 144 144
  • Page 145 145
  • Page 146 146
  • Page 147 147
  • Page 148 148
  • Page 149 149
  • Page 150 150
  • Page 151 151
  • Page 152 152
  • Page 153 153
  • Page 154 154
  • Page 155 155
  • Page 156 156
  • Page 157 157
  • Page 158 158
  • Page 159 159
  • Page 160 160
  • Page 161 161
  • Page 162 162
  • Page 163 163
  • Page 164 164
  • Page 165 165
  • Page 166 166
  • Page 167 167
  • Page 168 168
  • Page 169 169
  • Page 170 170
  • Page 171 171
  • Page 172 172
  • Page 173 173
  • Page 174 174
  • Page 175 175
  • Page 176 176
  • Page 177 177
  • Page 178 178
  • Page 179 179
  • Page 180 180

Boneco F100 AIR SHOWER Omaniku manuaal

Tüüp
Omaniku manuaal