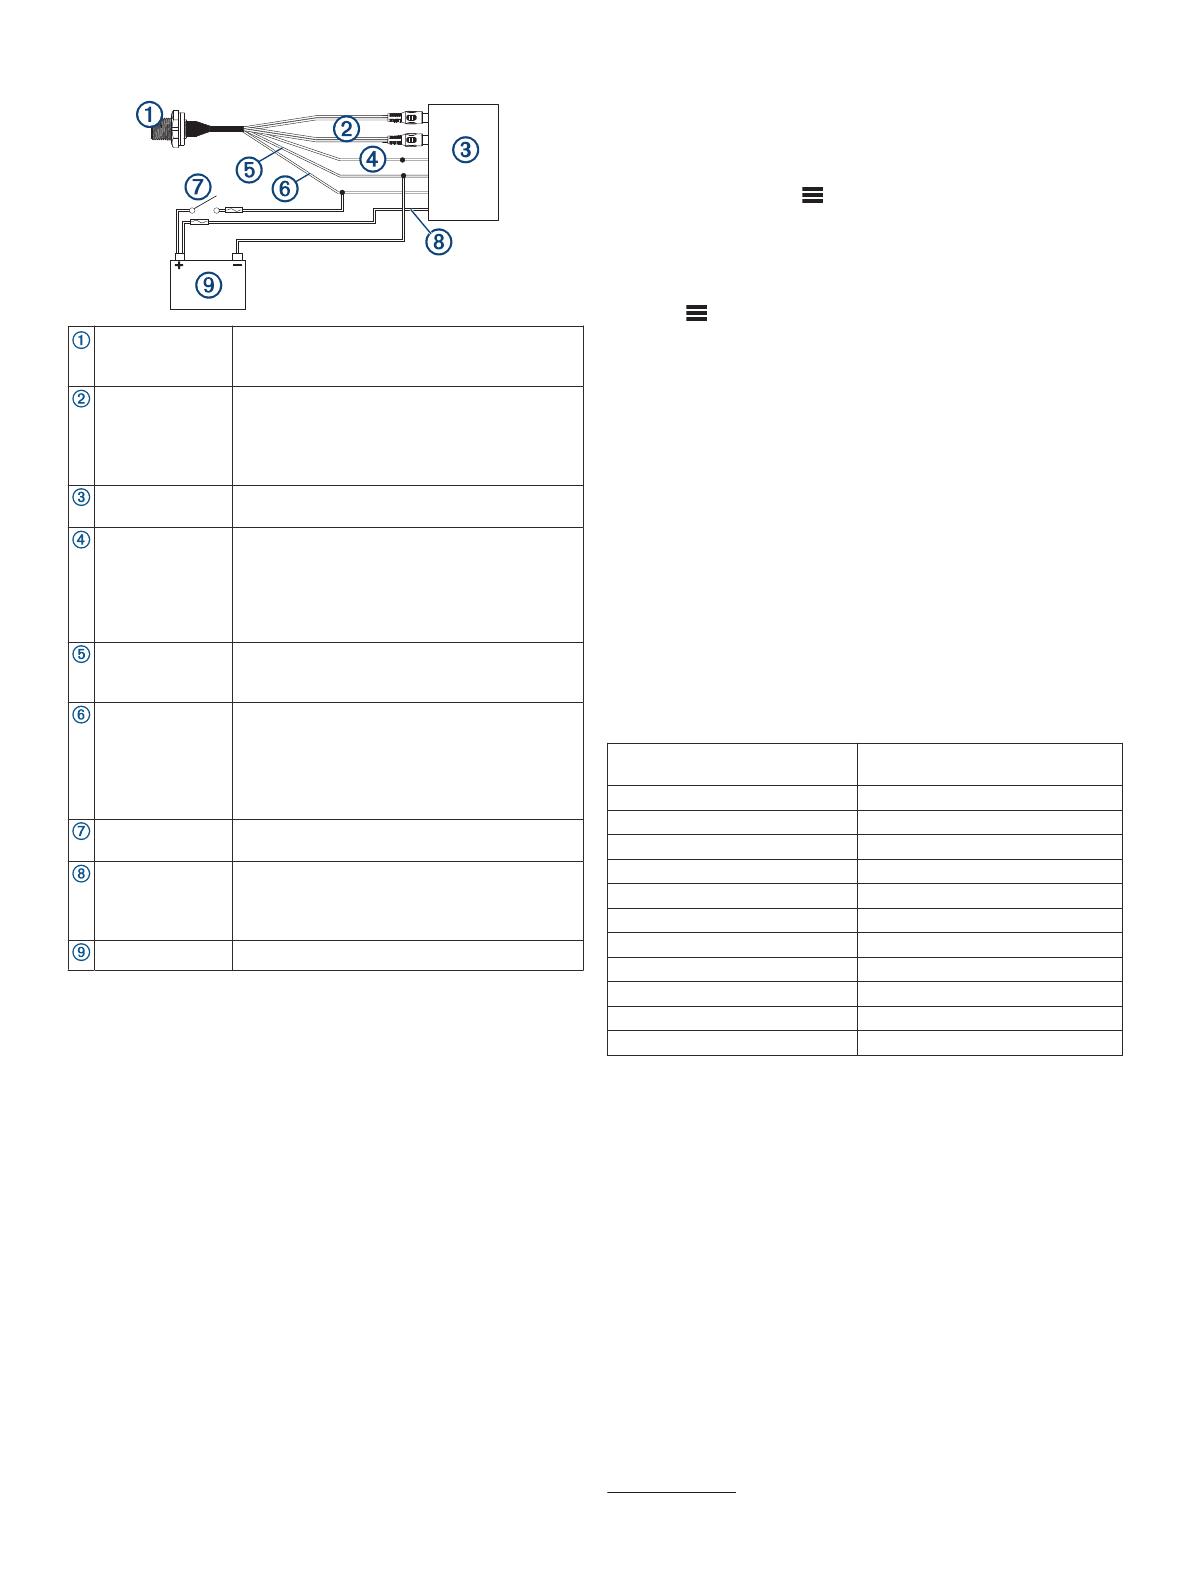
Connection Diagram
Microphone
connector
You can securely mount the microphone
connector in an accessible location (Installing
the Connector Mount, sivu 1).
RCA connectors You must connect these to the AUX IN
connector on the stereo wiring harness.
If the stereo has more than one AUX IN
connector, you must connect to the AUX1
connector.
Compatible
stereo
TELEMUTE You must connect the bare wire from the
microphone cable to the TELEMUTE wire on
the stereo wiring harness if you want the
microphone to change the source when
activated(Operating the Handheld Microphone,
sivu 2).
Negative (-)
power connection
For the best results, you should connect the
negative (-) wire from the microphone to the
same negative (-) terminal as the stereo.
Positive (+)
ignition power
connection
You should connect the positive (+) wire from
the handheld microphone to the ignition wire
from the stereo to avoid draining the battery.
You must route the combined positive (+) and
ignition wires through a 3 A fuse before connec-
ting to the ignition or manual switch.
Ignition or manual
switch
The ignition or manual switch turns on the
stereo and microphone.
Stereo power
positive connec-
tion
You should not connect the positive (+) wire
from the microphone to the constant power
cable from the stereo to avoid draining the
battery.
Power source
Operating the Handheld Microphone
You must configure the stereo before you can operate the
handheld microphone (Configuring the Fusion Stereo for the
Handheld Microphone, sivu 2).
You can use the handheld microphone from any source on the
stereo. If the source is set to anything other than AUX1 when
you hold the microphone button, the source switches to AUX1
automatically, and switches back to the original source after you
release the button.
HUOMAUTUS: you should stand behind the speakers that will
be broadcasting from the microphone. If you are standing in
front of the speakers, the microphone will pick up the broadcast
and cause feedback.
1
Select any source on the stereo.
HUOMAUTUS: if you set the stereo to the AUX1 source,
there is no sound until you hold the microphone button and
speak.
2
Hold the button on the side of the microphone and speak into
it.
HUOMAUTUS: if the stereo is playing music from a source,
you should wait about 2 seconds before speaking to avoid
cutting off the beginning of your announcement.
3
After you have finished speaking, release the button.
If the stereo was playing music from a source before you held
the button, the stereo switches back to that source
automatically.
Configuring the Fusion Stereo for the Handheld
Microphone
1
On the stereo, select > Asetukset >
PUHELINMYKISTYS.
2
Select AUX1 to fill the check box.
The stereo will now change to the AUX1 source when you
hold the button on the side of the handheld microphone.
3
Select > Asetukset > LÄHDE > AUX1.
4
Select PARTYBUS KÄYTÖSSÄ to clear the checkbox.
When you clear the checkbox, the AUX1 source is no longer
available for streaming over the Fusion PartyBus
™
network. It
is recommended to disable network streaming for the
microphone source to avoid feedback caused by the slight
delay present when streaming.
Adjusting the Gain of the Handheld Microphone
If the volume of the microphone broadcast is too loud or too
quiet in relation to the other sources on the stereo, you can
adjust the gain level for the AUX1 source.
1
On the stereo, change the source to AUX1.
2
Adjust the gain to raise or lower the microphone volume in
1 db steps.
A positive (+) gain setting increases the microphone volume,
and a negative (-) gain setting decreases the microphone
volume.
Specifications
Microphone dimensions (H×W×D) 88 × 60 × 34 mm (3
1
/
2
× 2
3
/
8
×
1
11
/
32
in.)
Power and audio cable length 60 cm (23
5
/
8
in.)
Frequency response From 100 Hz to 4 kHz
Microphone weight 250 g (8.75 oz)
Output (max.) 1 Vrms
THD+N (Vo = 1 Vrms, 1 kHz) Less than 0.1% Vrms
Gain +18 ± 0.5 dB
Load impedance (min.) 10k Ohm
Operating voltage From 10.5 to 32 Vdc
Current (at 14.4 Vdc) 0.005 A
Fuse (not included) 3 A
Water rating IEC 60529 IPX7
1
© 2020 Garmin Ltd. tai sen tytäryhtiöt
Garmin
®
, Garmin logo, Fusion
®
ja Fusion logo ovat Garmin Ltd:n tai sen tytäryhtiöiden
tavaramerkkejä, jotka on rekisteröity Yhdysvalloissa ja muissa maissa. Näitä
tavaramerkkejä ei saa käyttää ilman yhtiön Garmin nimenomaista lupaa.
M/N: A13014
1
For more information, go to garmin.com/waterrating.
© 2020 Garmin Ltd. tai sen tytäryhtiöt www.fusionentertainment.com

