Philips FC9204/01 Kasutusjuhend

Kategooria
Kaasaskantavad tolmuimejad
Tüüp
Kasutusjuhend

See käsiraamat sobib ka

Register your product and get support at
www.philips.com/welcome
FC9219-FC9200
4222_003_3573_2_DFU-Booklet_A5_v1.indd 1 27-06-11 14:22
FC9219-FC9200
4222_003_3573_2_DFU-Booklet_A5_v1.indd 2 27-06-11 14:22
1
4222_003_3573_2_DFU-Booklet_A5_v1.indd 3 27-06-11 14:23
4222_003_3573_2_DFU-Booklet_A5_v1.indd 4 27-06-11 14:23
FC9219-FC9200
ENGLISH 6
 19
 32
 45
 58
 71
 84
 97
 110
 123
 136
 149
 162
 175
 188
 201
225
237
Table of contents
4222_003_3573_2_DFU-Booklet_A5_v1.indd 5 27-06-11 14:23
6
Introduction
Congratulations on your purchase and welcome to Philips! To fully
benet from the support that Philips offers, register your product at
www.philips.com/welcome.
General description (Fig. 1)
1 Filter cylinder
2 Filter cylinder case
3 Dust bucket release button
4 Dust bucket
5 Motor protection lter
6 Cleaning brush
7 Cover
8 On/off button
9 Suction power knob
10 Hose connector
11 Handgrip
12 Accessory holder
13 Telescopic tube
14 Crevice tool
15 Small nozzle
16 Small brush (specic types only)
17 Parquet nozzle (specic types only)
18 Combination nozzle (specic types only)
19 Rocker switch for carpet/hard oor settings
20 Tri-Active nozzle (specic types only)
21 Cord rewind button
22 Super Clean Air Filter, Super Clean Air HEPA 12 lter or Ultra Clean
Air HEPA 13 lter
23 Filter grille
24 Parking slot
Important
Read this user manual carefully before you use the appliance and save it for
future reference.
Danger
- Never suck up water or any other liquid. Never suck up ammable
substances and do not suck up ashes until they are cold.
Warning
- Check if the voltage indicated on the appliance corresponds to the
local mains voltage before you connect the appliance.
- Do not use the appliance if the plug, the mains cord or the appliance
itself is damaged.
- If the mains cord is damaged, you must have it replaced by Philips, a
service centre authorised by Philips or similarly qualied persons in
order to avoid a hazard.
- This appliance is not intended for use by persons (including children)
with reduced physical, sensory or mental capabilities, or lack of
experience and knowledge, unless they have been given supervision or
ENGLISH
4222_003_3573_2_DFU-Booklet_A5_v1.indd 6 27-06-11 14:23
instruction concerning use of the appliance by a person responsible for
their safety.
- Children should be supervised to ensure that they do not play with the
appliance.
- Do not point the hose, the tube or any other accessory at the eyes
or ears nor put it in your mouth when it is connected to the vacuum
cleaner and the vacuum cleaner is switched on.
Caution
- Do not suck up large objects, as this may cause the air passage in the
tube or hose to become obstructed.
- When you use the vacuum cleaner to vacuum ashes, ne sand, lime,
cement dust and similar substances, the pores of the lter cylinder
become clogged. If you notice a strong decrease in suction power, clean
the lter cylinder.
- Sucking up large objects may cause the air passage in the tube or hose
to become obstructed. If this happens, the blockage indicator turns red
to indicate that there is an obstruction that needs to be removed.
- Never use the appliance without the motor protection lter. This
damages the motor and shortens the life of the appliance.
- Only use the Philips lter cylinder supplied with the appliance.
- During vacuum cleaning, especially in rooms with low air humidity, your
vacuum cleaner builds up static electricity. As a result you can
experience electric shocks when you touch the tube or other steel
parts of your vacuum cleaner. These shocks are not harmful to you and
do not damage the appliance. To reduce this inconvenience we advise
you:
1 to discharge the appliance by frequently holding the tube against other
metal objects in the room (for example legs of a table or chair, radiator
etc.);
2 to raise the air humidity level in the room by placing water in the room.
For example, you can hang containers lled with water from your
radiators or place bowls lled with water on or near your radiators.
- Noise level: Lc = 76 dB(A).

This Philips appliance complies with all standards regarding electromagnetic
elds (EMF). If handled properly and according to the instructions in this
user manual, the appliance is safe to use based on scientic evidence
available today.
ENGLISH 7
4222_003_3573_2_DFU-Booklet_A5_v1.indd 7 27-06-11 14:23
Preparing for use
Hose
1 Toconnectthehose,pushitrmlyintotheappliance(‘click’).
2 To disconnect the hose, press the release button and pull the hose
out of the appliance.

1 To connect the tube to the handgrip of the hose, press the spring-
loadedlockbuttononthehandgripandinsertthehandgripintothe
tube.Fitthespring-loadedlockbuttonintotheopeninginthetube
(‘click’).
2 To disconnect the tube from the handgrip, press the spring-loaded
lockbuttonandpullthehandgripoutofthetube.
Use the same method to connect and disconnect the nozzles.
3 Adjustthetubetothelengthyoundmostcomfortableduring
vacuum cleaning.

The Tri-Active nozzle is a multi-purpose nozzle for carpets and hard oors.
ENGLISH8
4222_003_3573_2_DFU-Booklet_A5_v1.indd 8 27-06-11 14:23
- The side brushes catch more dust and dirt at the sides of the nozzle
and allow you to clean better along furniture and other obstacles.
- The opening at the front of the nozzle allows you to suck up larger
particles.
1 Tocleanhardoors,pushtherockerswitchontopofthenozzle
with your foot.
, Thebrushstripforcleaninghardoorscomesoutofthehousing.
At the same time, the wheel is lifted to prevent scratching and to
increase manoeuvrability.
2 Tocleancarpets,pushtherockerswitchagain.
, Thebrushstripdisappearsintothenozzlehousingandthewheelis
lowered automatically.

The combination nozzle can be used on either carpets or hard oors.
1 Tocleanhardoors,pushtherockerswitchontopofthenozzle
with your foot.
, Thebrushstripforcleaninghardoorscomesoutofthenozzle
housing.
ENGLISH 9
4222_003_3573_2_DFU-Booklet_A5_v1.indd 9 27-06-11 14:23
2 Tocleancarpets,pushtherockerswitchagain.
, Thebrushstripdisappearsintothenozzlehousing.

- The parquet nozzle is designed for gentle cleaning of hard oors.

1 Connectthecrevicetool(1),thesmallnozzle(2)orthesmallbrush
(specictypesonly)(3)directlytothehandgriportothetube.

1 Snap the accessory holder onto the handgrip.
2 Snap two accessories into the accessory holder:
ENGLISH10
4222_003_3573_2_DFU-Booklet_A5_v1.indd 10 27-06-11 14:23
- Crevice tool and small nozzle.
Note:Makesurethesuctionopeningofthesmallnozzlepointsaway
from the holder.
- Crevice tool and small brush.
Note:Makesurethesuctionopeningofthesmallbrushpointstowards
the holder.

1 Pull the cord out of the appliance and put the mains plug in the wall
socket.
2 Press the on/off button on top of the appliance to switch on the
appliance.
3 During vacuum cleaning, you can adjust the suction power with the
knobontopoftheappliance.
- Use maximum suction power to vacuum very dirty carpets and hard
oors.
- Use minimum suction power to vacuum curtains, table carpets, etc.
4 Ifyouwanttopauseforamoment,inserttheridgeonthenozzle
intotheparkingslottoparkthetubeinaconvenientposition.
ENGLISH 11
4222_003_3573_2_DFU-Booklet_A5_v1.indd 11 27-06-11 14:23
Storage
1 Switch off the appliance and remove the mains plug from the wall
socket.
2 Press the cord rewind button to rewind the mains cord.
3 Inserttheridgeonthenozzleintotheparkingslottoattachthe
nozzletotheappliance.Storetheapplianceinhorizontalposition,
withallwheelstouchingtheoor.
4 AlwaysputtheTri-Activenozzleinthecarpetsettingwhenyoustore
it. Also prevent the side brushes from becoming bent.

Alwaysunplugtheappliancebeforeyouemptythedustbucket.
Thedustbucketisnotdishwasher-proof.
- Empty the dust bucket as soon as the dust level has reached the round
disc of the lter cylinder case.
1 Switch off the appliance and remove the hose.
2 Pressthereleasebuttonontopofthedustbuckethandletounlock
thecover(1).Swingopenthecover(2).
ENGLISH12
4222_003_3573_2_DFU-Booklet_A5_v1.indd 12 27-06-11 14:23
3 Liftthedustbucketoutoftheappliance.
4 Holdthedustbucketoveradustbinandlifttheltercylindercase
outofthebucket.Emptythebucket.
5 Ifyouwish,youcancleanthedustbucketwithcoldtapwaterand
some washing-up liquid.
6 Puttheltercylindercasebackintothedustbucketandputthe
bucketbackintotheappliance.
7 Closethecoverrmly(‘click’).
Alwaysputtheltercylindercasebackintothebucket,otherwisethe
appliance cannot be switched on.

Alwaysunplugtheappliancebeforeyoucleanorreplacethelters.
Theltercylinderandtheltercylindercasearenotdishwasher-proof.

Clean the lter cylinder every 2 months.
1 Switch off the appliance and remove the hose.
2 Pressthereleasebuttonontopofthedustbuckethandletounlock
thecover(1).Swingopenthecover(2).
3 Liftthedustbucketoutoftheappliance.
ENGLISH 13
4222_003_3573_2_DFU-Booklet_A5_v1.indd 13 27-06-11 14:23
4 Lifttheltercylindercaseoutofthebucket.
5 Turnthehandleontopoftheltercylindercaseanticlockwise(1)
andlifttheltercylinderoutofthecase(2).
6 Cleantheltercylinderandthecasewiththebrushsupplied.Brush
fromthetopofthelterdownwardsalongtheribsofthelter.
Onlyusethebrushsupplied.Otherbrushesmaydamagethelter
cylinder.
7 If there is dirt on the inside of the case, empty the case over a
dustbin.
8 Ifyouwish,youcancleantheltercylindercasewithcoldtapwater
and some washing-up liquid.
9 Ifyouwanttowashtheltercylinder,washitthoroughlywithonly
water. Do not use any soap, washing-up liquid or other detergent
tocleanthelter.Lettheltercylinderdrycompletelybeforeyou
reinsert it into the case.
10 Puttheltercylinderbackintothecaseandturnthehandle
clockwiseuntiltheltercylinderlocksintoposition.
Make sure the lter cylinder is securely xed in the case.
11 Putthecasewiththeltercylinderbackintothedustbucket.

Clean the permanent motor protection lter every time you clean the
lter cylinder case.
1 Takethemotorprotectionlteroutoftheappliance.Cleanthelter
by tapping the dust out of it over a dustbin.
If the motor protection lter is very dirty, you can also rinse it with cold tap
water.
Do not use washing-up liquid or any other cleaning agent to clean the
motorprotectionlter.
2 Pressthecleanlterrmlybackintotheltercompartmentto
ensure that it is properly placed.
ENGLISH14
4222_003_3573_2_DFU-Booklet_A5_v1.indd 14 27-06-11 14:23


This appliance is equipped with either the Super Clean Air lter, the Super
Clean Air HEPA 12 lter or the Ultra Clean Air HEPA 13 lter. These lters
are located in the back of the appliance.
Note: To guarantee optimal dust retention and performance of the
vacuumcleaner,alwaysreplacethelterwithanoriginalPhilipslterof
thecorrecttype(seechapter‘Orderingaccessories’).

The Super Clean Air lter lters a large part of the smaller particles from
the exhaust air with its electrostatically charged bres.
Replace the Super Clean Air lter every six months. This lter is not
washable.
1 Removetheltergrille.
2 Removetheoldlter.
3 Insertthenewlterintotheappliance.
4 Reattachthetopoftheltergrilleandpushthebottomcorners
untiltheysnaphome(‘click’).

The Super Clean Air HEPA 12 lter is able to remove 99.5% of all particles
down to 0.0003mm in size from the outlet air. This not only includes
normal house dust, but also harmful microscopic vermin such as dust mites
and their excrements, which are well-known causes of respiratory allergies.
Replace the Super Clean Air HEPA 12 lter every six months. This lter is
not washable.
To replace the Super Clean Air HEPA 12 lter, follow steps 1-4 of section
‘Super Clean Air lter’ above.

The Ultra Clean Air HEPA 13 lter is able to remove 99.95% of all particles
down to 0.0003mm in size from the outlet air. This not only includes
normal house dust, but also harmful microscopic vermin such as dust mites
and their excrements, which are well-known causes of respiratory allergies.
Clean the washable Ultra Clean Air HEPA 13 lter every 6 months. You can
clean the washable Ultra Clean Air HEPA 13 lter max. 4 times. Replace
the lter after it has been cleaned 4 times.
ENGLISH 15
4222_003_3573_2_DFU-Booklet_A5_v1.indd 15 27-06-11 14:23
1 Removetheltergrille.
2 TakeoutthewashableHEPA13lter.
3 RinsethepleatedsideoftheHEPA13lterunderahotslow-
running tap.
- Hold the lter in such a way that the pleated side points upwards and
the water ows parallel to the pleats. Hold the lter at an angle so that
the water washes away the dirt inside the pleats.
- Turn the lter 180° and let the water ow along the pleats in opposite
direction.
- Continue this process until the lter is clean.
Nevercleanthewashablelterwithabrush.
Note:Cleaningdoesnotrestoretheoriginalcolourofthelter,butdoes
restoreitsltrationpower.
4 Carefullyshakethewaterfromthesurfaceofthelter.Letthelter
dryatleast2hoursbeforeyouputitbackintothevacuumcleaner.
ENGLISH16
4222_003_3573_2_DFU-Booklet_A5_v1.indd 16 27-06-11 14:23
5 Putthelterbackintotheappliance.Reattachthetopofthelter
grilleandpushthebottomcornersuntiltheysnaphome(‘click’).
Ordering accessories
If you have any difculties obtaining lters or other accessories for this
appliance, please contact the Philips Customer Care Centre in your
country or consult the worldwide guarantee leaet.
- Philips lter cylinders are available under service number 4322 005
17520.
- Super Clean Air lters are available under type number FC8030.
- Non-washable Super Clean Air HEPA 12 lters are available under
type number FC8031.
- Washable Ultra Clean Air HEPA 13 lters are available under type
number FC8038.

- Do not throw the appliance away with the normal household waste
at the end of its life, but hand it in at an ofcial collection point for
recycling. By doing this, you help to preserve the environment.

If you need information or if you have a problem, please visit the Philips
website at www.philips.com or contact the Philips Customer Care Centre
in your country. You nd its phone number in the worldwide guarantee
leaet. If there is no Customer Care Centre in your country, go to your
local Philips dealer or contact the Service Department of Philips Domestic
Appliances and Personal Care BV.

This chapter summarises the most common problems you could
encounter with the appliance. If you are unable to solve the problem with
the information below, contact the Customer Care Centre in your country.
1 Thesuctionpowerisinsufcient.
- Check if the suction power knob is in maximum position.
- Check if the lter cylinder is lled with dirt.
If necessary, clean the lter cylinder.
- Check if the other lters need to be cleaned or replaced.
ENGLISH 17
4222_003_3573_2_DFU-Booklet_A5_v1.indd 17 27-06-11 14:23
- Check if the blockage indicator has changed colour. If it has changed
colour, the nozzle, tube or hose may be blocked up.
To remove the obstruction, disconnect the blocked-up item and connect it
(as far as possible) the other way around. Switch on the vacuum cleaner to
force the air through the blocked-up item in opposite direction.
2 The appliance cannot be switched on.
- Check if the lter cylinder case with the lter cylinder in it has been
inserted into the dust bucket.
ENGLISH18
4222_003_3573_2_DFU-Booklet_A5_v1.indd 18 27-06-11 14:23
19

Поздравления за вашата покупка и добре дошли във Philips! За
да се възползвате изцяло от предлаганата от Philips поддръжка,
регистрирайте продукта си на адрес www.philips.com/welcome.

1 Филтриращ цилиндър
2 Корпус на филтриращия цилиндър
3 Бутон за отваряне на отделението за прах
4 Кофа за прах
5 Филтър за защита на електромотора
6 Четка за почистване
7 Покритие
8 Бутон за вкл./изкл.
9 Копче за смукателна мощност
10 Съединител за маркуча
11 Ръкохватка
12 Гнездо за аксесоари
13 Телескопична тръба
14 Тесен накрайник
15 Малък накрайник
16 Малка четка (само за определени модели)
17 Накрайник за паркет (само за определени модели)
18 Комбиниран накрайник (само за определени модели)
19 Превключвател за килими/твърди подови повърхности
20 Накрайник Tri-Active (само за определени модели)
21 Бутон за навиване на кабела
22 Филтър Super Clean Air, филтър Super Clean Air HEPA 12 или
филтър Ultra Clean Air HEPA 13
23 Филтърна решетка
24 Гнездо за прибиране

Преди да използвате уреда, прочетете внимателно това ръководство
за експлоатация и го запазете за справка в бъдеще.

- Никога не всмуквайте вода или друга течност. Не всмуквайте
запалими вещества и не всмуквайте пепел, преди да е изстинала.

- Преди да включите уреда в мрежата, проверете дали посоченото
върху уреда напрежение отговаря на напрежението на местната
електрическа мрежа.
- Не използвайте уреда, ако щепселът, мрежовият кабелът или
самият уред са повредени.
- Ако захранващият кабел се повреди, той трябва винаги да се
подменя от Philips, упълномощен сервиз на Philips или подобни
квалифицирани лица, за да се избегне опасност.
- Този уред не е предназначен за ползване от хора с физичиска,
сетивна или умствена недостатъчност, а също и от лица без
опит и познания, вкл. деца, ако са оставени без надзор и не са

4222_003_3573_2_DFU-Booklet_A5_v1.indd 19 27-06-11 14:23
инструктирани от страна на отговарящо за тяхната безопасност
лице относно начина на използване на уреда.
- Следете деца да не играят с уреда.
- Не насочвайте маркуча, тръбата или друг аксесоар към очите
или ушите, и не ги поставяйте в устата си, когато са свързани към
прахосмукачката, а прахосмукачката е включена.

- Не всмуквайте големи предмети, тъй като това може да попречи
на преминаването на въздуха през тръбата или маркуча.
- Когато използвате прахосмукачката за всмукване на пепел,
фин пясък, вар, циментов прах и подобни вещества, порите на
филтриращия цилиндър се запушват. Ако забележите значително
снижаване на засмукващата мощност, почистете филтриращия
цилиндър.
- Засмукването на големи предмети може да попречи на
преминаването на въздуха през тръбата или маркуча. Ако това се
случи, индикаторът за задръстване светва червено, за да покаже, че
има препятствие, което трябва да се отстрани.
- Никога не използвайте уреда без предпазния филтър на двигателя.
Това ще повреди електромотора и ще съкрати живота на уреда.
- Използвайте само филтриращия цилиндър на Philips, включен в
комплекта на уреда.
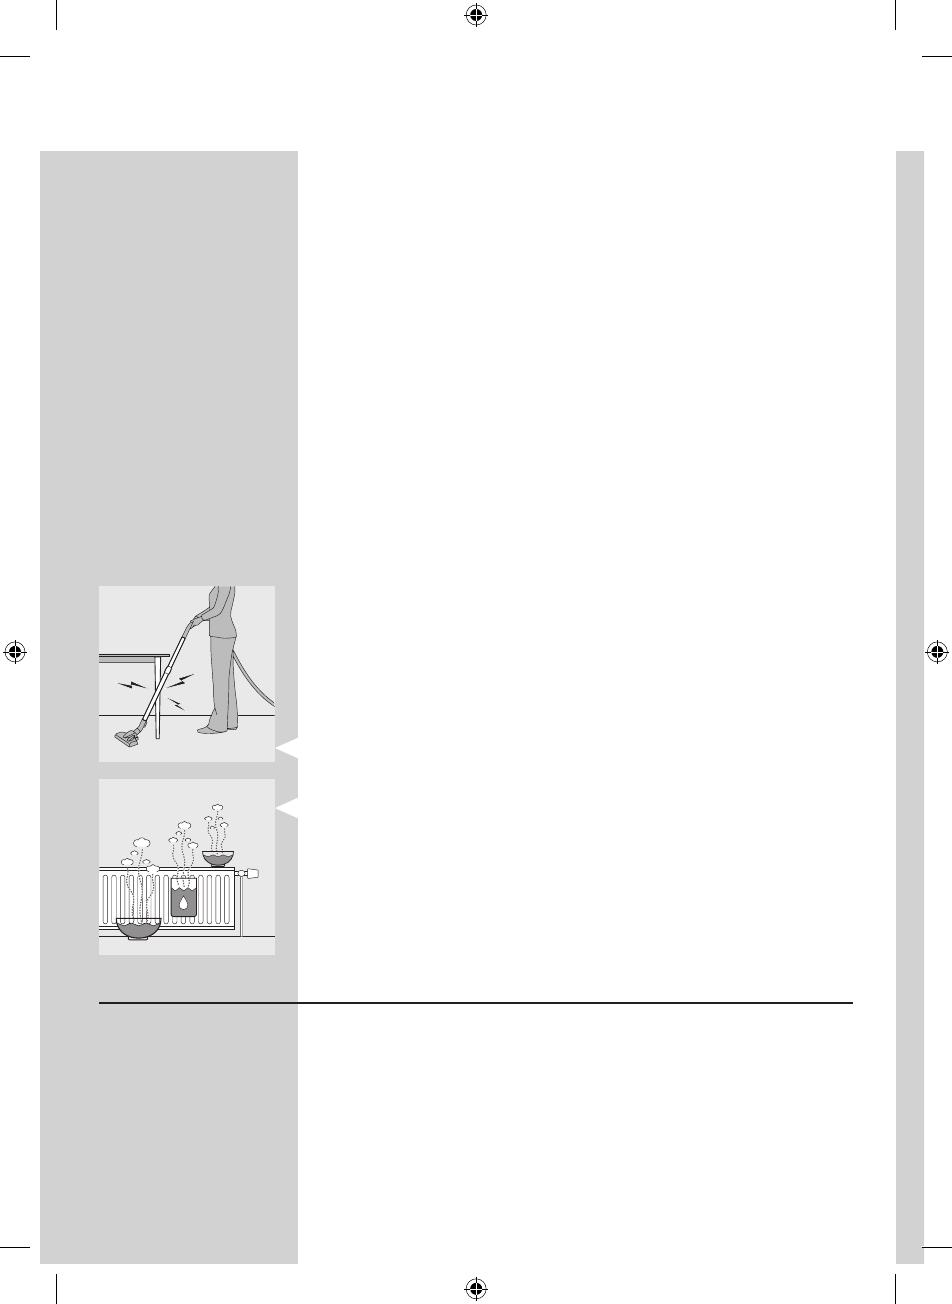
- При чистене с прахосмукачка, особено в стаи с ниска влажност
на въздуха, във вашата прахосмукачка се натрупва статично
електричество. В резултат на това може да усетите удари с
електрически ток, когато докосвате тръбата или други стоманени
части на прахосмукачката. Тези удари не са болезнени за вас
и не увреждат уреда. за да намалите това неудобство, ние
препоръчваме следното:
1 да разреждате уреда с често допиране на тръбата до други
метални предмети в стаята (например крака на маса или стол,
радиатор и др.);
2 да повишавате нивото на влажност на въздуха, като поставите
вода в стаята. Можете например да окачите съдове с вода на
радиаторите или да ги поставите близо до радиаторите.
- Ниво на шум: Lc= 76 dB [A]

Този уред Philips е в съответствие с всички стандарти по отношение
на електромагнитните излъчвания (EMF). Ако се употребява правилно
и съобразно напътствията в Ръководството, уредът е безопасен за
използване според наличните досега научни факти.
20
4222_003_3573_2_DFU-Booklet_A5_v1.indd 20 27-06-11 14:23
  • Page 1 1
  • Page 2 2
  • Page 3 3
  • Page 4 4
  • Page 5 5
  • Page 6 6
  • Page 7 7
  • Page 8 8
  • Page 9 9
  • Page 10 10
  • Page 11 11
  • Page 12 12
  • Page 13 13
  • Page 14 14
  • Page 15 15
  • Page 16 16
  • Page 17 17
  • Page 18 18
  • Page 19 19
  • Page 20 20
  • Page 21 21
  • Page 22 22
  • Page 23 23
  • Page 24 24
  • Page 25 25
  • Page 26 26
  • Page 27 27
  • Page 28 28
  • Page 29 29
  • Page 30 30
  • Page 31 31
  • Page 32 32
  • Page 33 33
  • Page 34 34
  • Page 35 35
  • Page 36 36
  • Page 37 37
  • Page 38 38
  • Page 39 39
  • Page 40 40
  • Page 41 41
  • Page 42 42
  • Page 43 43
  • Page 44 44
  • Page 45 45
  • Page 46 46
  • Page 47 47
  • Page 48 48
  • Page 49 49
  • Page 50 50
  • Page 51 51
  • Page 52 52
  • Page 53 53
  • Page 54 54
  • Page 55 55
  • Page 56 56
  • Page 57 57
  • Page 58 58
  • Page 59 59
  • Page 60 60
  • Page 61 61
  • Page 62 62
  • Page 63 63
  • Page 64 64
  • Page 65 65
  • Page 66 66
  • Page 67 67
  • Page 68 68
  • Page 69 69
  • Page 70 70
  • Page 71 71
  • Page 72 72
  • Page 73 73
  • Page 74 74
  • Page 75 75
  • Page 76 76
  • Page 77 77
  • Page 78 78
  • Page 79 79
  • Page 80 80
  • Page 81 81
  • Page 82 82
  • Page 83 83
  • Page 84 84
  • Page 85 85
  • Page 86 86
  • Page 87 87
  • Page 88 88
  • Page 89 89
  • Page 90 90
  • Page 91 91
  • Page 92 92
  • Page 93 93
  • Page 94 94
  • Page 95 95
  • Page 96 96
  • Page 97 97
  • Page 98 98
  • Page 99 99
  • Page 100 100
  • Page 101 101
  • Page 102 102
  • Page 103 103
  • Page 104 104
  • Page 105 105
  • Page 106 106
  • Page 107 107
  • Page 108 108
  • Page 109 109
  • Page 110 110
  • Page 111 111
  • Page 112 112
  • Page 113 113
  • Page 114 114
  • Page 115 115
  • Page 116 116
  • Page 117 117
  • Page 118 118
  • Page 119 119
  • Page 120 120
  • Page 121 121
  • Page 122 122
  • Page 123 123
  • Page 124 124
  • Page 125 125
  • Page 126 126
  • Page 127 127
  • Page 128 128
  • Page 129 129
  • Page 130 130
  • Page 131 131
  • Page 132 132
  • Page 133 133
  • Page 134 134
  • Page 135 135
  • Page 136 136
  • Page 137 137
  • Page 138 138
  • Page 139 139
  • Page 140 140
  • Page 141 141
  • Page 142 142
  • Page 143 143
  • Page 144 144
  • Page 145 145
  • Page 146 146
  • Page 147 147
  • Page 148 148
  • Page 149 149
  • Page 150 150
  • Page 151 151
  • Page 152 152
  • Page 153 153
  • Page 154 154
  • Page 155 155
  • Page 156 156
  • Page 157 157
  • Page 158 158
  • Page 159 159
  • Page 160 160
  • Page 161 161
  • Page 162 162
  • Page 163 163
  • Page 164 164
  • Page 165 165
  • Page 166 166
  • Page 167 167
  • Page 168 168
  • Page 169 169
  • Page 170 170
  • Page 171 171
  • Page 172 172
  • Page 173 173
  • Page 174 174
  • Page 175 175
  • Page 176 176
  • Page 177 177
  • Page 178 178
  • Page 179 179
  • Page 180 180
  • Page 181 181
  • Page 182 182
  • Page 183 183
  • Page 184 184
  • Page 185 185
  • Page 186 186
  • Page 187 187
  • Page 188 188
  • Page 189 189
  • Page 190 190
  • Page 191 191
  • Page 192 192
  • Page 193 193
  • Page 194 194
  • Page 195 195
  • Page 196 196
  • Page 197 197
  • Page 198 198
  • Page 199 199
  • Page 200 200
  • Page 201 201
  • Page 202 202
  • Page 203 203
  • Page 204 204
  • Page 205 205
  • Page 206 206
  • Page 207 207
  • Page 208 208
  • Page 209 209
  • Page 210 210
  • Page 211 211
  • Page 212 212
  • Page 213 213
  • Page 214 214
  • Page 215 215
  • Page 216 216
  • Page 217 217
  • Page 218 218
  • Page 219 219
  • Page 220 220
  • Page 221 221
  • Page 222 222
  • Page 223 223
  • Page 224 224
  • Page 225 225
  • Page 226 226
  • Page 227 227
  • Page 228 228
  • Page 229 229
  • Page 230 230
  • Page 231 231
  • Page 232 232
  • Page 233 233
  • Page 234 234
  • Page 235 235
  • Page 236 236
  • Page 237 237
  • Page 238 238
  • Page 239 239
  • Page 240 240

Philips FC9204/01 Kasutusjuhend

Kategooria
Kaasaskantavad tolmuimejad
Tüüp
Kasutusjuhend
See käsiraamat sobib ka