Jabra GN 8210 Kasutusjuhend

Kategooria
Telefonid
Tüüp
Kasutusjuhend
1
User guide
Bedienungsanleitung
Manual del usuario
Guide d’utilisation
Gebruikersshandleiding
Guia do utilizador
Istruzioni d’uso
Brugsanvisning
Bruksanvisning
Käyttöohje
ENG
D
ES
F
NL
P
I
DK
S
FIN
2
16
31
44
58
70
84
98
110
122
1558-979A Rev. A
1558-979_RevA_20-06-2004_10sprog.indd 11558-979_RevA_20-06-2004_10sprog.indd 1 21-06-2004 11:29:1021-06-2004 11:29:10
2 3
English – GN 8210 user guide
This user guide provides you with information on setting up, using and maintaining
your GN 8210.
Contents
1. Parts and signatures .............................................. 3
2. Product information .............................................. 3
2.1 GN 8210 – What’s in the box ................................ 4
3. Setting up the GN 8210 ......................................... 4
3.1 Assembly .............................................................. 4
3.2 Clear dial tone adjustment .................................... 6
3.3 Microphone volume adjustment ............................ 6
3.4 Choosing the audio mode ..................................... 7
4. Features and use ................................................... 8
4.1 Answering and making telephone calls .................. 9
4.2 Muting a call ......................................................... 9
4.3 Automatic Volume Adjust ...................................... 9
4.4 Visual indicators .................................................... 10
5. Frequently asked questions ................................... 11
6. Operational and safety information ....................... 12
1. Parts and signatures
A) On-line indicator
B) Headset stand
C) Top cover
D) Microphone volume adjustment
control
E) Audio mode switch
F) Mute switch with indicator light
G) Manual headset volume control
H) Handset/headset switch
I) Telephone termination switch
J) Handset socket
K) *Telephone socket
L) Power adapter socket
M) *Headset socket
* The telephone and headset are
not included in the GN 8210 box.
The reference letters found through-out this user guide refer to this illustration.
2. Product information
Congratulations on purchasing the GN 8210, a digital headset amplifi er that enables
you to connect your GN Netcom headset to your telephone. With its advanced digital
technology, the GN 8210 provides you with enhanced sound quality and protection
against excessively-loud sounds. The GN 8210 operates in one of three user-selected
audio modes to suit the protection needs and sound quality preferences of each
user.
Follow the instructions in this user guide carefully and in the same order they are pre-
sented to fully benefi t from your GN 8210.
1558-979_RevA_20-06-2004_10sprog.indd 2-31558-979_RevA_20-06-2004_10sprog.indd 2-3 21-06-2004 11:29:1021-06-2004 11:29:10
4 5
2.1 GN 8210
– What’s in the box
GN 8210 amplifi er with headset
stand
• Power adapter
• Telephone connection cord
• Quick Disconnect connector (to
connect headset’s cord)
Note:
The telephone and headset are not
included in the GN 8210 box.
3. Setting up the GN 8210
To set up the GN 8210, fi rst complete the assembly (3.1), then adjust for clear dial
tone (3.2) and transmit volume (3.3), and fi nally choose the audio mode (3.4).
3.1 Assembly
To connect the GN 8210 to your telephone, com-
plete the following:
1. Disconnect the handset cord from the tele-
phone’s handset socket, and connect it to the
handset socket (J) on the GN 8210.
2. Connect the telephone connection cord to the
telephone’s handset socket.
Note: The telephone connection cord is already
connected to the GN 8210’s telephone socket
(K) from factory.
3. Connect the power adapter to the power
adapter socket (L) at the back of the ampli-
er, and then connect it to a power socket.
The amplifi er indicates power connection
and functioning status with 2 seconds of
rapid fl ashing on the mute switch (F) and
on-line indicator (A).
4. Connect your headset to the headset con-
nection cord, using the Quick Disconnect
connector.
5. (Optional)
Insert the headsetstand to the back of the
amplifi er by pressing it in.
1558-979_RevA_20-06-2004_10sprog.indd 4-51558-979_RevA_20-06-2004_10sprog.indd 4-5 21-06-2004 11:29:1021-06-2004 11:29:10
6 7
3.2 Clear dial tone adjustment
In order to hear a dial tone, you must select the telephone termi-
nation setting. Complete the following:
1. Put on your headset. Make sure that the headset/handset
switch (H) is set to headset position, and volume (G) is set
to mid-range.
2. Remove the telephone’s handset from the telephone and lis-
ten for a dial tone in your headset.
3. If there is no dial tone or it is not clear, stepwise slide the
termination switch (I) through all 9 settings (along the “A-I”
range), listening for the clearest possible dial tone. If the dial
tone is just as clear in position “A” as in position “I”, leave the
switch in position “A.
4. When you hear the clearest dial tone, you have located the
correct termination setting.
3.3 Microphone volume adjustment
Adjust the volume of transmitted sound according to an appropri-
ate level. You will need to make a call to adjust the volume.
Complete the following instructions to adjust the volume:
1. Put on your headset and make sure that the microphone is
placed 2 cm from your mouth, and that mute switch (F) is set
to talk position.
2. Make a telephone call to someone who will act as your test
person.
3. While speaking, adjust the microphone volume adjustment con-
trol (D) until your test person hears your voice at an appropriate
level. If you start hearing an echo of your own voice, adjust the
control to a lower level.
3.4 Choosing the audio mode
The GN 8210 operates in one of three user-selectable audio modes to match individual
protection needs and sound quality preferences.
The three audio modes for customised sound enhancement and protection setting:
Europe and Asia/Pacifi c only:
AUDIO MODE PROTECTION
A TrebleBoost • pitch
• high tones accentuated
• advanced protection
• EU Health and Safety compliant
B CrystalClear • level
• all tones accentuated
• enhanced protection
• EU Health and Safety compliant
CTT-4 • bass-rich
• low tones accentuated
• Superior
• TT4 compliant
1558-979_RevA_20-06-2004_10sprog.indd 6-71558-979_RevA_20-06-2004_10sprog.indd 6-7 21-06-2004 11:29:1121-06-2004 11:29:11
8 9
Description
a) For all earpads: Superior sound quality and good protection with extra emphasis on
treble tones (for people who prefer a sound with more pitch or those with a high
frequency hearing loss) .
b) For all earpads: Superior sound quality and good protection (If you prefer a level
sound with normal pitch, this will be your preferred setting)
c) For all earpads: Good sound quality and superior protection (For those requiring
highest protection according to the Australian TT4 standard)
For USA only:
Headset
Earpad
Audio Mode Protection
A Treble-
Boost
Foam • pitch
• high tones accentuated
• advanced protection
• NIOSH compliant
B Crystal
Clear 1
Foam • level
• all tones accentuated
• advanced protection
• NIOSH compliant
C Crystal
Clear2
Leatherette • level
• all tones accentuated
• advanced protection
• NIOSH compliant
Description
a) For foam earpads: Superior sound quality and good protection with extra emphasis
on treble tones (for people who prefer a sound with more pitch or those with a
high frequency hearing loss) .
b) For foam earpads: Superior sound quality and good protection (If you prefer a level
sound with normal pitch, this will be your preferred setting) .
c) For leatherette earpads: Superior sound quality and good protection (If you use
leathette earpads and prefer a level sound with normal pitch, this will be your pre-
ferred setting) .
If you want to select a different audio mode, complete the fol-
lowing:
1. Open the top cover (C).
2. Select the desired audio mode (setting “A, “B” or “C)” using
the audio mode switch (E). A beep in the headset indicates
that a new audio mode has been selected.
3. Close the top cover (C).
Note: The GN 8210 provides you with protection against exces-
sively-loud sounds only when using your headset. If you use the
telephone’s handset, you will not have this protection or enjoy
the GN 8210’s sound quality enhancement.
If you want to know more about the GN 8210’s protection compliance, please refer to
Section 6 “Operational and Safety Information” on page 13.
4. Features and use
Before using your GN 8210 for the fi rst time, verify the following settings:
• Handset/headset switch (H) is set to the headset position
Mute switch (F) is set to the talk position, indicated by an unlit mute switch
indicator
• Headset volume (G) is set to mid-range
1558-979_RevA_20-06-2004_10sprog.indd 8-91558-979_RevA_20-06-2004_10sprog.indd 8-9 21-06-2004 11:29:1221-06-2004 11:29:12
10 11
4.1 Answering and making telephone calls
To answer or make a telephone call:
1. Put the headset on.
2. Make sure that the handset/headset switch (H) is set to headset, and that the
mute switch (F) is not activated. (The mute indicator light should not be fl ashing).
3. Lift the telephone’s handset out of its cradle and answer the call/dial the
number.
4. To end the call, replace the handset on the telephone.
To answer or make a telephone call using a handset:
1. Make sure that the handset/headset switch (H) is set to handset.
2. Lift the telephone’s handset out of its cradle and answer the call/dial the
number.
3. To end the call, replace the handset on the telephone.
Note: It is recommended that you always use the headset, otherwise you will not
benefi t from the GN 8210’s features and protection.
4.2 Muting a call
To mute a call so that the other party is not able to hear you,
set the mute switch (F) to the mute position. The mute indi-
cator (F) will fl ash and low beeps will be heard in the head-
set every 10 seconds to indicate that mute is activated.
4.3 Automatic Volume Adjust
The volume of incoming calls is regulated by the Automatic Volume Adjust function,
which is built into the amplifi er. Automatic Volume Adjust automatically adjusts each
incoming call’s volume to the same level as that of the previous call, giving you a con-
sistent volume for each and every call you receive.
At any time, you may change the volume of incoming calls by adjusting the manual
headset volume control (G). The volume of your next incoming call will then be at this
new level.
4.4 Visual indicators
The amplifi er has two visual indicators: the on-line indicator (A)
on the headset stand and the mute indicator (F).
On-line indicator
The on-line indicator (A) fl ashes when speech is detected, indi-
cating to others that you are on a call.
When the amplifi er is fi rst connected to power through the power
adapter, the on-line indicator (A) fl ashes rapidly for 2 seconds.
Mute indicator
A fl ashing mute indicator (F) indicates that you have muted the
call, and that the other party is not able to hear you.
When the amplifi er is fi rst connected to power through the
power adapter, the mute indicator fl ashes rapidly for 2 sec-
onds.
Functions On-line indicator Mute indicator
Power-up, system check Short fl ashes for 2 seconds Short fl ashes for 2 seconds
On-line Flashes when speaking
Muted Flashes when muted
1558-979_RevA_20-06-2004_10sprog.indd 10-111558-979_RevA_20-06-2004_10sprog.indd 10-11 21-06-2004 11:29:1321-06-2004 11:29:13
12 13
5 Frequently Asked Questions
GN 8210 is a digital amplifi er - can I use with both analogue and digital
telephone systems?
• Yes, the GN 8210 works with both analogue and digital telephone systems.
Why cant I hear a dial tone when the headset is on?
Make sure you have inserted both the headset and handset cords into the
appropriate sockets located on the rear of GN 8210.
• Make sure the handset/headset switch is in headset position.
You may have the telephone termination switch in a position that does not
correspond with your telephone. Lift the amplifi er top cover and move the telephone
termination switch to another position.
Why does the other party have a hard time hearing me?
• Make sure that the mute switch is in talk position.
• Check the position of the headset microphone boom arm and make sure it is placed
approximately 2 cm from your mouth.
The transmit volume control may be set too low. Lift the amplifi er top cover and
adjust the transmit volume clockwise to a higher number.
You may have the telephone selector switch in a position that does not correspond
with your telephone. Lift the amplifi er top cover and move the telephone selector
switch to another position.
Why do I have a hard time hearing the other party or why does he/she sound dif-
ferent?
• Depending on your selected audio mode, the incoming volume may seem low com-
pared to what you are used to.
If you have selected TT-4 Protection mode (setting C), you should be aware that
this mode is a very strict protection standard, designed to enhance your protection
against acoustic shrieks. By providing this protection the standard does not allow
high-pitched sounds and high volume levels to get through to your ear. This can
infl uence the level and the sound of the conversation, but your ears should typically
adjust to this mode after a short time.
Why do I hear my own voice in my headset when I talk?
The microphone volume control may be set too high. Lift the GN 8210 top cover and
adjust the microphone volume counter clockwise to a lower number.
Why doesnt the on-line indicator light or fl ash?
Make sure the headset stand/on-line indicator is plugged all the way into the port
on the rear of the GN 8210.
• Make sure that the power adapter is connected to a functioning wall socket.
6. Operational and safety information
Clean the GN 8210 by wiping with a dry or slightly damp cloth as required. Dampen the
cloth with soapy water if needed. The headset stand, power adapter and cords may
be dry-dusted as required.
Avoid getting moisture or other liquids into any button sockets or other openings. Do
not immerse the GN 8210 in water.
Keep out of reach of children:
The plastic bags the GN 8210 and its parts are wrapped in are not toys for children. The
bags themselves or the many small parts they contain may cause choking if ingested.
Never try to dismantle the product yourself. None of the internal components can be
replaced or repaired by users.
Only authorised dealers or service centres may open the product. If any parts of your
GN 8210 require replacement for any reason, including normal wear and tear or break-
age, contact your dealer.
Avoid exposing the product to rain or other liquids.
Dispose of the product according to local standards and regulations.
1558-979_RevA_20-06-2004_10sprog.indd 12-131558-979_RevA_20-06-2004_10sprog.indd 12-13 21-06-2004 11:29:1421-06-2004 11:29:14
14 15
Audio Mode settings
The three audio modes for customized sound enhancement and protection setting (A,
B & C) covers the following standards and recommendations. Setting:
A, B & C The EU directive 2003/10/EC on the minimum health and safety require-
ments regarding the exposure of workers risks arising from physical
agents (noise).
“Specifying max average output to a maximum of 85dB(A).”
A, B & C The NIOSH Publication No. 98-126 “Occupational Noise Exposure”.
“NIOSH compliant” “Specifying max time –weighted average (TWA) out-
put to 85dB.”
A, B & C The ACIF Draft Guideline DR ACIF G616:2003 “Acoustic safety for tele-
phone equipment”
C
(EU & APAC)
The “TT4” Telstra Publication – Technical Reference TP TT404B51.
“Headset & Limiting Amplifi er. Acoustic Protection.”
EUROPE Declaration
This product is CE marked according to the provisions of the R & TTE Directive (99/5/EC). Hereby, GN Netcom as declares that
this product is in compliance with the essential requirements and other relevant provisions of Directive 1999/5/EC. For further
information please consult http://www.gnnetcom.com.
Only to be used together with the delivered certifi ed AC mains adapter or with a similar with a GS mark.
ACTA Required Customer Information
This equipment complies with part 68 of the FCC rules and the requirements adopted by the ACTA. On case of this equipment
(GN 8210 Telephone Headset Amplifi er) is a label that contains, among other information, a product identifi er in the format
US:1LSKXNANGN8210. If requested, this number must be provided to the telephone company.
If this equipment (GN 8210 Telephone Headset Amplifi er) causes harm to the telephone network the telephone company will
notify you in advance that temporary discontinuance of service may be required. But if advance notice is not practical, the
telephone company will notify the customer as soon as possible. Also, you will be advised of your right to fi le a complaint with
the FCC if you believe it is necessary.
The telephone company may make changes in its facilities, equipment, operations and/or procedures that could affect the
operation of this equipment (GN 8210 Telephone Headset Amplifi er). If this happens, the telephone company will provide
advanced notice in order for you to make the necessary modifi cations to maintain uninterrupted service. If trouble is expe-
rienced with this equipment (GN 8210 Telephone Headset Amplifi er), for repair or warranty information, please contact: GN
Netcom Inc., 77 Northeastern Blvd., Nashua, NH 03062, Tel.no. 1-800-826-4656 / 1-603-598-1100, Fax: 1-603-598-1122,
www.gnnetcom.com
If this equipment (GN 8210 Telephone Headset Amplifi er) is causing harm to the telephone network, the telephone company
may request that you disconnect the equipment until the problem is solved.
There are no repairs that the customer can perform. Defective units must be returned to GN Netcom for repair.
Australia CAUTION Notice
The Telephone Headset may hold small objects in the area of the earpiece.
Do not use in areas where there are explosive hazards.
If you have any problems or questions regarding the product, please contact your vendor or go to http://
www.gnnetcom.com
There is an international patent pending for the GN 8210.
1558-979_RevA_20-06-2004_10sprog.indd 14-151558-979_RevA_20-06-2004_10sprog.indd 14-15 21-06-2004 11:29:1421-06-2004 11:29:14
16 17
Deutsch – GN 8210 Bedienungsanleitung
Die vorliegende Bedienungsanleitung beschreibt die Einrichtung, Bedienung und
Wartung Ihres GN 8210.
Inhalt
1. Teile und Bezeichnungen ........................................ 17
2. Produktinformationen 17
2.1 GN 8210 – Verpackungsinhalt ............................... 18
3. Einrichten des GN 8210 ......................................... 18
3.1 Montage ............................................................... 18
3.2 Wähltoneinstellung ............................................... 20
3.3 Einstellung der Mikrofon-Lautstärke ....................... 20
3.4 Auswahl des Audiomodus ..................................... 21
4. Funktionen und Verwendung .................................. 22
4.1 Annehmen und Durchführen von Telefonaten ........ 23
4.2 Stummschalten eines Anrufs ................................. 23
4.3 Automatische Lautstärkeanpassung ...................... 23
4.4 Optische Anzeigen ................................................ 24
5. Häufi g gestellte Fragen .......................................... 25
6. Betriebs- und Sicherheitshinweise ......................... 26
1. Teile und Bezeichnungen
A) Online-Anzeige
B) Headset-Ständer
C) Abdeckung
D) Mikrofon-Lautstärkeregler
E) Audiomodus-Schalter
F) Stummschalter mit Anzeige
G) Manueller Headset-Lautstärkeregler
H) Telefonhörer/Headset-Umschalter
H) Telefon-Setupschalter
J) Telefonhörerbuchse
K) *Telefonbuchse
L) Netzteilbuchse
M) *Headset-Buchse
* Telefon und Headset befi nden sich
nicht im Lieferumfang des GN 8210.
Die in dieser Bedienungsanleitung verwendeten Kennbuchstaben beziehen sich auf
diese Abbildung.
2. Produktinformationen
Herzlichen Glückwunsch zum Kauf des GN 8210. Mit diesem digitalen Headset-
Verstärker können Sie Ihr GN Netcom Headset an das Telefon anschließen. Die
moderne Digitaltechnologie bietet Ihnen nicht nur eine verbesserte Tonqualität,
sondern auch Schutz vor hohen Lautstärkepegeln. Der GN 8210 lässt sich durch drei
auswählbare Betriebsarten an die jeweiligen Anforderungen hinsichtlich Schutz und
Tonqualität anpassen.
Befolgen Sie die Schritte in dieser Bedienungsanleitung sorgfältig und in der beschrie-
benen Reihenfolge, damit Sie alle Möglichkeiten Ihres GN 8210 nutzen können.
1558-979_RevA_20-06-2004_10sprog.indd 16-171558-979_RevA_20-06-2004_10sprog.indd 16-17 21-06-2004 11:29:1421-06-2004 11:29:14
18 19
2.1 GN 8210
– Verpackungsinhalt
GN 8210 Verstärker mit Headset-
Ständer
• Netzteil
• Telefonverbindungskabel
• Schnelltrennkupplung (zur
Verbindung des Headsetkabels)
Hinweis:
Telefon und Headset befi nden
sich nicht im Lieferumfang des
GN 8210.
3. Einrichten des GN 8210
Zur Einrichtung des GN 8210 montieren Sie zuerst das Gerät (3.1), nehmen dann die
Einstellungen für Wählton (3.2) und Übertragungslautstärke vor (3.3) und wählen zum
Schluss den gewünschten Audiomodus (3.4).
3.1 Montage
GN 8210 an das Telefon anschließen:
1. Ziehen Sie das Telefonhörerkabel aus der
Buchse des Telefons, und schließen Sie es an
die Telefonhörerbuchse (J) des GN 8210 an.
2. Schließen Sie das Telefonverbindungskabel an
die Telefonhörerbuchse des Telefons an.
Hinweis: Das Telefonanschlusskabel ist bereits
werkseitig an der Telefonbuchse (K) des GN
8210 angeschlossen.
3. Schließen Sie das Netzteilkabel an die Netz-
teilbuchse (L) auf der Rückseite des Ver-
stärkers an, und stecken Sie das Netzteil
in eine Netzsteckdose. Der Verstärker zeigt
die Stromversorgung und den Funktionssta-
tus an, indem die Stummschaltungsanzeige
(F) und Online-Anzeige (A) zwei Sekunden
schnell blinken.
4. Schließen Sie das Headset mit der Schnell-
kupplung an das Headset-Verbindungska-
bel an.
5. (Optional)
Sie können den Headset-Ständer auch di-
rekt an den Verstärker anschließen, indem
Sie den Ständer auf der Rückseite des Ver-
stärkers hineindrücken.
1558-979_RevA_20-06-2004_10sprog.indd 18-191558-979_RevA_20-06-2004_10sprog.indd 18-19 21-06-2004 11:29:1421-06-2004 11:29:14
20 21
3.2 Wähltoneinstellung
Um einen Wählton hören zu können, müssen Sie den Telefon-
Setupschalter richtig einstellen. Gehen Sie dazu folgendermaßen
vor:
1. Setzen Sie das Headset auf. Vergewissern Sie sich, dass sich
der Umschalter für Headset/Telefonhörer (H) in der Headset-
Position befi ndet und der Lautstärkeregler auf eine mittlere
Position eingestellt ist.
2. Ziehen Sie den Telefonhörer vom Telefon ab, und prüfen Sie,
ob Sie im Headset einen Wählton hören.
3. Bei fehlendem oder verzerrtem Wählton schieben Sie den
Telefon-Setupschalter (I) schrittweise durch alle neun Ein-
stellungen (von A bis I), bis der Wählton am klarsten hörbar
ist. Wenn sich die Wiedergabe in Position “A” und Position
“I” nicht unterscheidet, belassen Sie den Schalter in Position
“A.
4. Wenn der Wählton am klarsten hörbar ist, haben Sie die rich-
tige Setup-Einstellung gefunden.
3.3 Einstellung der Mikrofonlautstärke
Stellen Sie die Sprachübertragungslautstärke auf den gewünsch-
ten Wert ein. Hierzu müssen Sie einen Anruf durchführen.
Lautstärke einstellen:
1. Setzen Sie das Headset auf. Achten Sie darauf, dass das Mi-
krofon 2 cm vom Mund entfernt ist und sich der Stummschal-
ter (F) in Sprechposition befi ndet.
2. Führen Sie einen Probeanruf zu einer Testperson durch.
3. Regeln Sie während des Gesprächs den Mikrofon-Lautstärkereg-
ler (D) so lange, bis die Testperson Sie klar und in angemessener
Lautstärke hört. Sobald Sie das Echo Ihrer eigenen Stimme hö-
ren, stellen Sie die Lautstärke etwas herunter.
3.4 Auswahl des Audiomodus
Der GN 8210 lässt sich an die Anforderungen hinsichtlich Schutz und Tonqualität
anpassen.
Hierzu stehen die folgenden drei Audiomodi zur Auswahl:
AUDIOMODUS SCHUTZ
A Höhen-
anhebung
• Tonhöhe
• Hervorhebung hoher
Töne
• erweiterter Schutz
• gemäß Gesundheits- und Sicher-
heitsbestimmungen der EU
B CrystalClear • ausgewogen
• Betonung aller
Frequenzen
• erweiterter Schutz
• gemäß Gesundheits- und Sicher-
heitsbestimmungen der EU
CTT-4 • Bassanhebung
• lHervorhebung tiefer
Frequenzen
• Höher
• TT4-kompatibel
1558-979_RevA_20-06-2004_10sprog.indd 20-211558-979_RevA_20-06-2004_10sprog.indd 20-21 21-06-2004 11:29:1521-06-2004 11:29:15
22 23
Audiomodus wechseln:
1. Klappen Sie die Abdeckung (C) auf.
2. Wählen Sie den gewünschten Modus (Einstellung “A,
“B” oder “C”) mit dem Audio-Betriebsartenschalter (E)
aus. Ein Signalton im Headset zeigt an, dass ein neuer
Audiomodus ausgewählt wurde.
3. Klappen Sie die Abdeckung (C) zu.
Hinweis: Der GN 8210 bietet den Schutz vor übermä-
ßig hohen Lautstärken nur in Verbindung mit Ihrem
Headset. Bei Verwendung des Telefonhörers ist weder der
Lautstärkeschutz noch die Verbesserung der Tonqualität
des GN 8210 wirksam.
Weitere Informationen darüber, welche Bestimmungen der GN 8210 einhält, fi nden Sie
in Abschnitt 6 “Betriebs- und Sicherheitshinweise” auf Seite 26.
4. Funktionen und Verwendung
Prüfen Sie vor der erstmaligen Nutzung des GN 8210 die folgenden Einstellungen:
• Telefonhörer/Headset-Umschalter (H) in Position “Headset”
• Stummschalter (F) in Sprechposition (Stummschaltungsanzeige ist aus)
• Headset-Lautstärke (G) im mittleren Bereich
4.1 Annehmen und Durchführen von Telefonaten
Anruf annehmen oder durchführen:
1. Setzen Sie das Headset auf.
2. Vergewissern Sie sich, dass der Headset/Telefonhörer-Umschalter (H) auf Headset
eingestellt und die Stummschaltung (F) nicht aktiviert ist. (Die Stummschaltungs-
anzeige darf nicht blinken.).
3. Heben Sie den Telefonhörer aus seiner Docking-Station, und beantworten Sie den
Anruf bzw. wählen Sie die Nummer.
4. Zum Beenden des Anrufs legen Sie den Hörer wieder auf das Telefon.
Anruf mit einem Telefonhörer annehmen oder durchführen:
1. Vergewissern Sie sich, dass der Telefonhörer/Headset-Umschalter (H) auf Telefon-
hörer eingestellt ist.
2. Heben Sie den Telefonhörer ab, und beantworten Sie den Anruf bzw. wählen Sie
die Nummer.
3. Zum Beenden des Anrufs legen Sie den Hörer wieder auf das Telefon.
Hinweis: Es wird empfohlen, immer mit dem Headset zu telefonieren, um die Komfort-
und Schutzfunktionen des GN 8210 nutzen zu können.
4.2 Stummschalten eines Anrufs
Um einen Anruf stummzuschalten, sodass der Gesprächs-
partner Sie nicht hören kann, bringen Sie den Stumm-
schalter (F) in die Stummschaltungsposition. Die Stumm-
schaltungsanzeige (F) blinkt, und tiefe Signaltöne im
Headset im Abstand von zehn Sekunden zeigen an, dass
die Stummschaltung aktiviert ist.
4.3 Automatische Lautstärkeanpassung
Die Lautstärke eingehender Gespräche wird mit der in den Verstärker integrierten
Funktion zur automatischen Lautstärkeregelung eingestellt. Die Lautstärkeautomatik
stellt einen eingehenden Anruf automatisch auf die Lautstärke des vorherigen Anrufs
1558-979_RevA_20-06-2004_10sprog.indd 22-231558-979_RevA_20-06-2004_10sprog.indd 22-23 21-06-2004 11:29:1621-06-2004 11:29:16
24 25
ein. Dadurch werden alle eingehenden Anrufe mit der gleichen Lautstärke wiederge-
geben.
Sie können die Lautstärke jedoch jederzeit mit dem manuellen Headset-Lautstärkeregler
(G) einstellen. Der nächste eingehende Anruf wird dann mit der neuen Lautstärke wie-
dergegeben.
4.4 Optische Anzeigen
Der Verstärker besitzt zwei optische Anzeigen: die
Online-Anzeige (A) am Headset-Ständer und die
Stummschaltungsanzeige (F).
Online-Anzeige
Die Online-Anzeige (A) blinkt, wenn Sprache erkannt wird
und zeigt anderen an, dass Sie gerade telefonieren.
Wenn der Verstärker erstmals an das Netzteil angeschlos-
sen wird, blinkt die Online-Anzeige (A) zwei Sekunden lang
schnell.
Stummschaltungsanzeige
Ein Blinken der Stummschaltungsanzeige (F) zeigt an,
dass Sie das Gespräch stummgeschaltet haben und Ihr
Gesprächspartner Sie nicht hören kann.
Wenn der Verstärker erstmals an das Netzteil ange-
schlossen wird, blinkt die Stummschaltungsanzeige zwei
Sekunden lang schnell.
Funktionen Online-Anzeige Stummschaltungsanzeige
Einschalten, Systemprüfung 2 Sekunden kurz blinken 2 Sekunden kurz blinken
Online Blinkt beim Sprechen
Stumm Blinkt bei Stummschaltung
5 Häufi g gestellte Fragen
Der GN 8210 ist ein digitaler Verstärker - kann ich ihn sowohl mit analogen als
auch digitalen Telefonsystemen verwenden?
• Ja, der GN 8210 funktioniert sowohl mit analogen als auch mit digitalen
Telefonsystemen.
Weshalb kann ich keinen Wählton hören, wenn ich das Headset aufhabe?
• Vergewissern Sie sich, dass Sie sowohl das Kabel des Headsets als auch des
Telefonhörers an die zugehörigen Buchsen auf der Rückseite des GN 8210 ange-
schlossen haben.
Der Telefonhörer/Headset-Umschalter muss auf Headset eingestellt sein.
Unter Umständen müssen Sie den Verstärker mit Hilfe des Telefon-Setupschalters
auf Ihr Telefon einstellen. Klappen Sie die Abdeckung des Verstärkers auf, und ver-
schieben Sie den Setupschalter in die entsprechende Position.
Warum kann mich mein Gesprächspartner nicht hören?
• Vergewissern Sie sich, dass sich der Stummschalter in Sprechposition befi ndet.
• Prüfen Sie die Position des Headset-Mikrofonarms: Der Abstand zwischen Mikrofon
und Mund soll ca. 2 cm betragen.
• Möglicherweise ist die Übertragungslautstärke zu niedrig eingestellt. Klappen Sie
die Abdeckung des Verstärkers auf, und regeln Sie die Übertragungslautstärke im
Uhrzeigersinn auf einen höheren Wert.
• Unter Umständen müssen Sie den Telefonauswahlschalter in eine Position bringen,
die Ihrem Telefon entspricht. Klappen Sie die Abdeckung des Verstärkers auf, und
verschieben Sie den Auswahlschalter in die entsprechende Position.
Warum ist mein Gesprächspartner kaum hörbar oder klingt ungewohnt?
• Abhängig vom ausgewähltem Audiomodus kann Ihnen die Lautstärke ankommender
Anrufe niedriger als gewohnt erscheinen.
• Die Auswahl des Schutzmodus TT-4 (Einstellung C) bedeutet einen sehr strengen
Schutzstandard und ist speziell darauf ausgelegt, Sie vor Lautstärkespitzen zu schüt-
zen. Dadurch wird verhindert, dass hohe und laute Töne an Ihr Ohr gelangen können.
Dies kann die allgemeine Gesprächslautstärke beeinfl ussen, wobei sich das Ohr in
der Regel schnell an diesen Modus gewöhnt.
1558-979_RevA_20-06-2004_10sprog.indd 24-251558-979_RevA_20-06-2004_10sprog.indd 24-25 21-06-2004 11:29:1721-06-2004 11:29:17
26 27
Weshalb höre ich mich selbst im Headset, wenn ich spreche?
• Möglicherweise ist die Mikrofonlautstärke zu hoch eingestellt. Klappen Sie die
Abdeckung des GN 8210 auf, und stellen Sie den Mikrofonlautstärkeregler gegen
den Uhrzeigersinn auf einen niedrigeren Wert ein.
Warum leuchtet oder blinkt die Online-Anzeige nicht?
Vergewissern Sie sich, dass der Headset-Ständer bzw. die Online-Anzeige ordnungs-
gemäß an die Buchse auf der Rückseite des GN 8210 angeschlossen ist.
Stellen Sie sicher, dass das Netzteil an eine funktionierende Wandsteckdose ange-
schlossen ist.
6. Betriebs- und Sicherheitshinweise
Reinigen Sie den GN 8210 nach Bedarf mit einem trockenen oder leicht angefeuch-
teten Tuch. Falls erforderlich, kann hierzu Wasser verwendet werden, dem etwas
Reinigungs- oder Spülmittel zugegeben wurde. Staub auf Headset-Ständer, Netzteil
und Kabel lässt sich bei Bedarf mit einem trockenen Tuch entfernen.
Anschlussbuchsen und andere Öffnungen dürfen nicht mit Wasser oder anderen
Flüssigkeiten in Berührung kommen. Tauchen Sie den GN 8210 nicht in Wasser.
Halten Sie das Produkt außerhalb der Reichweite von Kindern:
Die Kunststofftüten und anderes Verpackungsmaterial des GN 8210 sind keine
Kinderspielzeuge. Die Tüten und darin enthaltene Kleinteile können beim Verschlucken
zum Ersticken führen.
Versuchen Sie niemals, das Produkt selbst zu zerlegen. Die internen Bauteile können
nicht vom Benutzer ersetzt oder repariert werden.
Das Produkt darf nur von autorisierten Händlern oder Service-Zentren geöffnet wer-
den. Falls Teile Ihres GN 8210 wegen Defekt, Verschleiß oder anderen Gründen ersetzt
werden müssen, wenden Sie sich an Ihren Händler.
Setzen Sie das Produkt niemals Regen oder anderen Flüssigkeiten aus. Entsorgen Sie
das Produkt gemäß den örtlichen Standards und Vorschriften.
Audiomodus-Einstellungen
Die drei verfügbaren Audiomodi zur individuellen Einstellung von Klangverbesserung und
Schutz (A, B und C) entsprechen den nachstehenden Standards und Empfehlungen:
Einstellung:
A, B & C EU-Richtlinie 2003/10/EC über Mindestanforderungen für Gesundheit
und Sicherheit von Mitarbeitern in Bezug auf Risiken durch physikalische
Einwirkungen (Lärm).
“Maximal zulässige Ausgangslautstärke von 85 dB(A).” A, B & C.”
A, B & C Veröffentlichung Nr. 98-126 “Geräuschpegel am Arbeitsplatz”. “NIOSH-
kompatibel” “Maximaler zeitgewichteter Durchschnitt (TWA) am Ausgang
85 dB.”
A, B & C ACIF-Richtlinienentwurf DR ACIF G616:2003 “Akustische Sicherheit für
Telefoneinrichtungen
C TT4” Telstra-Veröffentlichung – Technische Referenz TP TT404B51.
“Headset und Begrenzerverstärker. Akustischer Schutz.”
EU-Erklärung
Dieses Produkt besitzt das CE-Prüfzeichen gemäß den Bestimmungen der Richtlinie
über Funk- und Telekommunikationsendgeräte (99/5/ EC). GN Netcom erklärt hier-
mit, dass dieses Produkt den wesentlichen Anforderungen und anderen relevanten
Vorschriften der Richtlinie 1999/5/EC entspricht. Weitere Informationen sind unter
http://www.gnnetcom.com erhältlich.
Nur zur Verwendung in Verbindung mit dem mitgelieferten Netzteil oder einem ähnli-
chen Produkt mit GS-Kennzeichen.
1558-979_RevA_20-06-2004_10sprog.indd 26-271558-979_RevA_20-06-2004_10sprog.indd 26-27 21-06-2004 11:29:1721-06-2004 11:29:17
28 29
1. Componentes y
referencias
A) Indicador de conexión (“on-line”)
B) Soporte de los microcascos telefó-
nicos
C) Tapa
D) Control de ajuste del volumen del
micrófono
E) Conmutador de modo de voz
F) Conmutador de silencio (“mute”)
con indicador luminoso
G) Control de volumen manual para
los microcascos
H) Conmutador teléfono/microcascos
I) Conmutador de la terminación
telefónica
J) Toma del auricular del teléfono
K) *Toma del teléfono
L) Toma del adaptador de corriente
M) *Toma de los microcascos
* El teléfono y los microcascos no están incluidos en el paquete del GN 8210.
Las letras de referencia que se encuentran a lo largo de este manual del usuario corres-
ponden a esta ilustración.
2. Información del producto
Le felicitamos por haber adquirido el dispositivo GN 8210, un amplifi cador digital para
microcascos telefónicos, con el que podrá conectar unos microcascos de GN Netcom al
teléfono. Gracias a su tecnología digital avanzada, el amplifi cador GN 8210 le propor-
ciona una calidad de sonido mejorada y protección frente a volúmenes excesivamente
elevados. El GN 8210 dispone de tres modos de voz que puede seleccionar el usuario,
para adaptarse a las necesidades de protección y las preferencias en cuanto a calidad
del sonido de cada usuario.
Español – Manual del usuario del amplifi cador GN 8210
Este manual del usuario contiene información sobre la confi guración, el uso y el man-
tenimiento del GN 8210.
Índice
1. Componentes y referencias .................................... 29
2. Información del producto ...................................... 29
2.1 GN 8210: Contenido del paquete .......................... 30
3. Confi guración del amplifi cador GN 8210 ................. 30
3.1 Montaje ................................................................ 30
3.2 Ajuste de tono de marcación claro ........................ 32
3.3 Ajuste del volumen del micrófono ......................... 33
3.4 Selección del modo de voz .................................... 33
4. Funciones y uso ..................................................... 34
4.1 Responder y hacer llamadas telefónicas ................ 35
4.2 Silenciar una llamada ............................................ 35
4.3 Ajuste automático del volumen ............................. 36
4.4 Indicadores visuales .............................................. 36
5. Preguntas frecuentes ............................................ 37
6. Información operativa y de seguridad .................... 38
1558-979_RevA_20-06-2004_10sprog.indd 28-291558-979_RevA_20-06-2004_10sprog.indd 28-29 21-06-2004 11:29:1721-06-2004 11:29:17
30 31
Siga las instrucciones de este manual del usuario en el orden en que se exponen para
sacar el máximo partido a su amplifi cador GN 8210.
2.1 GN 8210: Contenido del paquete
• Amplifi cador GN 8210 con
soporte para microcascos telefó-
nicos
• Adaptador de corriente
• Cable para conexión al teléfono
• Conector para desconexión
rápida (para conectar el cable de
los microcascos)
Nota:
El teléfono y los microcascos no
están incluidos en el paquete del
GN 8210.
3. Confi guración del amplifi cador GN 8210
Para instalar el GN 8210, primero debe montar el conjunto (3.1), a continuación, ajus-
tar un tono de marcación claro (3.2) y, por último, elegir el modo de voz (3.4).
3.1 Montaje
Para conectar el amplifi cador GN 8210 a un telé-
fono, siga este procedimiento:
1. Desenchufe el cable del auricular del teléfono
de la toma correspondiente en el teléfono y
conéctelo en la toma para el auricular (J) en el
GN 8210.
2. Inserte el cable de conexión del teléfono en la
toma para el auricular en el teléfono.
Nota: El cable de conexión del teléfono se en-
trega ya conectado a la toma para el teléfono
(K) en el amplifi cador GN 8210.
3. Conecte el adaptador de corriente en la toma
correspondiente (L) de la parte trasera del
amplifi cador y, a continuación, enchúfelo en
una toma de corriente. El amplifi cador indica
que está conectado a la corriente y el estado
de funcionamiento mediante 2 segundos de
parpadeo rápido en el conmutador de silen-
cio (F) y en el indicador de conexión (A).
4. Conecte los microcascos al cable de co-
nexión de microcascos, mediante el conec-
tor de desconexión rápida.
1558-979_RevA_20-06-2004_10sprog.indd 30-311558-979_RevA_20-06-2004_10sprog.indd 30-31 21-06-2004 11:29:1821-06-2004 11:29:18
32 33
5. (Opcional)
Inserte el soporte de los microcascos en el lado trasero
del amplifi cador (presionando).
3.2 Ajuste de tono de marcación claro
Para poder escuchar un tono de marcación, debe seleccionar
la confi guración de la terminación telefónica. Siga este procedi-
miento:
1. Colóquese los microcascos. Compruebe que el conmutador
teléfono/microcascos (H) está en la posición de microcascos
y que el volumen (G) está en un nivel intermedio.
2. Descuelgue el auricular del teléfono y escuche el tono de
marcación en los microcascos.
3. Si no se escucha ningún tono o no es claro, deslice paso a
paso el conmutador de terminación (I) por las 9 posiciones
(de la A a la I) para elegir el tono de marcación más claro
posible. Si el tono es igual de claro en la posición “A” que
en la “I”, deje el conmutador en la posición “A”.
4. Cuando oiga el tono de marcación más claro, habrá locali-
zado la confi guración correcta de la terminación.
3.3 Ajuste del volumen del micrófono
Ajuste el volumen de los sonidos transmitidos en un nivel apropiado. Para ello, tendrá
que hacer una llamada.
Siga estas instrucciones para ajustar el volumen:
1. Colóquese los microcascos y compruebe que el micrófono
queda a 2 cm de su boca y que el conmutador de silencio (F)
está en la posición de conversación.
2. Haga una llamada a alguien como prueba.
3. Mientras hable, ajuste el control de volumen del micrófono (D)
hasta que la persona a la que ha llamado pueda oír su voz a un
nivel apropiado. Si oye el eco de su propia voz, ajuste el control
en un nivel menor.
3.4 Selección del modo de voz
El GN 8210 dispone de tres modos de voz que puede seleccionar el usuario, para
adaptarse a las necesidades de protección y las preferencias en cuanto a calidad del
sonido individuales. Confi guración de los tres modos de voz para personalización de la
calidad del sonido y la protección:
1558-979_RevA_20-06-2004_10sprog.indd 32-331558-979_RevA_20-06-2004_10sprog.indd 32-33 21-06-2004 11:29:1821-06-2004 11:29:18
34 35
Solamente para Europa y Asia/Pacífi co:
MODO DE VOZ PROTECCIÓN
A TrebleBoost • agudos
• se acentúan los tonos
altos
• protección avanzada
• cumple las normas de
seguridad y salud de la UE
B CrystalClear • nivel
• se acentúan todos los
tonos
• protección mejorada
• cumple las normas de
seguridad y salud de la UE
C TT-4 • bajos
• se acentúan los tonos
bajos
• superior
• cumple la especifi cación TT4
Descripción
a) Para todas las almohadillas: Calidad de sonido superior y buena protección, enfasis
en los tonos agudos (para aquellas personas que necesitan más agudos)
b) Para todas las almohadillas: Calidad de sonido superior y buena protección, (nivel
de sonido medio con tonos agudos intermedios)
c) Para todas las almohadillas: Buena calidad de sonido y protección superior (Para
aquellas personas que necesiten la máxima protección conforme al estándar aus-
traliano TT4)
Solamente para EEUU:
Almohadilla Modo Audio Protección
A Potenci-
ador de
agudos
Espuma • agudos
• tonos altos acentuados
• alta protección
• cumple las normas de
seguridad y salud NIOSH
B Sonido
nítido 1
Espuma • nivel
• acentuación de todos
los tonos
• alta protección
• cumple las normas de
seguridad y salud NIOSH
C Sonido
nítido 2
Polipiel • nivel
• acentuación de todos
los tonos
• alta protección
• cumple las normas de
seguridad y salud NIOSH
Descripción
a) Almohadillas espuma: Calidad de sonido superior y buena protección, enfasis en
los tonos agudos (para aquellas personas que necesitan más agudos)
b) Almohadillas espuma: Calidad de sonido superior y buena protección, (nivel de
sonido medio con tonos agudos intermedios)
c) Almohadillas polipiel: Calidad de sonido superior y buena protección (nivel de soni-
do medio con tonos agudos intermedios)
Si desea cambiar de modo de voz, siga este procedimiento:
1. Abra la tapa (C).
2. Seleccione el modo de voz que desee (opción “A”, “B”
o “C”) mediante el conmutador (E). Cuando escuche un
pitido por los microcascos, signifi ca que se habrá selec-
cionado un nuevo modo de voz.
3. Cierre la tapa (C).
Nota: El GN 8210 únicamente ofrece protección frente a
sonidos demasiado elevados cuando se usen los microcas-
cos. Si se utiliza el auricular del teléfono, no se dispondrá de
esta protección ni se podrá disfrutar de la calidad de sonido
mejorada del GN 8210.
Si desea obtener más información sobre el cumplimiento de las especifi caciones de
protección del amplifi cador GN 8210, consulte la sección 6 (“Información operativa y
de seguridad”) de este manual.
4. Funciones y uso
Antes de utilizar el GN 8210 por primera vez, compruebe lo siguiente:
• El conmutador teléfono/microcascos (H) está en la posición de microcascos.
El conmutador de silencio (F) está en la posición de conversación, es decir, que el
indicador luminoso está apagado.
• El volumen de los microcascos (G) está en una posición intermedia.
1558-979_RevA_20-06-2004_10sprog.indd 34-351558-979_RevA_20-06-2004_10sprog.indd 34-35 21-06-2004 11:29:1921-06-2004 11:29:19
36 37
4.1 Responder y hacer llamadas telefónicas
Para responder o hacer una llamada telefónica:
1. Póngase los microcascos.
2. Compruebe que el conmutador teléfono/microcascos (H) está en la posición de
microcascos y que el conmutador de silencio (F) no está activado (el indicador
luminoso no parpadea).
3. Descuelgue el auricular del teléfono y responda a la llamada o marque el número.
4. Para fi nalizar la llamada, cuelgue el auricular del teléfono.
Para responder o hacer una llamada utilizando el auricular del teléfono:
1. Compruebe que el conmutador teléfono/microcascos (H) está en la posición de
teléfono.
2. Descuelgue el auricular del teléfono y responda a la llamada o marque el número.
3. Para fi nalizar la llamada, cuelgue el auricular del teléfono.
Nota: Se recomienda utilizar siempre los microcascos para aprovechar las ventajas y la
protección del amplifi cador GN 8210.
4.2 Silenciar una llamada
Para silenciar una llamada, de modo que el interlocutor no
pueda oírle, lleve el conmutador (F) a la posición de silencio.
El indicador de silencio (F) parpadeará y se emitirán pitidos
por los microcascos cada 10 segundos, como indicación de
que el modo de silencio está activado.
4.3 Ajuste automático del volumen
El volumen de las llamadas entrantes se regula mediante la función de ajuste automá-
tico del volumen, incorporada en el amplifi cador. Esta función ajusta automáticamente
el volumen de cada llamada entrante para que sea igual que el de la llamada anterior.
De este modo, el volumen se mantendrá constante en todas las llamadas que reciba.
Podrá cambiar el volumen de las llamadas entrantes en cualquier momento, ajustando
el control manual del volumen de los microcascos (G). Así, el volumen de la siguiente
llamada entrante estará en este nuevo nivel.
4.4 Indicadores visuales
El amplifi cador dispone de dos indicadores visuales: el indi-
cador de conexión (A) en el soporte de los microcascos y el
indicador de silencio (F).
Indicador de conexión (“on-line”)
El indicador de conexión (A) parpadea cuando detecta una
conversación, para que otras personas sepan que está
hablando por teléfono.
Cuando se conecta por primera vez el amplifi cador a la
corriente mediante el adaptador, el indicador de conexión (A)
parpadea rápidamente durante 2 segundos.
Indicador de silencio (“mute”)
El indicador de silencio (F) parpadea cuando se ha silenciado
una llamada y el interlocutor no puede escucharle.
Cuando se conecta por primera vez el amplifi cador a la
corriente mediante el adaptador, el indicador de silencio par-
padea rápidamente durante 2 segundos.
1558-979_RevA_20-06-2004_10sprog.indd 36-371558-979_RevA_20-06-2004_10sprog.indd 36-37 21-06-2004 11:29:2021-06-2004 11:29:20
38 39
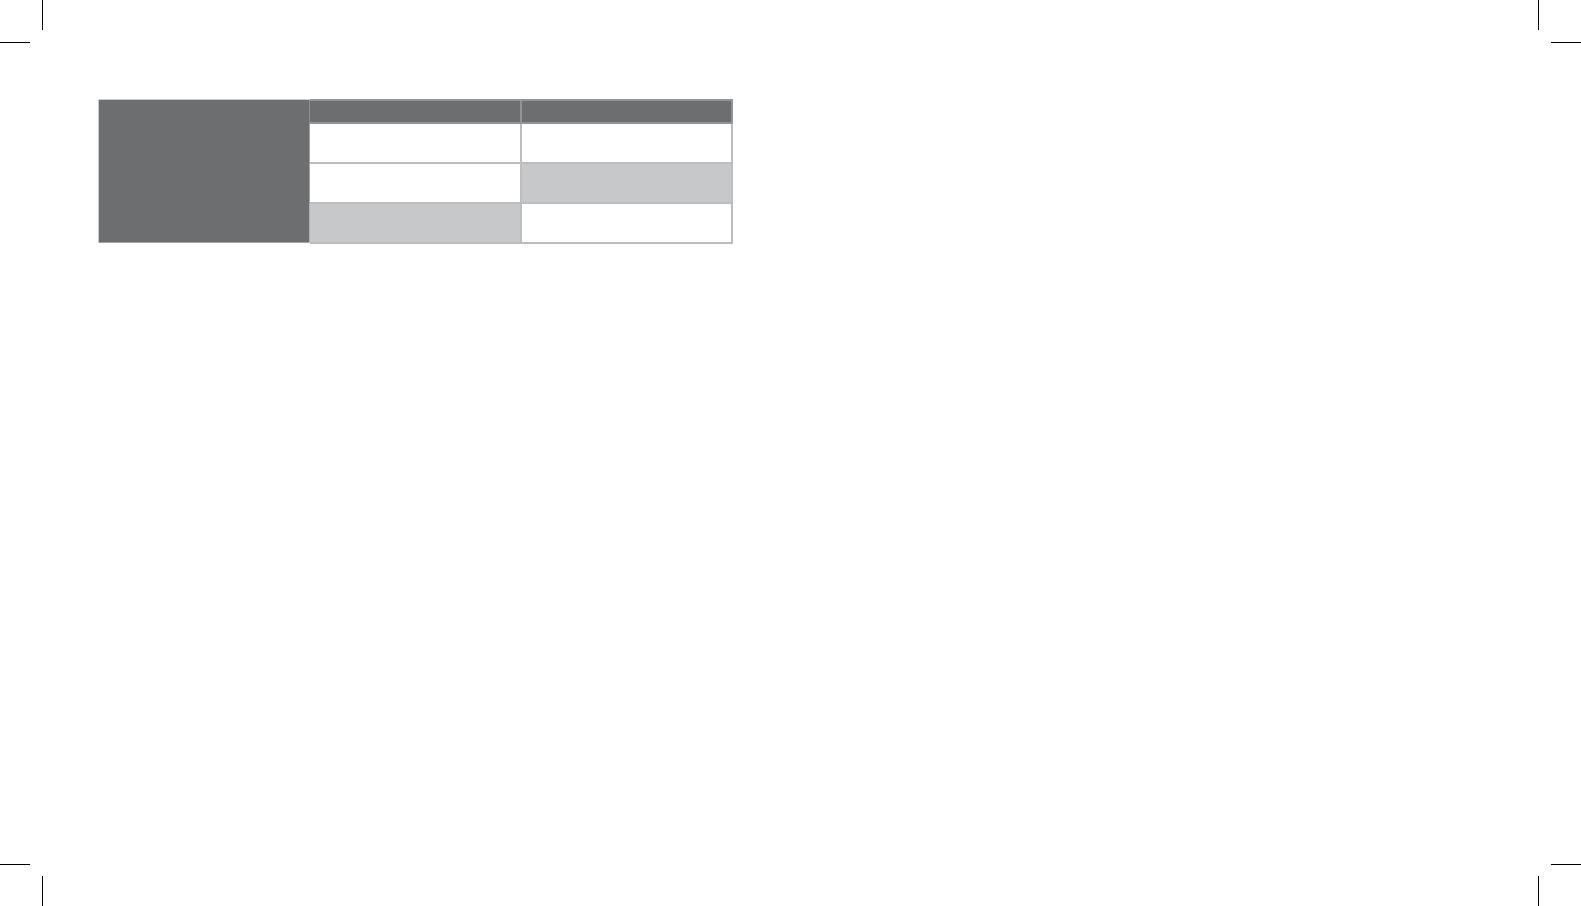
Funciones Indicador de conexión Indicador de silencio
Encendido, control del
sistema Parpadeo breve durante 2
segundos Parpadeo breve durante 2
segundos
Conexión Parpadea durante una
conversación
Silencio Parpadea con una llamada
silenciada
5 Preguntas frecuentes
El dispositivo GN 8210 es un amplifi cador digital: ¿puedo utilizarlo con siste-
mas telefónicos analógicos y digitales?
Sí, el amplifi cador GN 8210 funciona con sistemas telefónicos tanto analógicos como
digitales.
¿Por qué no oigo el tono de marcación con los microcascos puestos?
Compruebe que ha insertado los cables de los microcascos y del auricular del telé-
fono en las tomas correspondientes situadas en la parte trasera del amplifi cador GN
8210.
Compruebe que el conmutador teléfono/microcascos está en la posición de micro-
cascos.
• Es posible que el conmutador de la terminación telefónica esté en una posición que
no corresponda al teléfono que utiliza. Levante la tapa del amplifi cador y desplace
este conmutador a otra posición.
¿Por qué me oye mal mi interlocutor?
• Compruebe que el conmutador de silencio está en la posición de conversación.
Revise la posición de la varilla del micrófono de los microcascos y compruebe que
está separada aproximadamente 2 cm de su boca.
Puede que el control de volumen de transmisión esté en un nivel demasiado bajo.
Levante la tapa del amplifi cador y ajuste el volumen de transmisión a un número
mayor, moviéndolo en sentido de las agujas del reloj.
Es posible que el selector de teléfono esté en una posición que no corresponda al modelo
que utiliza. Levante la tapa del amplifi cador y desplace este selector a otra posición.
¿Por qué oigo mal a mi interlocutor o por qué suena distinto?
Dependiendo del modo de voz que haya seleccionado, el volumen de entrada puede
parecer bajo en comparación con lo que está acostumbrado.
Si ha seleccionado el modo de protección TT-4 (opción C), debe tener en cuenta que
este modo es un estándar de protección muy estricto, diseñado para mejorar la pro-
tección frente a shocks acústicos. Con esta protección, el estándar no permite que
entren en su oído sonidos muy agudos o niveles de volumen demasiado elevados.
Esto puede infl uir en el nivel y el sonido de la conversación, aunque por lo general,
sus oídos se adaptarán a este modo al cabo de unos instantes.
¿Por qué oigo mi voz por los microcascos cuando hablo?
• Puede que el control de volumen del micrófono esté en un nivel demasiado alto.
Levante la tapa del GN 8210 y ajuste el volumen del micrófono a un número menor,
moviéndolo en sentido de las agujas del reloj.
¿Por qué no se enciende ni parpadea el indicador de conexión?
• Compruebe que el indicador de conexión o del soporte de los microcascos está cor-
rectamente enchufado en el puerto del lado trasero del GN 8210.
Compruebe que el adaptador de corriente está conectado a una toma de pared en
buen estado.
6. Información operativa y de seguridad
Limpie el amplifi cador GN 8210 con un trapo seco o ligeramente humedecido si es
necesario. Humedezca el trapo con agua jabonosa. Limpie el polvo del soporte de los
microcascos, el adaptador de corriente y los cables, cuando sea necesario.
Evite que haya humedad o que entren líquidos en las tomas o en otras aberturas. No
introduzca en agua el GN 8210.
Manténgalo fuera del alcance de los niños:
Las bolsas de plástico que se utilizan para embalaje del amplifi cador GN 8210 y sus
componentes no son juguetes. Las propias bolsas o las numerosas piezas pequeñas
que contienen podrían provocar asfi xia si se ingiriesen.
1558-979_RevA_20-06-2004_10sprog.indd 38-391558-979_RevA_20-06-2004_10sprog.indd 38-39 21-06-2004 11:29:2121-06-2004 11:29:21
  • Page 1 1
  • Page 2 2
  • Page 3 3
  • Page 4 4
  • Page 5 5
  • Page 6 6
  • Page 7 7
  • Page 8 8
  • Page 9 9
  • Page 10 10
  • Page 11 11
  • Page 12 12
  • Page 13 13
  • Page 14 14
  • Page 15 15
  • Page 16 16
  • Page 17 17
  • Page 18 18
  • Page 19 19
  • Page 20 20
  • Page 21 21
  • Page 22 22
  • Page 23 23
  • Page 24 24
  • Page 25 25
  • Page 26 26
  • Page 27 27
  • Page 28 28
  • Page 29 29
  • Page 30 30
  • Page 31 31
  • Page 32 32
  • Page 33 33
  • Page 34 34
  • Page 35 35
  • Page 36 36
  • Page 37 37
  • Page 38 38
  • Page 39 39
  • Page 40 40
  • Page 41 41
  • Page 42 42
  • Page 43 43
  • Page 44 44
  • Page 45 45
  • Page 46 46
  • Page 47 47
  • Page 48 48
  • Page 49 49
  • Page 50 50
  • Page 51 51
  • Page 52 52
  • Page 53 53
  • Page 54 54
  • Page 55 55
  • Page 56 56
  • Page 57 57
  • Page 58 58
  • Page 59 59
  • Page 60 60
  • Page 61 61
  • Page 62 62
  • Page 63 63
  • Page 64 64
  • Page 65 65
  • Page 66 66
  • Page 67 67
  • Page 68 68
  • Page 69 69

Jabra GN 8210 Kasutusjuhend

Kategooria
Telefonid
Tüüp
Kasutusjuhend