Sonicare HX9112/02 Kasutusjuhend

Kategooria
Elektrilised hambaharjad
Tüüp
Kasutusjuhend
Sonicare
FlexCare
Platinum
4235_020_7270_1_DFU-Luxury_A6_v4.indd 1 9/23/13 3:54 PM
1
4235_020_7270_1_DFU-Luxury_A6_v4.indd 2 9/23/13 3:54 PM
Sonicare FlexCare Platinum
ENGLISH 4
 22
 43
 61
 79
 97
 116
 136
 154
 172
 193
 212
 233
 252
 270
 289
4235_020_7270_1_DFU-Luxury_A6_v4.indd 3 9/23/13 3:54 PM
4
Introduction
Congratulations on your purchase and welcome
to Philips! To fully benet from the support that
Philips offers, register your product at
www.philips.com/welcome.
Important
Read this user manual carefully before
you use the appliance and save it for
future reference.
Danger
- Keep the charger and/or sanitiser
away from water. Do not place or
store it over or near water contained
in a bathtub, washbasin, sink etc.
Do not immerse the charger and/or
sanitiser in water or any other liquid.
After cleaning, make sure the charger
and/or sanitiser is completely dry
before you connect it to the mains.
Warning
- The mains cord cannot be replaced.
If the mains cord is damaged, discard
the charger and/or sanitiser.
- Always have the charger and/or
sanitiser replaced with one of the
original type in order to avoid a hazard.
ENGLISH
4235_020_7270_1_DFU-Luxury_A6_v4.indd 4 9/23/13 3:54 PM
- Do not use the charger and/or sanitiser
outdoors or near heated surfaces.
Do not operate the sanitiser where
aerosol (spray) products are being used
or where oxygen is being administered.
- If the appliance is damaged in any
way (brush head, toothbrush handle,
charger and/or sanitiser), stop using it.
This appliance contains no serviceable
parts. If the appliance is damaged,
contact the Consumer Care Centre in
your country (see chapter ‘Guarantee
and support).
- This appliance can be used by children
aged from 8 years and above and
by persons with reduced physical,
sensory or mental capabilities or
lack of experience and knowledge
if they have been given supervision
or instruction concerning use of the
appliance in a safe way and if they
understand the hazards involved.
Cleaning and user maintenance shall
not be made by children unless they
are older than 8 and supervised. Keep
the appliance and its cord out of reach
of children aged less than 8 years.
ENGLISH 5
4235_020_7270_1_DFU-Luxury_A6_v4.indd 5 9/23/13 3:54 PM
- Children shall not play with the
appliance.
- Discontinue use of the sanitiser if the
UV light bulb remains on when the
door is open. UV light can be harmful
to the human eye and skin. Keep the
sanitiser out of the reach of children
at all times.
Caution
- Do not clean the brush head, the
handle, the charger, the charger cover
and/or the sanitiser in the dishwasher.
- If you have had oral or gum surgery
in the previous 2 months, consult
your dentist before you use the
toothbrush.
- Consult your dentist if excessive
bleeding occurs after using this
toothbrush or if bleeding continues
to occur after 1 week of use. Also
consult your dentist if you experience
discomfort or pain when you use the
Sonicare.
- The Sonicare toothbrush complies
with the safety standards for
electromagnetic devices. If you have a
pacemaker or other implanted device,
contact your physician or the device
ENGLISH6
4235_020_7270_1_DFU-Luxury_A6_v4.indd 6 9/23/13 3:54 PM
manufacturer of the implanted device
prior to use.
- If you have medical concerns, consult
your doctor before you use the
Sonicare.
- This appliance has only been
designed for cleaning teeth, gums and
tongue. Do not use it for any other
purpose. Stop using the appliance
and contact your doctor if you
experience any discomfort or pain.
- The Sonicare toothbrush is a
personal care device and is not
intended for use on multiple patients
in a dental practice or institution.
- Stop using a brush head with crushed
or bent bristles. Replace the brush
head every 3 months or sooner if
signs of wear appear.
- Do not use other brush heads than
the ones recommended by the
manufacturer.
- If your toothpaste contains peroxide,
baking soda or bicarbonate (common
in whitening toothpastes), thoroughly
clean the brush head with soap and
water after each use. This prevents
possible cracking of the plastic.
ENGLISH 7
4235_020_7270_1_DFU-Luxury_A6_v4.indd 7 9/23/13 3:54 PM
- Do not insert objects into the air
openings of the sanitiser or block
these air openings by placing it on
a soft surface or in a position or
location where objects will block
these openings (examples of objects:
magazine, tissue paper and hair.
- The UV light bulb is hot during and
immediately after the sanitising cycle.
Do not touch the UV light bulb when
it is hot.
- Do not operate the sanitiser without
the protective screen in place to
avoid contact with a hot bulb.
- If the sanitiser has been used for
3 consecutive UV clean cycles
(i.e. 3 times in a row), switch it off for
at least 30 minutes before ou start
another UV clean cycle.

This Philips appliance complies with all applicable
standards and regulations regarding exposure to
electromagnetic elds.
ENGLISH8
4235_020_7270_1_DFU-Luxury_A6_v4.indd 8 9/23/13 3:54 PM

1 Hygienic travel cap
2 Brush head with unique identier
3 Handle
4 Power on/off button
5 Intensity level indicator
6 Intensity level button (+ and -)
7 Brushing modes
8 Mode button
9 Battery level indicator
10 UV sanitiser and base with integrated charger
and cord wrap (specic types only)
- Not shown: UV light bulb
- Not shown: Sanitiser drip tray
- Not shown: Protective screen for UV light bulb
11 Mains cord with plug
12 Deluxe charger (specic types only)
13 Charger cover with brush head holders and
base with cord wrap
14 Travel charger
- Not shown: Travel case
Note: The contents of the box may vary based on the
type purchased.
ENGLISH 9
4235_020_7270_1_DFU-Luxury_A6_v4.indd 9 9/23/13 3:54 PM


1 Align the front of the brush head with the
front of the handle.
2 Firmly press the brush head down onto the
metal shaft until it stops.
Note: Sonicare Platinum brush heads come with easily
identiable icons to identify your brush head.

1 Put the plug of the charger or sanitiser in a
wall socket.
2 Place the handle on the charger.
, The ashing light of the battery level indicator
shows that the toothbrush is charging.
Note: It takes at least 24 hours to fully charge the
battery.


1 Wet the bristles and apply a small amount of
toothpaste.
2 Place the toothbrush bristles against the teeth
at a slight angle towards the gumline.
3 Press the power on/off button to switch on
the Sonicare.
ENGLISH10
4235_020_7270_1_DFU-Luxury_A6_v4.indd 10 9/23/13 3:54 PM
4 Apply light pressure to maximise Sonicare’s
effectiveness and let the Sonicare toothbrush
do the brushing for you. Do not scrub.
5 Gently move the brush head slowly across
the teeth in a small back and forth motion
so the longer bristles reach between your
teeth. Continue this motion throughout
your brushing cycle.
Note: To make sure you brush evenly throughout the
mouth, divide your mouth into 4 sections using the
Quadpacer feature (see chapterFeatures’).
6 Brush each section for 30 seconds for a total
brushing time of 2 minutes. Start with section
1 (outside top teeth) and then brush section
2 (inside top teeth). Continue with section
3 (outside bottom teeth) and nally brush
section 4 (inside bottom teeth).
Note: After you have completed the brushing
cycle, you can spend additional time brushing the
chewing surfaces of your teeth and areas where
staining occurs. You may also brush your tongue, with
the toothbrush switched on or off, as you prefer.
The Sonicare is safe to use on:
- Braces (brush heads may wear out more quickly
when used on braces)
- Dental restorations (llings, crowns, veneers,
implants)

1 Clean: The ultimate in plaque removal
(default mode).
2 2 minutes to remove surface stains
and 30 seconds to brighten and polish your
front teeth.
ENGLISH 11
4235_020_7270_1_DFU-Luxury_A6_v4.indd 11 9/23/13 3:54 PM
3 Gum care: Combines the Clean mode with
an additional minute to gently stimulate and
massage gums to improve gum health.
The Sonicare comes with the Clean mode
activated.
Note: When the toothbrush is switched on, you
cannot toggle between modes.
1 Before you switch on the Sonicare, press the
mode button to toggle between modes.
, The selected brushing mode lights up.
, Once a brushing mode has been selected, it
remains active until another brushing mode is
selected.
Note: When the Sonicare is used in clinical studies,
the default 2-minute Clean mode must be selected.
The handle has to be fully charged and the Easy-start
feature must be deactivated.

- Low: 1 LED indicator light
- Medium: 2 LED indicator lights
- : 3 LED indicator lights
Note: To adjust the intensity level to the next higher
or lower level, you can press the + button to increase
intensity or the - button to decrease intensity at any
time during the brushing cycle.

A change in vibration (and a slight change in sound)
alerts you when you apply too much pressure
while brushing. See chapter ‘Features’.
ENGLISH12
4235_020_7270_1_DFU-Luxury_A6_v4.indd 12 9/23/13 3:54 PM


- 1 yellow LED indicates a low charge.
- 3 green LEDs indicate a full charge.
Note: If you hear a long beep and the yellow LED of
the battery level indicator ashes, the rechargeable
battery is empty and the Sonicare switches off. Place
the handle on the charger to recharge it.
Note: To keep the battery fully charged at all times,
you can keep the Sonicare on the charger when you
are not using it.


This Sonicare comes with the Pressure Sensor
feature activated. The Pressure Sensor works in all
3 modes and at all 3 intensity levels.
To deactivate or reactivate the Pressure Sensor
feature:
1 Place the handle with a brush head attached
on the plugged-in charger or sanitiser.
2 Press and hold the power button and the
mode button for 2 seconds.
, You hear 1 beep to indicate that the Pressure
Sensor has been deactivated.
, You hear 2 beeps to indicate that the Pressure
Sensor has been activated.
ENGLISH 13
4235_020_7270_1_DFU-Luxury_A6_v4.indd 13 9/23/13 3:54 PM
Quadpacer
- The Quadpacer is an interval timer that has a
short beep and pause to remind you to brush
the 4 sections of your mouth. Depending on
the brushing mode you have selected, the
Quadpacer beeps at different intervals during
the brushing cycle. The Quadpacer works in all 3
modes and at all 3 intensity levels.
The Quadpacer feature on this Sonicare has
been activated. To deactivate or reactivate the
Quadpacer feature:
1 Place the handle with a brush head attached
on the plugged-in charger or sanitiser.
2 Press and hold the mode button for 2
seconds.
, You hear 1 beep to indicate that the
Quadpacer has been deactivated.
, You hear 2 beeps to indicate that the
Quadpacer has been activated.
Smartimer
The Smartimer indicates that your brushing cycle
is complete when it automatically switches off the
toothbrush at the end of the brushing cycle.
Dentists recommend brushing at least 2 minutes
twice a day.

The Easy-start feature gently increases power over
the rst 14 brushings to let you get used to brushing
with the Sonicare. The Easy-start feature only works
in the Clean mode and at the High intensity level.
This Sonicare comes with the Easy-start feature
deactivated. To activate or deactivate the Easy-
start feature:
ENGLISH14
4235_020_7270_1_DFU-Luxury_A6_v4.indd 14 9/23/13 3:54 PM
1 Attach your brush head to the handle.
2 Place the handle on the plugged-in charger or
sanitiser.
3 Activate or deactivate Easy-start:
, To activate Easy-start: Press and hold the
power on/off button for 2 seconds. You hear
2 beeps to indicate that the Easy-start feature
has been activated.
, To deactivate Easy-start: Press and hold the
power on/off button for 2 seconds. You hear
1 beep to indicate that the Easy-start feature
has been deactivated.
Note: Each of the rst 14 brushings must be at least
1 minute in length to properly move through the
Easy-start ramp-up cycle.
Note: Using the Easy-start feature beyond the initial
ramp-up period is not recommended and reduces
Sonicare’s effectiveness in removing plaque.

If your Sonicare includes the charger cover and
base, the travel charger is pre-installed inside the
cover.
1 To separate the charger cover from the
charger base, press the two gray snap bars on
the charger base and pull the white charger
cover upwards.
2 Wrap excess mains cord around the gray
charger base as shown in the picture. Be sure
to wrap the cord on the inside of the two
snap levers. Guide the cord through the small
groove in the back of the charger base.
ENGLISH 15
4235_020_7270_1_DFU-Luxury_A6_v4.indd 15 9/23/13 3:54 PM
3 To reattach the charger cover, press it down
over the charger base until it snaps into place.
Tip: For extra convenience during travel, you can
remove the travel charger and use it without the
charger cover and charger base.

- With the UV sanitiser you can clean your brush
head after every use.

:
- The UV light bulb remains on when the door is open.
- The window is broken or missing from the sanitiser.
- The sanitiser gives off smoke or a burning smell
while it is operating.
Note: UV light can be harmful to the human eye and
skin. The Sanitiser should be kept out of reach of
children at all times.
1 After brushing, rinse the brush head and
shake off excess water.
Do not place the travel cap on the brush head
during sanitisation.
2 Place your nger in the door recess on top of
the sanitiser and pull open the door.
3 Place the brush head on one of the 2 pegs in the
sanitiser with the bristles facing the light bulb.
Note: Only clean Sonicare snap-on brush heads in the
sanitiser.
Note: Do not clean Sonicare for Kids brush heads in
the sanitiser.
4 Put the plug in a wall socket.
ENGLISH16
4235_020_7270_1_DFU-Luxury_A6_v4.indd 16 9/23/13 3:54 PM
5 Close the door and press the green power
on/off button once to select the UV clean
cycle.
Note: You can only switch on the sanitiser if the door
is properly closed.
Note: The sanitiser stops if you open the door during
the sanitising cycle.
Note: The sanitiser operates for 10 minutes and then
automatically switches off.
, The sanitiser is in operation when the light
glows through the window.
Cleaning
Do not clean the brush head, handle, travel
charger, charger cover and the UV sanitiser in the
dishwasher.

1 Remove the brush head and rinse the metal
shaft area with warm water.
Do not push on the rubber seal on the metal
shaft with sharp objects, as this may cause
damage.
2 Use a damp cloth to wipe the entire surface
of the handle.

1 Rinse the brush head and bristles after each
use.
ENGLISH 17
4235_020_7270_1_DFU-Luxury_A6_v4.indd 17 9/23/13 3:54 PM
2 Remove the brush head from the handle and
rinse the brush head connection at least once
a week with warm water.

1 Unplug the charger and remove the charger
cover.
2 Use a damp cloth to wipe the surface of the
charger and charger cover.

Do not immerse the sanitiser in water or rinse it
under the tap.
Do not clean the sanitiser when the UV light bulb
is hot.
For optimal effectiveness, it is recommended to
clean the sanitiser every week.
1 Unplug the sanitiser.
2 Pull the drip tray straight out. Rinse the drip
tray and wipe it clean with a damp cloth.
3 Clean all interior surfaces with a damp cloth.
4 Remove the protective screen in front of the
UV light bulb.
To remove the screen, grasp the edges next to the
snaps, gently squeeze and pull out the protective
screen.
5 Remove the UV light bulb.
To remove the light bulb, grasp it and pull it out of
the metal clasp.
6 Clean the protective screen and the UV light
bulb with a damp cloth.
7 Reinsert the UV light bulb.
ENGLISH18
4235_020_7270_1_DFU-Luxury_A6_v4.indd 18 9/23/13 3:54 PM
To reinsert the light bulb, align the bottom of the
light bulb with the metal clasp and push the bulb
into the clasp.
8 Reinsert the protective screen.
To reinsert the screen, align the pegs on the screen
with the slots on the reective surface near the UV
light bulb. Push the screen straight into the slots on
the sanitiser.
Storage
If you are not going to use the appliance for an
extended period of time, remove the mains plug
from the wall socket. Then clean the appliance
and store it in a cool and dry place away from
direct sunlight. You can use the cord wrap feature
to store the mains cord neatly.
Replacement

Replace Sonicare brush heads every 3 months to
achieve optimal results.
Only use genuine Philips Sonicare replacement
brush heads that are suitable for this model.

Replacement UV bulbs are available through the
Philips Consumer Care Centre in your country.

To buy accessories or spare parts, visit
 or go to your
Philips dealer. You can also contact the Philips
Consumer Care Centre in your country (see the
worldwide guarantee leaet for contact details).
ENGLISH 19
4235_020_7270_1_DFU-Luxury_A6_v4.indd 19 9/23/13 3:54 PM

- Do not throw away the appliance or the UV light
bulb (bulb contains mercury) with the normal
household waste at the end of its life, but hand
it in at an ofcial collection point for recycling. By
doing this, you help to preserve the environment.
- The built-in rechargeable battery of the Sonicare
contains substances that may pollute the
environment. Always remove the battery before
you discard and hand in the appliance at an ofcial
collection point. Dispose of the battery at an
ofcial collection point for batteries. If you have
trouble removing the battery, you can also take
the appliance to a Philips service centre. The staff
of this centre will remove the battery for you and
will dispose of it in an environmentally safe way.

This process is not reversible.
To remove the rechargeable battery, you need a
at-head (standard) screwdriver. Observe basic
safety precautions when you follow the procedure
described below. Be sure to protect your eyes,
hands, ngers, and the surface on which you work.
1 Remove the toothbrush from the charger,
switch it on and let it operate until it stops.
Continue to switch on the Sonicare until the
battery is completely empty.
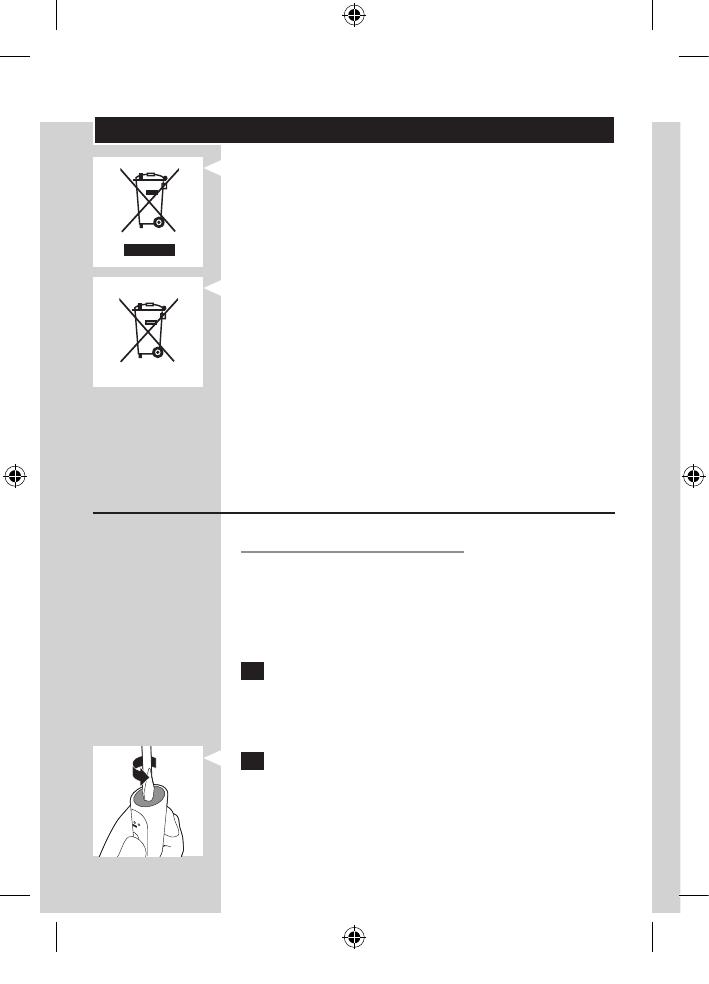
2 Insert a athead (standard) screwdriver into
the slot located at the bottom of the handle.
Turn the screwdriver anticlockwise to release
the bottom cap.
ENGLISH20
4235_020_7270_1_DFU-Luxury_A6_v4.indd 20 9/23/13 3:54 PM
1 / 1