Samsung SYNCMASTER NC190 Omaniku manuaal

Tüüp
Omaniku manuaal
See the Users Manual for further instructions for installation and adjustment. / Reportez-vous au manuel de l’utilisateur pour obtenir des instructions supplémentaires sur l’installation et le réglage.
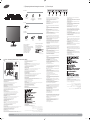
Unpacking Your Monitor / Déballage de votre moniteur
Rear - Connecting Cables / Arriére - Connexion des câbles
Front / Façade
1. Sambungkan kabel listrik untuk monitor ke port daya di bagian belakang monitor.
2. Sambungkan kabel sinyal ke port D-Sub, 15-pin di bagian belakang monitor.
3. Sambungkan kabel audio untuk monitor ke port audio di bagian belakang komputer.
4. Terminal koneksi headphone.
5. Sambungkan mikrofon ke terminal MIC.
A. Sambungkan perangkat USB seperti mouse, keyboard, dan perangkat penyimpanan eksternal (DSC (Digital Still Camera), MP3, media eksternal, dll.).
B. Kunci Kensington adalah perangkat yang digunakan untuk secara fisik menahan sistem bila digunakan di tempat umum.
1. Connect the power cord for your monitor to the power port on the back of the monitor.
2. Connect the signal cable to the 15-pin, D-Sub port on the back of your monitor.
3. Connect the audio cable for your monitor to the audio port on the back of your computer.
4. Headphone connection terminal.
5. Connect a microphone to the MIC terminal.
A. Connect USB devices such as a mouse, keyboard and external storage devices (DSC, MP3, external storage, etc.).
B. The Kensington lock is a device used to physically fix the system when using it in a public place.
1
D-sub2
3
4
.“MIC5
MP3DSCUSBA

 KensingtonB







1. Brancher le cordon électrique a la prise d ‘alimentation au dos de votre moniteur.
2. Connectez le câble de signal au port D-Sub 15 broches à l’arrière du moniteur.

4. Connexion Casque.
5. Branchez un microphone à la borne MIC
A. Vous pouvez connecter des périphériques USB, comme une souris, un clavier ou un périphérique de stockage externe
(p.ex. DSC, MP3, stockage externe, etc.).
B. Le verrou Kensington est un périphérique utilisé pour fixer physiquement le système lorsque vous l’utilisez dans un lieu public.

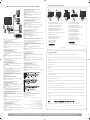
2. Press the button at least 2sec to connect to the host PC in Client mode. In order to turn the
host PC off, press the button more than 2 sec, being connected to the host PC.



while


disconnect from the server.
6. Use this button for turn the monitor on and off.

sebelumnya.
2. Tekan tombol minimal selama 2 detik untuk menyambung ke PC host dalam mode Client.
Untuk menonaktifkan PC host, tekan tombol selama lebih dari 2 detik saat tersambung ke
PC host.

2.3 Menyesuaikan pengaturan dalam menu.


5. Dalam mode Analog, tombol ini digunakan untuk penyesuaian otomatis. Dalam mode Klien,
tombol ini digunakan untuk memutuskan dari server.










5. 



précédent.
2. Maintenez enfoncé le bouton pendant au moins 2 secondes pour connecter le PC hôte en
mode Client. Pour mettre le PC hôte hors tension alors qu’il est connecté, maintenez enfoncé
le bouton pendant au moins 2 secondes.

2.3. Permet de régler les options du menu.
4.
Permet d’activer un élément de menu mis en surbrillance. / Quand vous enfoncez la touche


déconnecter du serveur.
6. Ce voyant Vert s’allume lors du fonctionnement normal et clignote lorsque le moniteur
enregistre vos réglages.






Helligkeit.




trennen Sie mit dieser Taste die Verbindung zum Server.

1.

visszatereshez.





4. 




1.
Se il menu di regolazione dello schermo è disattivato: utilizzare questo pulsante per aprire il

2. Premere il tasto per almeno 2 sec per collegarsi al PC host in modalità Client. Per spegnere
il PC host, premere il tasto per più di 2 sec.
3. 
nosità.

4. 

5. In modalità Analog, questo tasto viene usato per le regolazioni automatiche. In modalità Cli-
ent, viene usato per disconnettersi dal server.
6. Utilizzare questo pulsante per accendere e spegnere il monitor.
1.

poprzedniego menu.
-




4. 




1.





3.














4.



se utiliza para desconectarse del servidor.

1.

meny.


värddatorn.


4.





1.













2. Carregue no botão durante, pelo menos, 2 seg. para se ligar ao PC anfitrião no modo cliente.
Para desligar o PC anfitrião, carregue no botão durante mais de 2 seg., estando ligado ao
PC anfitrião.


4.



utilizado para desligar do servidor.
6. Utilize este botão para ligar e desligar o monitor.














csatlakoztathat.

1. Collegare il cavo di alimentazione del monitor alla porta dell’alimentazione posta sul retro del calcolatore.
2. Collegare il cavo di segnale alla porta D-Sub a 15-pin sul retro del monitor.
3. Collegare un cavo qui per prendere il suono dalla scheda audio del computer.
4. Terminale di collegamento delle cuffie.
5. Collegare il microfono al terminale MIC.

B. il blocco Kensington è un dispositivo utilizzato per assicurare fisicamente il sistema quando viene utilizzato in un luogo pubblico.


3. Podlaczyc kabel audio monitora do portu audio z tylu komputera.







3. Ligue aqui um cabo para a entrada do som da placa de som do computador.

5. Ligue um microfone ao terminal MIC.

armazenamento externo, etc.).










2. Conecte el cable de señal al puerto D-Sub de 15 patillas, en la parte posterior del monitor.



















觥G紻者G艇蘉譄ஆ诅虣蠯蠸詧荼缬ଟ觥G艇G艇蘉譄ஆ诅虣蠯覥苷蹧虣ଟ
೼Nj⫼᠊ッnj῵ᓣϟᣝԣᣝ䟩㟇ᇥ⾦䧬ҹ䗷᥹㟇Џ″䳏㜺DŽ
೼䗷᥹㟇Џ″䳏㜺ⱘᚙ⊕ϟˈ㢹㽕䮰䭝Џ″䳏㜺ˈ䂟ᣝԣᣝ䟩⾦䧬ҹϞDŽ
Power Cord /





d’installation rapide




les agences)
Cable / Câble
Manual / Manuel
USB Keyboard /
Clavier (USB)
USB Mouse /
Souris (USB)
Sold separately /
Vendu séparément
D-Sub Cable /
Câble D-sub

1. 전원선을 220V 또는 110V 전용 콘센트에 꽂아 사용하세요.
2. D-Sub 케이블로 모니터의 RGB IN 단자와 컴퓨터의 D-Sub 단자를 연결하세요.
3. 컴퓨터에서 오디오 입력신호를 출력할 경우AUDIO-IN 케이블로 모니터의 AUDIO-IN 단자에 연결하세요.
4. 헤드폰을 헤드폰 연결단자에 연결합니다.
5. 마이크를 마이크 연결단자에 연결합니다.
A. 마우스나키보드,외부입력장치(DSC,MP3,외장형저장장치등)등USB를사용하는 기기를연결합니다.
B. 공공 장소에서도 안심하고 사용할 수 있도록 하는 도난 방지용 장치입니다.
1. OSD메뉴를 엽니다. 그리고 OSD를 빠져나오거나 OSD 상위 메뉴로 되돌아갈 때 사용됩니다.
2. 클라이언트 모드에서 호스트 PC와 연결하려면 2초이상 누르세요. 호스트 PC와 연결된 상태에서
2초 이상 누르면 호스트 PC의 전원이 꺼집니다.
3. 음량의 크기를 조절합니다.
2.3. OSD메뉴화면에서 메뉴이동을 하거나 값을 조정할 때 사용됩니다.
4. 기능을 선택할 때 누릅니다. / ‘SOURCE 버튼’ 비디오 신호를 선택합니다.(아날로그/클라이언트)
5. 아날로그 모드 에서는 자동조정이 되고 클라이언트 모드에서는 서버의 연결을 종료시키는데 사용합니다.
6. 모니터와 클라이언트 모드의 전원을 켜고 끌때 사용합니다.
 1
Client2

3
2.3
4

.ClientAnalog5
6
Buka kotak dan periksa isinya.





Aprire la confezione e controllarne il contenuto.
Abra a caixa e confirme o conteúdo.






구성품이 모두 들어 있는지 확인 하세요.
BN68-02338A-04.indd 1 2011-10-19 �� 11:21:05
  • Page 1 1
  • Page 2 2

Samsung SYNCMASTER NC190 Omaniku manuaal

Tüüp
Omaniku manuaal