
1
CR 1173
(GB) user manual - 4 (DE) bedienungsanweisung - 11
(FR) mode d'emploi - 18 (ES) manual de uso - 25
(PT) manual de serviço - 32 (LT) naudojimo instrukcija - 39
(RU) инструкция обслуживания - 102 (GR) οδηγίες χρήσεως - 80
(HU) felhasználói kézikönyv - 73 (BS) upute za rad - 66
(RO) Instrucţiunea de deservire - 59 (CZ) návod k obsluze - 96
(LV) lietošanas instrukcija - 46 (EST) kasutusjuhend - 53
(MK) упатство за корисникот - 88 (NL) handleiding - 110
(SL) navodila za uporabo - 117 (FI) manwal ng pagtuturo - 130
(PL) instrukcja obsługi - 179 (IT) istruzioni operative - 150
(HR) upute za uporabu - 124 (SV) instruktionsbok - 137
(DK) brugsanvisning - 164 (UA) інструкція з експлуатації-171
(SR) Корисничко упутство - 157 (SK) Používateľská príručka - 143

2
A

3
A
B

4
ENGLISH
1.Before using the product please read carefully and always comply with the following
instructions. The manufacturer is not responsible for any damages due to any misuse.
SAFETY CONDITIONS IMPORTANT INSTRUCTIONS ON SAFETY OF USE PLEASE
READ CAREFULLY AND KEEP FOR FUTURE REFERENCE
The warranty conditions are different, if the device is used for commercial purpose.
2.The product is only to be used indoors. Do not use the product for any purpose that is not
compatible with its application.
3.The applicable voltage is 230V, ~50Hz. For safety reasons it is not appropriate to
connect multiple devices to one power outlet.
4.Please be cautious when using around children. Do not let the children to play with the
product. Do not let children or people who do not know the device to use it without
supervision.
5.WARNING: This device may be used by children over 8 years of age and persons with
reduced physical, sensory or mental capabilities, or persons without experience or
knowledge of the device, only under the supervision of a person responsible for their
safety, or if they were instructed on the safe use of the device and are aware of the
dangers associated with its operation. Children should not play with the device. Cleaning
and maintenance of the device should not be carried out by children, unless they are over
8 years of age and these activities are carried out under supervision.
6.After you are finished using the product always remember to gently remove the plug from
the power outlet holding the outlet with your hand. Never pull the power cable!!!
7.Never put the power cable, the plug or the whole device into the water. Never expose the
product to the atmospheric conditions such as direct sun light or rain, etc.. Never use the
product in humid conditions.
8.Periodically check the power cable condition. If the power cable is damaged the product
should be turned to a professional service location to be replaced in order to avoid
hazardous situations.
9.Never use the product with a damaged power cable or if it was dropped or damaged in
any other way or if it does not work properly. Do not try to repair the defected product
yourself because it can lead to electric shock. Always turn the damaged device to a
professional service location in order to repair it. All the repairs can be done only by
authorized service professionals. The repair that was done incorrectly can cause
hazardous situations for the user.
10.Never put the product on or close to the hot or warm surfaces or the kitchen appliances
like the electric oven or gas burner.
11.Never use the product close to combustibles.
12.Do not let cord hang over edge of counter or touch hot surfaces.
13.Never leave the product connected to the power source without supervision. Even when
use is interrupted for a short time, turn it off from the network, unplug the power.
14.In order to provide additional protection, it is recommended to install residue current

5
2. Follow the polarity markings inside the battery compartment, and insert 2 x AAA batteries (not included) into the two battery slots located
in the battery compartment.
3. Replace the battery door.
device (RCD) in the power circuit, with residual current rating not more than 30 mA. Contact
professional electrician in this matter.
15. Avoid getting the device wet.
16. The device may only be wiped with a dry cloth. Do not use water or cleaning fluids.
17. The device should be kept in a dry room.
DEVICE:
1. POWER ON/OFF STANDBY INDICATOR 2.SOURCE 3.TIME SET/MEMORY BUTTON
4. TUNER CHANNEL - 5.AUX IN 6.USB 7.TUNER CHANNEL +
8. CD STOP BUTTON / BLUETOOTH PAIR BUTTON
9. CD / BLUETOOTH PLAY / PAUSE / RADIO AUTO SEARCH BUTTON
10. CD / BLUETOOTH SKIP PREVIOUS / TUNE - BUTTON
11. CD / BLUETOOTH SKIP NEXT / TUNE + BUTTON
12. VOLUME CONTROL KNOB 13.LCD DISPLAY
14. CD DOOR OPEN / CLOSE BUTTON 15.CD DOOR 16.FM ANTENNA
17. HEADPHONE JACK 18.RIGHT SPEAKER CONNECTOR 19.LEFT SPEAKER CONNECTOR
20. AC POWER CORD 21.BATTERY COMPARTMENT DOOR
REMOTE CONTROL:
1. POWER ON/OFF STANDBY INDICATOR 2.DISC DIRECT SEARCH BUTTON
3. PROG. BUTTON 4. CD/USB TRACK DOWN OR TIME DOWN BUTTON, TUNER DOWN BUTTON.
5. EQUALIZER BUTTON 6.REPEAT BUTTON 7.X-BASS BUTTON 8.TRACK DOWN BUTTON
9. CD / BLUETOOTH PLAY / PAUSE / RADIO AUTO SEARCH BUTTON
10. CD / BLUETOOTH SKIP PREVIOUS / TUNE - BUTTON
11. CD / BLUETOOTH SKIP NEXT / TUNE + BUTTON
12.CLOCK SET 13.LCD DISPLAY 14.CD DOOR OPEN / CLOSE BUTTON
15. CD DOOR 16.FM ANTENNA 17. HEADPHONE JACK
18. RIGHT SPEAKER CONNECTOR 19.LEFT SPEAKER CONNECTOR
20. RANDOM BUTTON AND INTRO BUTTON 21.BATTERY COMPARTMENT DOOR
22. BT PLAY / PAUSE BUTTON 23.VOLUM UP AN DOWN BUTTON
24. CD PLAY / PAUSE BUTTON 25.CD STOP BUTTON
SYSTEM CONNECTIONS
Make sure to unplug the AC power cord is unplugged from the wall outlet before making any connections.
AC Power Connection
Plug the AC power cord into an available 230V~ 50Hz AC Outlet. Make sure the plug is securely inserted into the AC outlet.
Installing the Batteries for the Battery Back-Up
1. Remove the battery compartment door located on the bottom of the main unit.
NOTES:
· When replacing the back-up batteries, do not disconnect the AC power cord from the wall outlet. If you do, all the current date time and
alarm settings will be erased.
· If the unit will be left unplugged for a long period of time, remove the batteries to avoid any damage that may occur if the batteries leak
and cause corrosion.
Remote Control
The remote control operates on one CR2025 3V lithium battery (included in the remote). To activate the remote control, remove the
insulator tab inserted in the battery compartment.
If the remote operation becomes intermittent or unsatisfactory, replace the original battery with a new CR2025 3V lithium battery.
1.Press down on the compartment cover, slide out the battery holder from the remote control case.
2.Replace the battery making sure the battery is installed correctly. The remote will not work if the battery is installed with the wrong polarity.
CAUTION:
1.) Danger of explosion if the battery is replaced incorrectly.
2.) Replace only with the same or equivalent type battery.
3.) Insert the battery holder back into the battery slot.
TURNING THE UNIT ON/OFF
1. In Off (standby) mode, tap the POWER / STANDBY Button (A1,B1) on main unit or remote control to turn the unit ON. The unit will turn
on, the last selected input mode icon will show on LCD display.
2. To turn the unit OFF (standby), tap the Power On POWER / STANDBY Button (A1,B1) on main unit or remote control again. The LCD
DISPLAY will go dim and show the current time. The standby mode indicator lights.

6
SETTING THE CLOCK
After plugging in the AC power, “00:00” will appear and start blinking on the LCD display.
1. In Power Off (Standby) mode, press and hold the CLOCK SET Button (B13) on remote control or main unit, the 24 HOUR format “24H”
will show in display.
2. Tap the Previous / Next Button (B4, B18) on remote control or main unit to select 24 Hour format if necessary. Otherwise, press the
CLOCK SET (B12) Button to confirm 12 Hour clock format and enter clock setup mode, Hour digits will be flashing.
3. Tap the Previous / Next Button (B4, B18) on remote control or main unit to adjust the hour. Press and hold the button for fast advance /
reverse setting.
Note: Make sure the hour is set so that the PM indicator is displayed correctly.
4. Press the CLOCK SET (B12) Button on remote control to confirm the hour setting, the minute digits will flash to prompt for input.
5. Tap the Previous / Next Button (B4, B18)on remote control or main unit to adjust the minute. Press and hold the button for fast advance
/ reverse setting.
6. Press the CLOCK SET (B12) Button on remote control again to complete the setting.
NOTE: The clock and radio station presets will need to be reset if the power is interrupted or in the event of a power outage. “00:00” will
appear and start blinking on the LCD display to notify you that the power was interrupted and the clock will need to be reset. Please
follow steps 1-6 above to reset the clock.
CHECKING THE CLOCK
The unit will show the current time in standby mode. To check the current time in Power ON mode, press and hold the CLOCK SET (B12)
Button on main unit or remote control for 3 seconds, the current time will show for 5 seconds and then return to the previous screen.
ALARM OPERATION (REMOTE CONTROL ONLY)
SETTING THE ALARM CLOCK
This function allows the system to turn on automatically and wake you using a beeping alarm, the CD, USB or BU the RADIO.
1. Press and hold the TIMER (B13) button on the remote control until the display shows “On ”, and the hour digits flash.
2. Press the Previous / Next Button (B4, B18) buttons to adjust the hour digits, and then press the TIMER button to confirm. The minute
digits will flash on the display.
3. Press the Previous / Next Button (B4, B18)buttons to adjust the minute digits, and then press the TIMER (B13) button to confirm.
4. When the Previous / Next Button (B4, B18) On Timer Clock set is set, the display will show “OFF” and the hour digits will flash.
5. Press the Previous / Next Button (B4, B18) buttons to adjust the hour digits, and then press the TIMER (B13) button to confirm. The
minute digits will flash on the display.
6. Press the Previous / Next Button (B4, B18) buttons on the remote control to adjust the minute digits, and then press the TIMER button to
confirm.
7. Press the buttons to select CD, USB ,BT or FM mode, then press the TIMER (B13) button to confirm. The display will show “VOL#” and
flash.
Press the Previous / Next Button (B4, B18) buttons to adjust the volume, and then press the TIMER button to confirm.
8. Press the TIMER (B13) button to select "Timer On", and the Timer is now
set.
9. In standby mode, the Timer Icon will show on the display to indicate the Timer is On.
NOTE:
1.) If “Wake to CD, USB” is selected but a CD is not inserted, the alarm will default to the Beeping Alarm automatically when the alarm
wake time is reached.
2.) For 'Wake to Radio”, the system will default to the last FM radio station listened to before switching off.
3.) The crescendo alarm will increase to the volume level you have set.
ACTIVE/DE-ACTIVE ALARM FUNCTION
1. To active ALARM, tap the TIMER (B13) Button once, and the alarm icon will show on LCD display.
2. Cancel the ALARM function by tapping on the TIMER (B13) Button again. The alarm icon will go off.
Wake to Radio, CD, USB or BUZZER Alarm
· When the alarm time is reached, the CD, USB or radio beeping alarm will sound for 60 minutes then shut off and reset itself for the
following day (without pressing the snooze button).
· To stop the alarm immediately after it sounds, tap the POWER / STANDBY Button (A1,B1) on remote control or on main unit once. It
resets itself for the following day.
· To cancel the following day alarm, tap the TIMER (B13) BUTTON once, ALARM icon goes off.
RADIO OPERATION
1. Tap the POWER / STANDBY Button (A1,B1) on main unit or remote control to turn on the unit.
2. Tap the SOURCE Button (A1, B11) on main unit or remote control to select FM mode, the FM radio frequency appear in display.
3. To manually tune to a specific radio station, tap the Track Down, Track up (A10, A11, B8, B18) on either main unit or remote control
repeatedly. Use the manual tuning method to tune in weaker stations that are bypassed during Automatic Tuning.
4. To automatically tune to the next available radio station, press and hold the Track Down Button (A10, A11, B8, B18) on main unit or
remote control for 1-2 seconds until frequency readout on the display begins to scan and then release the button. The tuner will stop
scanning when it receives the next broadcasting station of adequate signal strength.
5. Press the volume control on main unit or remote control to adjust the volume control to the desired volume level.
FM / FM Stereo reception

7
When listening to the FM radio, press the ST./ MONO Button (B16) on remote control to switch between stereo mode and mono mode. The
FM stereo icon “ST” will appear on the display if unit is in stereo mode. It is preferable to receive the program in mono when you are
receiving a weak station.
HINTS FOR BEST RECEPTION:
FM - For best FM reception, the FM lead wire antenna located on the back of the unit
should be fully unwrapped and extended.
NOTE: Automatic tuning depends on the signal strength of the broadcasting station, so weak stations may be skipped. You can manually
tune to find the weak stations if a station gets skipped. With strong signals, the tuner may stop before it reaches the actual broadcast
frequency, so you may need to manually tune for the best reception.
PRESET RADIO STATIONS
1. Press the POWER / STANDBY Button (A1,B1) on main unit or remote control to turn on the unit.
2. Tap the SOURCE Button (A1, B11) on main unit or remote control to select FM radio mode.
3. Press and hold tap the Track Down, Track up (A10, A11, B8, B18) button on main unit or remote control until frequency readout on the
display begins to scan and then release the button for auto search and program preset channels. “PROG” appears in display and
flashing. Auto searching and program will stop at P01 after scan finished, “PROG” shows in display steadily.
Note: If the channels stored during the auto search & programmed preset are not ones you want saved, use the method below for the
manually saving radio presets.
4. Tune to the desired radio station either by “manually” or “automatically” tuning method.
5. Tap the PROG. (B3) on remote control, the next available preset memory number and a flashing PROG. (B3) icon will show in the LCD
display. (Note: ”P01” will show in the display if you are programming preset for first time)
6. Tap the PRE. Button (B15, B19) on main unit or remote control to select the preset number you want to assign the station to.
7. Tap the PROG. (B3) Button to confirm the setting.
8. Repeat above steps 4 - 8 to preset up to 30 FM stations.
RECALLING PRESET MEMORY CHANNELS
In radio mode, recall the pre-set channels by pressing the PRE. Button (B15, B19) on remote control repeatedly.
CD PLAYER OPERATION
Note:
1. This CD player will not only play commercial CDs, but also self-compiled CD-R/RW,MP3 discs. Do not attempt to play CD-ROM, CDI,
VCD, DVD or computer CDs.
2. MP3 is a form of compression. It is an acronym which stands for MPEG Audio Layer 3. MP3 is a type of audio code which is processed
by significant compression from the original audio source with very little loss in sound quality.
● This system supports MPEG 1 Layer 3 and VBR files.
● During VBR file playback, time counter in the display may differ from its actual playback time.
● Bitrate which is supported by MP3 is 32 ~ 320 kbps
PLEASE READ THIS IMPORTANT INFORMATION:
CD mechanisms used in devices like this are designed to read all commercial CDs. It will also read self-compiled CD-R/CD-RW,MP3 discs,
but it may take up to 10 seconds for the actual playback to begin. If playback does not start, it is likely due to the quality of the CD-
R/RW ,MP3 disc and/or the compatibility of the CD compilation software. The manufacturer is not responsible for the playback quality of
CD-R/RW ,MP3 discs.
Do not attach a label or seal to either side of the CD-R/RW,MP3 disc. It may cause a malfunction.
PLAYING A CD
1. Press the POWER / STANDBY Button (A1,B1) on main unit or remote control to turn on the unit.
2. Tap the SOURCE Button (A1, B11) on remote control or main unit to select CD mode and then press the Open the disc compartment.
3. Place an audio CD on the center spindle with its label side facing out towards the CD DOOR. Close the disc compartment.
4. Unit starts to read the disc, “---” shows in display and flashing. After few seconds, the total number of tracks show one second and then
total time of the CD will be shown on the LCD DISPLAY.
5. Press the PLAY / PAUSE (A9, B22) Button on main unit or remote control, PLAY indicator shows in display, the CD will start playing
from first track.
6. Press the volume control Adjust the volume . on main unit or remote control to adjust to the desired volume level.
7. To pause playback, press the PLAY / PAUSE (A9, B22) Button on main unit or remote control. The track time will be paused and PAUSE
indicator will show in display. To resume playing, press the CD PLAY / PAUSE (A9, B22) Button again.
8. You can choose to play your favorite track directly by pressing either the Track Down, Track up (A10, A11, B8, B18) . The LCD Display
will indicate the correct track number selected.
9. To locate a particular section within a track, press and hold the Track Down, Track up (A10, A11, B8, B18) until the section is found.
Release the button to continue playing your selection.
10. To stop playing, press the STOP (A8, B25) button.
PROCEDURE TO PLAYBACK MP3 DISC
To play back CD-R/RW,MP3
1 Press the SOURCE Button (A1, B11) on the remote control, and load an MP3 disc.
2 Press the FOLDER (B15, B19) button to select desired playback folder.
3 Select desired file to be played back by pressing the Track Down, Track up (A10, A11, B8, B18) Button.
4 Press the PLAY / PAUSE (A9, B22). Playback will start and file name will be displayed.

8
s In case of playback with the folder mode on, press the FOLDER (B15, B19) button, and the folder can be selected even though it is in
playback/pause mode. It will continue playback/pause mode in the 1st track of the selected folder.
TO PLAY BACK USB/MP3 PLAYER WITH FOLDER
1. Press the SOURCE Button (A1, B11) on the remote control or SOURCE Button (A1, B11) repeatedly on main unit to select USB function.
Connect the USB memory device that has MP3 format files on the unit. When the USB memory is connected to the main unit, the
device information will be displayed.
2. Press the FOLDER (B15, B19) button to select desired playback folder. To start playback with folder mode on, go to step .
3. Select desired file to be played back by pressing the Track Down, Track up (A10, A11, B8, B18) button.
4. Press the PLAY / PAUSE (A9, B22). Playback will start and the file name will be displayed.
NOTE:
· This product is not compatible with MTP and AAC file systems from USB mass storage device or MP3 player.
· This unit supports FAT16 and FAT32, but some USB storage media may not support both file systems. For details, refer to the
operation manual of the USB storage device in question or contact the manufacturer.
SKIP AND SEARCH MODE
1. During Play or Pause mode, tap the Track Down, Track up (A10, A11, B8, B18) Button to go to the next track or go back to the
beginning of the current track.
2. During playback, press and hold the Track Down, Track up (A10, A11, B8, B18) to search within the current track with audible high
speed playback.
DIFFERENT PLAY MODES (REMOTE CONTROL ONLY)
Press the REPEAT Button (B6) on remote control repeatedly to select different of play modes when CD is playing.
When playing CD, the play modes are shown as below:
Repeat
Repeat All
Normal
REPEAT 1 - the track being played and will repeat continuously. Repeat one icon “REPEAT 1” shows in display.
REPEAT ALL - all tracks will repeat continuously. Repeat All icon “REPEAT ALL” shows in display.
RANDOM PLAY
When the RANDOM (B20) button is pressed three, the “RDM “indicator will light in the LCD display. The tracks on the disc can be played in
random order automatically.
To Cancel Random Play:
Press the RANDOM (B20) button again. “RDM” indicator will disappear.
NOTE:
If you press the button during random play, you can move to the track selected next by the random operation. On the other hand, the
button does not allow you to move to the previous track. The beginning of the track being played will be located.
In random play, the unit will select and play tracks automatically. (You cannot select the order of the tracks.)
INTRO PLAYBACK
1. Press INTRO (B20) on the remote control. The “ INTRO (B20) ” indicator will show on the display.
The unit will play the first 10 seconds of each track.
2. Press INTRO (B20) on the remote control again to resume normal playback.
PLAY TRACK SEQUENCE PROGRAMMING
This function allows the tracks to be played in a programmed sequence. User can program up to 32 tracks in CD mode or 99 tracks in MP3
in any
NOTE: Program can only be set in STOP mode.
1. Tap the PROG. Button (B3) on remote control, the program number “1” shows in display, “PROG” icon and CD track number “- -“ also
flashing in the LCD display. (Note: ”1 --” will be in the display if you are programming first time).
2. Use the Track Down, Track up (A10, A11, B8, B18) on main unit or remote control to select the desired track. The track number will be
shown in display.
3. Tap the PROG. Button (B3) on main unit or remote control to store the selected track in the memory, the next program number will
advance one (i.e.“2”) in LCD display.
4. Repeat steps 2 to 3 to store more tracks in the memory. You can store up to CD 32 track,MP3 99 tracks. Display will show “FUL” after
tracks have been programmed.
5. Tap the PLAY / PAUSE (A9, B22). on main unit or remote control to start playing the CD in the programmed sequence.
6. Press the REPEAT Button (B6) on remote control to select Repeat 1/All if necessary.
7. To stop playing, press the STOP Button (A8, B25) on main unit or remote control.
To cancel the program play, press the STOP Button (A8, B25) on main unit or remote control twice, “PROG” icon disappears from display.
BLUETOOTH OPERATION
Press the POWER / STANDBY Button (A1,B1) to turn ON the unit and follow the directions below to connect via Bluetooth.
PAIRING (Linking) a BLUETOOTH ENABLED cell phone OR OTHER BLUETOOTH ENABLED DEVICE to the Device
If the CR 1173 has never been paired with a Bluetooth device before. You need to follow the pairing instructions below to link the Device
with your Bluetooth device.
1. Press the POWER / STANDBY Button (A1,B1) on main unit or remote control to turn on the unit.

9
2. Tap the SOURCE Button (A1, B11) on main or remote control to select Bluetooth mode, Bluetooth “bt” message appears in display and
flashing.
3. If the CR 1173 has never been paired with a Bluetooth device before or cannot find the last paired device, the flashing “bt” on LCD will
indicate the XXX is in search mode. You need to follow the pairing instructions below to link the Device with your Bluetooth device.
· Turn on the Bluetooth function of your Bluetooth device and enable the search or scan function to find the CR 1173.
· Select " CR 1173 " from the device list when it appears on your device screen. If required, enter the pass code “0000” to pair (link) the
CR 1173 with your device.
4. After successfully pairing (linking), display will change to show “bt” steadily, the Bluetooth icon also will show in display. You can begin
playing music from your Bluetooth device wirelessly to the speaker.
5. After selecting your favorite song, press PLAY PAUSE (B22, A9) Button on the unit or remote control to play or pause the song.
6. Press the volume control on main unit or remote control to adjust to the desired volume level.
7. Press Track Down, Track up (B8, B9) Button on main unit or remote control to skip to previous or next song.
8. If you want to pair the Device with another Bluetooth enabled device, press and hold the PAIR (B10) Button for 3 seconds or turn off the
Bluetooth function of device currently paired with Device then repeat step 3 above.
Notes:
1.) Refer to the manual of your cell phone, tablet PC, computer or other Bluetooth enabled devices for Bluetooth operation since it may
vary from model to model.
2.) If your Bluetooth enabled device does not support A2DP profile, it will not play the music through the speaker, even if paired (linked).
3.) If you are pairing (linking) your computer to the unit using Bluetooth, you may need to set the speaker as your computer's default sound
device.
AUXILIARY INPUT OPERATION
This unit features an auxiliary audio signal input jack for connecting external audio devices like MP3 players, Digital Audio Device and listen
to them through the speakers of this unit.
1. Use an audio cable (not included) with one 3.5 mm stereo plug on each end of the cable.
2. Plug one end into the AUX IN JACK (A5) on main unit and the other end of the cable into the Line-out Jack or Headphone Jack of your
external audio device.
3. Turn on the unit and external audio device.
4. Tap the SOURCE Button (A1, B11) on main or remote control to select AUX mode, “AUX” icon turns on, display shows “AUX” message.
5. The volume level can now be controlled through the main unit. Operate all other functions on the auxiliary device as usual.
Note:
· If you connect this unit to the Line-Out Jack of your external device then you only need to adjust the volume control of this unit. If you
connect the Headphone Jack of your external device then you may need to adjust both the volume controls of your external device and
this unit to obtain the desirable volume setting.
PRESET EQ (REMOTE CONTROL ONLY)
This unit provides 4 different EQ modes to enhance your listening experience. You can select the desired effect by pressing the EQ Button
(B5) on remote control repeatedly at following sequence:
ROCK POP JAZZ CLASSIC OFF
MUTE BUTTON (REMOTE CONTROL ONLY)
· Press the MUTE Button (B21) on remote control to mute the sound output from the speaker temporarily. The “V 00” will appear in
display.
· Press the MUTE Button (B21) again or VOLUME CONTROL (B23, A12) to resume the normal speaker playback.
SLEEP OPERATIONS (REMOTE CONTROL ONLY)
The sleep timer allows you to turn the unit off after a designated time is reached.
1. To activate the sleep timer, turn the unit on and tap the SOURCE Button (A1, B11) to select FM radio, CD, USB, Bluetooth or listening to
music via AUX IN.
2. Tap the SLEEP button (B14) on remote control, the sleep time icon “SLEEP” appears on the display.
3. Repeatedly tap the SLEEP button (B14) to select a sleep time. The unit will turn off after 10, 20, 30, 40, 50, 60, 70, 80 or 90 minutes.
Wait for 3 seconds after your selection for the unit to confirm the selection, the unit will play for the selected length of time then
automatically turn off.
4. To cancel the sleep timer, tap the SLEEP button (B14) repeatedly until timer shows “OFF”, the sleep time icon “SLEEP” disappears on
the display
5. To turn the unit off before the selected length of time, press the POWER / STANDBY Button (A1,B1) at any time.
Notes:
1.) To check the remaining sleep time, tap the SLEEP button (B14) once.
2.) If you are falling asleep to music from an external device connected to the AUX input, the sleep timer will shut off the power to this
system but it will not turn off the external device.
USING HEADPHONES (NOT INCLUDED)
Inserting the plug of your headphones into the Stereo Headphone Jack (A17) will enable you to listen to the CD or Radio music in private.
When using headphones, the Built-in Speakers will be disconnected.
READ THIS IMPORTANT INFORMATION BEFORE USING YOUR HEADPHONES
1. Avoid extended play at very high volume as it may impair your hearing.
2. If you experience ringing in your ears, reduce the volume or shut off your unit.

10
3. Keep the volume at a reasonable level even if your headset is an open-air type designed to allow you to hear outside sounds. Please
note that excessively high volume may still block outside sounds.
RESETTING
If the system does not respond or has erratic operation, you may have experienced an electrostatic discharge (ESD) or a power surge that
triggered the internal computer to shut down automatically. If this occurs, unplug the AC cord from power source, wait for 60 seconds,
then plug the AC cord to power source again. The unit will be reset, you need to setup the clock, alarm and preset radio channels.
CARE AND MAINTENANCE
1. Do not subject the unit to excessive force, shock, dust or extreme temperature (Above 40C).
2. Do not tamper the internal components of the unit.
3. Clean your unit with a dry cloth. Solvent or detergent should never be used.
4. Avoid leaving your unit in direct sunlight or in hot, humid or dusty places.
5. Keep your unit away from heating appliances and sources of electrical noise such as fluorescent lamps or motors.
6. If drop-outs or interruptions occur in the music during CD play, or if the CD fails to play at all, its bottom surface may require cleaning.
Before playing, wipe the disc from the center outwards with a good soft cleaning cloth.
CLEANING THE UNIT
· To prevent fire or shock hazard, disconnect your unit from the AC power source when cleaning.
· The finish on the unit may be cleaned with a dust cloth and cared for as other furniture, Use caution when cleaning and wiping the
plastic parts.
· If the cabinet becomes dusty wipe it with a soft dry dust cloth. Do not use any wax or polish sprays on the cabinet.
· If the front panel becomes dirty or smudged with fingerprints it may be cleaned with a soft cloth slightly dampened with a mild soap and
water solution. Never use abrasive cloths or polishes as these will damage the finish of your unit.
CAUTION: Never allow any water or other liquids to get inside the unit while cleaning
Technical Data:
Power Requirements:
Main Unit: 230V ~ 50Hz
Remote: CR2025 3V
DISC player section
System: Compact disc and digital audio system Laser Diode Properties
Emission Duration: Continuous
Laser Output : Less than 44.6Μw (This output is the value measurement at a distance of 200mm from the objective
lens surface on the Optical Pick-up Block with 7mm aperture.)
Frequency Range
FM tuner section:
Tuning range: 87.5 MHz-108.0 MHz (50 kHz step.)
Speaker Power: 2x 5W
Max: 28W
To protect your environment: please separate carton boxes and plastic bags and dispose them in corresponding waste bins.
Used appliance should be delivered to the dedicated collecting points due to hazarsous components, which may effect the
environment. Do not dispose this appliance in the common waste bin.

11
DEUTSCH
SICHERHEITSBEDINGUNGEN WICHTIGE HINWEISE ZUR SICHERHEIT DER
VERWENDUNG BITTE SORGFÄLTIG DURCHLESEN UND AUFBEWAHREN
Die Garantiebedingungen sind unterschiedlich, wenn das Gerät zu gewerblichen Zwecken
verwendet wird.
1. Bevor Sie das Produkt verwenden, lesen Sie es bitte sorgfältig und befolgen Sie die
folgenden Anweisungen. Der Hersteller haftet nicht für Schäden aufgrund von Missbrauch.
2. Das Produkt darf nur in Innenräumen verwendet werden. Verwenden Sie das Produkt
nicht für Zwecke, die nicht mit seiner Anwendung kompatibel sind.
3.Die anwendbare Spannung beträgt 230V, ~ 50Hz. Aus Sicherheitsgründen ist es nicht
angebracht, mehrere Geräte an eine Steckdose anzuschließen.
4.Bitte seien Sie vorsichtig, wenn Sie mit Kindern arbeiten. Lassen Sie die Kinder nicht mit
dem Produkt spielen. Lassen Sie Kinder oder Personen, die das Gerät nicht kennen, es nicht
unbeaufsichtigt benutzen.
5.WARNUNG: Dieses Gerät darf von Kindern über 8 Jahren und Personen mit
eingeschränkter körperlicher, sensorischer oder geistiger Leistungsfähigkeit oder von
Personen ohne Erfahrung oder Kenntnis des Geräts nur unter Aufsicht einer für ihre
Sicherheit verantwortlichen Person verwendet werden wenn sie über die sichere
Verwendung des Geräts unterrichtet wurden und sich der Gefahren bewusst sind, die mit
dem Betrieb des Geräts verbunden sind. Kinder sollten nicht mit dem Gerät spielen. Die
Reinigung und Wartung des Geräts darf nicht von Kindern durchgeführt werden, es sei denn,
sie sind über 8 Jahre alt und diese Aktivitäten werden unter Aufsicht durchgeführt.
6. Vergessen Sie nicht, den Stecker nach der Verwendung des Produkts vorsichtig aus der
Steckdose zu ziehen, indem Sie die Steckdose mit der Hand halten. Niemals am Netzkabel
ziehen !!!
7. Stecken Sie das Netzkabel, den Stecker oder das gesamte Gerät niemals ins Wasser.
Setzen Sie das Produkt niemals den Witterungsbedingungen wie direktem Sonnenlicht oder
Regen usw. aus. Verwenden Sie das Produkt niemals in feuchter Umgebung.
8.Überprüfen Sie regelmäßig den Zustand des Netzkabels. Wenn das Netzkabel beschädigt
ist, sollte das Produkt zu einem professionellen Kundendienst gebracht werden, um es zu
ersetzen, um gefährliche Situationen zu vermeiden.
9.Verwenden Sie das Produkt niemals mit einem beschädigten Netzkabel, wenn es
heruntergefallen ist oder auf andere Weise beschädigt wurde oder nicht ordnungsgemäß
funktioniert. Versuchen Sie nicht, das defekte Produkt selbst zu reparieren, da dies zu einem
elektrischen Schlag führen kann. Schalten Sie das beschädigte Gerät immer an einem
qualifizierten Servicestandort aus, um es zu reparieren. Alle Reparaturen können nur von
autorisierten Servicefachkräften ausgeführt werden. Die falsch durchgeführte Reparatur
kann zu gefährlichen Situationen für den Benutzer führen.
10.Stellen Sie das Produkt niemals auf oder in die Nähe von heißen oder warmen
Oberflächen oder Küchengeräten wie dem Elektroherd oder dem Gasbrenner.
11. Verwenden Sie das Produkt niemals in der Nähe von brennbaren Stoffen.
12. Lassen Sie das Kabel nicht über die Kante der Theke hängen oder heiße Oberflächen
berühren.
13.Lassen Sie das Produkt niemals unbeaufsichtigt an der Stromquelle an. Schalten Sie das
Gerät auch dann aus, wenn der Betrieb kurzzeitig unterbrochen wird, und ziehen Sie den
Netzstecker.
14.Um zusätzlichen Schutz zu gewährleisten, wird empfohlen, einen
Fehlerstromschutzschalter (RCD) in den Stromkreis einzubauen, dessen Nennstrom nicht
mehr als 30 mA beträgt. Wenden Sie sich in dieser Angelegenheit an einen Elektriker.
15. Vermeiden Sie, dass das Radio nass wird.

12
16. Das Radio darf nur mit einem trockenen Tuch abgewischt werden. Verwenden Sie kein
Wasser oder Reinigungsflüssigkeiten.
17. Das Radio sollte in einem trockenen Raum aufbewahrt werden.
GERÄT:
1. STANDBY-ANZEIGE EIN- / AUSSCHALTEN 2. QUELLE 3. ZEITSET / SPEICHER-TASTE
4. TUNER CHANNEL - 5.AUX IN 6.USB 7.TUNER CHANNEL +
8. CD-STOP-TASTE / BLUETOOTH-PAAR-TASTE
9. CD / BLUETOOTH PLAY / PAUSE / RADIO AUTO SEARCH-TASTE
10. CD / BLUETOOTH SKIP PREVIOUS / TUNE - TASTE
11. CD / BLUETOOTH SKIP NEXT / TUNE + BUTTON
12. VOLUMENKONTROLLKNOPF 13.LCD-ANZEIGE
14. Taste zum Öffnen / Schließen der CD-Tür 15. CD-Tür 16.FM-ANTENNE
17. KOPFHÖRERBUCHSE 18. RECHTER LAUTSPRECHERANSCHLUSS 19. LINKER LAUTSPRECHERANSCHLUSS
20. AC-STROMKABEL 21. TÜR DES BATTERIEABTEILS
FERNBEDIENUNG:
1. POWER ON / OFF STANDBY INDICATOR 2.DISC DIRECT SEARCH BUTTON
3. PROG . TASTE 4. CD / USB TRACK DOWN- ODER TIME DOWN-TASTE, TUNER DOWN-TASTE.
5. AUSGLEICHSTASTE 6. WIEDERHOLUNGSTASTE 7.X-BASS-TASTE 8. TRACK DOWN-TASTE
9. CD / BLUETOOTH PLAY / PAUSE / RADIO AUTO SEARCH-TASTE
10. CD / BLUETOOTH SKIP PREVIOUS / TUNE - TASTE
11. CD / BLUETOOTH SKIP NEXT / TUNE + BUTTON
12.UHR SET 13.LCD DISPLAY 14.CD TÜR ÖFFNEN / SCHLIESSEN
15. CD DOOR 16.FM ANTENNE 17. HEADPHONE JACK
18. RECHTER LAUTSPRECHERANSCHLUSS 19. LINKER LAUTSPRECHERANSCHLUSS
20. ZUFÄLLIGE TASTE UND EINGABETASTE 21. TÜR DES BATTERIEABTEILS
22. BT PLAY / PAUSE-TASTE 23.VOLUM UP A DOWN-TASTE
24. CD-PLAY / PAUSE-TASTE 25.CD STOP-TASTE
SYSTEMANSCHLÜSSE
Stellen Sie sicher, dass das Netzkabel aus der Steckdose gezogen ist, bevor Sie Verbindungen herstellen.
Wechselstromanschluss
Stecken Sie das Netzkabel in eine verfügbare 230V ~ 50Hz Wechselstromsteckdose. Stellen Sie sicher, dass der Stecker fest in der
Steckdose steckt.
Einlegen der Batterien für die Batteriesicherung
1. Entfernen Sie die Batteriefachabdeckung an der Unterseite des Hauptgeräts.
2. Befolgen Sie die Polaritätsmarkierungen im Batteriefach und legen Sie 2 x AAA-Batterien (nicht im Lieferumfang enthalten) in die beiden
Batteriefächer im Batteriefach ein.
3. Setzen Sie das Batteriefach wieder ein.
ANMERKUNGEN:
· Ziehen Sie beim Ersetzen der Pufferbatterien das Netzkabel nicht aus der Steckdose. In diesem Fall werden alle aktuellen Einstellungen
für Datum, Uhrzeit und Alarm gelöscht.
· Wenn das Gerät längere Zeit nicht angeschlossen ist, entfernen Sie die Batterien, um Schäden zu vermeiden, die auftreten können, wenn
die Batterien auslaufen und Korrosion verursachen.
Fernbedienung
Die Fernbedienung wird mit einer 3-V-Lithiumbatterie CR2025 (in der Fernbedienung enthalten) betrieben. Entfernen Sie zum Aktivieren der
Fernbedienung die Isolatorlasche im Batteriefach.
Wenn die Fernbedienung zeitweise oder unbefriedigend wird, ersetzen Sie die Originalbatterie durch eine neue 3-V-Lithiumbatterie Cr2025.
1.Drücken Sie auf den Fachdeckel und schieben Sie den Batteriehalter aus dem Fernbedienungsgehäuse.
2. Tauschen Sie den Akku aus und stellen Sie sicher, dass der Akku richtig eingelegt ist. Die Fernbedienung funktioniert nicht, wenn der
Akku mit der falschen Polarität installiert ist.
VORSICHT:
1.) Explosionsgefahr bei falschem Batteriewechsel.
2.) Nur durch dieselbe oder eine gleichwertige Batterie ersetzen.
3.) Setzen Sie den Batteriehalter wieder in den Batteriefach ein.
EIN- / AUSSCHALTEN DES GERÄTS
1. Tippen Sie im Aus-Modus (Standby-Modus) auf die POWER / STANDBY-Taste (A1, B1) am Hauptgerät oder an der Fernbedienung, um
das Gerät einzuschalten. Das Gerät schaltet sich ein und das zuletzt ausgewählte Eingabemodus-Symbol wird auf dem LCD-Display
angezeigt.
2. Um das Gerät auszuschalten (Standby), tippen Sie erneut auf die Power On POWER / STANDBY-Taste (A1, B1) am Hauptgerät oder an
der Fernbedienung. Das LCD-DISPLAY wird dunkel und zeigt die aktuelle Uhrzeit an. Die Standby-Modus-Anzeige leuchtet.
UHR EINSTELLEN
Nach dem Anschließen der Wechselstromversorgung erscheint „00:00“ und beginnt auf dem LCD-Display zu blinken.
1. Halten Sie im Ausschaltmodus (Standby) die CLOCK SET-Taste (B13) auf der Fernbedienung oder dem Hauptgerät gedrückt. Das 24-

13
Stunden-Format „24H“ wird im Display angezeigt.
2. Tippen Sie auf die Schaltfläche Zurück / Weiter (B4, B18) auf der Fernbedienung oder dem Hauptgerät, um bei Bedarf das 24-Stunden-
Format auszuwählen. Andernfalls drücken Sie die CLOCK SET (B12) -Taste, um das 12-Stunden-Format zu bestätigen und den Uhren-
Setup-Modus aufzurufen. Die Stundenziffern blinken.
3. Tippen Sie auf die Schaltfläche Zurück / Weiter (B4, B18) auf der Fernbedienung oder dem Hauptgerät, um die Stunde einzustellen.
Halten Sie die Taste gedrückt, um schnell vor- und rückwärts einzustellen.
Hinweis: Stellen Sie sicher, dass die Stunde so eingestellt ist, dass die PM-Anzeige korrekt angezeigt wird.
4. Drücken Sie die Taste CLOCK SET (B12) auf der Fernbedienung, um die Stundeneinstellung zu bestätigen. Die Minutenziffern blinken,
um zur Eingabe aufzufordern.
5. Tippen Sie auf die Schaltfläche Zurück / Weiter (B4, B18) auf der Fernbedienung oder dem Hauptgerät, um die Minute einzustellen.
Halten Sie die Taste gedrückt, um schnell vor- und rückwärts einzustellen.
6. Drücken Sie erneut die Taste CLOCK SET (B12) auf der Fernbedienung, um die Einstellung abzuschließen.
HINWEIS: Die Voreinstellungen für Uhr und Radiosender müssen zurückgesetzt werden, wenn die Stromversorgung unterbrochen wird
oder wenn ein Stromausfall auftritt. Auf dem LCD-Display wird „00:00“ angezeigt und beginnt zu blinken, um Sie darüber zu informieren,
dass die Stromversorgung unterbrochen wurde und die Uhr zurückgesetzt werden muss. Bitte befolgen Sie die obigen Schritte 1-6, um die
Uhr zurückzusetzen.
UHR PRÜFEN
Das Gerät zeigt die aktuelle Zeit im Standby-Modus an. Um die aktuelle Uhrzeit im Einschaltmodus zu überprüfen, halten Sie die Taste
CLOCK SET (B12) am Hauptgerät oder an der Fernbedienung 3 Sekunden lang gedrückt. Die aktuelle Uhrzeit wird 5 Sekunden lang
angezeigt und kehrt dann zum vorherigen Bildschirm zurück.
ALARMBETRIEB (NUR FERNBEDIENUNG)
EINSTELLEN DER ALARMUHR
Diese Funktion ermöglicht es dem System, sich automatisch einzuschalten und Sie mit einem Piepton zu wecken, der CD, USB oder BU
das RADIO.
1. Halten Sie die TIMER-Taste (B13) auf der Fernbedienung gedrückt, bis auf dem Display „Ein“ angezeigt wird und die Stundenziffern
blinken.
2. Drücken Sie die Tasten Zurück / Weiter (B4, B18), um die Stundenziffern anzupassen, und drücken Sie dann zur Bestätigung die Taste
TIMER. Die Minutenziffern blinken auf dem Display.
3. Drücken Sie die Tasten Zurück / Weiter (B4, B18), um die Minuten einzustellen, und drücken Sie dann zur Bestätigung die Taste TIMER
(B13).
4. Wenn die vorherige / nächste Taste (B4, B18) auf Timer Clock eingestellt ist, zeigt das Display „OFF“ an und die Stundenziffern blinken.
5. Drücken Sie die Tasten Zurück / Weiter (B4, B18), um die Stundenziffern anzupassen, und drücken Sie dann zur Bestätigung die Taste
TIMER (B13). Die Minutenziffern blinken auf dem Display.
6. Drücken Sie die Tasten Zurück / Weiter (B4, B18) auf der Fernbedienung, um die Minuten einzustellen, und drücken Sie dann zur
Bestätigung die Taste TIMER.
7. Drücken Sie die Tasten, um den CD-, USB-, BT- oder FM-Modus auszuwählen, und drücken Sie dann zur Bestätigung die TIMER-Taste
(B13). Das Display zeigt "VOL #" und blinkt.
Drücken Sie die Tasten Zurück / Weiter (B4, B18), um die Lautstärke einzustellen, und drücken Sie dann zur Bestätigung die Taste TIMER.
8. Drücken Sie die Taste TIMER (B13), um "Timer ein" auszuwählen. Der Timer ist jetzt einstellen.
9. Im Standby-Modus wird das Timer-Symbol auf dem Display angezeigt, um anzuzeigen, dass der Timer eingeschaltet ist.
HINWEIS:
1.) Wenn „Auf CD wecken, USB“ ausgewählt ist, aber keine CD eingelegt ist, wird der Alarm standardmäßig automatisch auf den Alarmton
piepen eingestellt, wenn die Weckzeit des Alarms erreicht ist.
2.) Für 'Wake to Radio' wählt das System standardmäßig den zuletzt FM-Radiosender, der vor dem Ausschalten gehört wurde.
3.) Der Crescendo-Alarm erhöht sich auf die von Ihnen eingestellte Lautstärke.
AKTIVE / DEAKTIVE ALARMFUNKTION
1. Um ALARM zu aktivieren, tippen Sie einmal auf die TIMER-Taste (B13). Das Alarmsymbol wird auf dem LCD-Display angezeigt.
2. Brechen Sie die ALARM-Funktion ab, indem Sie erneut auf die TIMER-Taste (B13) tippen. Das Alarmsymbol erlischt.
Aktivieren Sie den Radio-, CD-, USB- oder Summer-Alarm
· Wenn die Alarmzeit erreicht ist, ertönt 60 Minuten lang ein CD-, USB- oder Radio-Piepton, der sich dann ausschaltet und für den nächsten
Tag zurücksetzt (ohne die Schlummertaste zu drücken).
· Um den Alarm sofort nach dem Ertönen zu stoppen, tippen Sie einmal auf die POWER / STANDBY-Taste (A1, B1) auf der Fernbedienung
oder am Hauptgerät. Es setzt sich für den nächsten Tag zurück.
· Um den Alarm am nächsten Tag abzubrechen, tippen Sie einmal auf die Taste TIMER (B13). Das Symbol ALARM erlischt.
FUNKBETRIEB
1. Tippen Sie auf die POWER / STANDBY-Taste (A1, B1) am Hauptgerät oder an der Fernbedienung, um das Gerät einzuschalten.
2. Tippen Sie auf die SOURCE-Taste (A1, B11) am Hauptgerät oder an der Fernbedienung, um den FM-Modus auszuwählen. Die FM-
Radiofrequenz wird im Display angezeigt.
3. Um einen bestimmten Radiosender manuell einzustellen, tippen Sie wiederholt auf Track Down, Track Up (A10, A11, B8, B18) auf dem
Hauptgerät oder der Fernbedienung. Verwenden Sie die manuelle Abstimmungsmethode, um schwächere Sender einzustellen, die
während der automatischen Abstimmung umgangen werden.
4. Um automatisch zum nächsten verfügbaren Radiosender zu wechseln, halten Sie die Track-Down-Taste (A10, A11, B8, B18) am
Hauptgerät oder an der Fernbedienung 1-2 Sekunden lang gedrückt, bis die Frequenzanzeige auf dem Display zu scannen beginnt, und
dann lass den Knopf los. Der Tuner stoppt den Scanvorgang, wenn er den nächsten Sender mit ausreichender Signalstärke empfängt.
5. Drücken Sie den Lautstärkeregler am Hauptgerät oder an der Fernbedienung, um den Lautstärkeregler auf den gewünschten
Lautstärkepegel einzustellen.
FM / FM Stereo-Empfang
Drücken Sie beim Hören von UKW-Radio die ST./ MONO-Taste (B16) auf der Fernbedienung, um zwischen Stereomodus und Monomodus
zu wechseln. Das FM-Stereosymbol „ST“ erscheint auf dem Display, wenn sich das Gerät im Stereomodus befindet. Es ist vorzuziehen,

14
das Programm in Mono zu empfangen, wenn Sie einen schwachen Sender empfangen.
TIPPS FÜR DEN BESTEN EMPFANG:
FM - Für einen optimalen FM-Empfang befindet sich die FM-Anschlusskabelantenne auf der Rückseite des Geräts
sollte vollständig ausgepackt und verlängert werden.
HINWEIS: Die automatische Abstimmung hängt von der Signalstärke des Senders ab, sodass schwache Sender möglicherweise
übersprungen werden. Sie können manuell einstellen, um die schwachen Sender zu finden, wenn ein Sender übersprungen wird. Bei
starken Signalen stoppt der Tuner möglicherweise, bevor er die tatsächliche Sendefrequenz erreicht. Daher müssen Sie möglicherweise
manuell einstellen, um den besten Empfang zu erzielen.
VORGESTELLTE FUNKSTATIONEN
1. Drücken Sie die POWER / STANDBY-Taste (A1, B1) am Hauptgerät oder an der Fernbedienung, um das Gerät einzuschalten.
2. Tippen Sie auf die SOURCE-Taste (A1, B11) am Hauptgerät oder an der Fernbedienung, um den FM-Radiomodus auszuwählen.
3. Halten Sie die Taste Track Down, Track Up (A10, A11, B8, B18) am Hauptgerät oder an der Fernbedienung gedrückt, bis die
Frequenzanzeige auf dem Display zu scannen beginnt, und lassen Sie dann die Taste für die automatische Suche und das Programmieren
voreingestellter Kanäle los. Im Display erscheint „ PROG “ und blinkt. Die automatische Suche und das Programm werden nach Abschluss
des Scanvorgangs bei P01 gestoppt. „ PROG “ wird ständig im Display angezeigt.
Hinweis: Wenn die während der automatischen Suche und der programmierten Voreinstellung gespeicherten Kanäle nicht die Kanäle sind,
die Sie speichern möchten, verwenden Sie die folgende Methode zum manuellen Speichern von Radio-Voreinstellungen.
4. Stellen Sie den gewünschten Radiosender entweder manuell oder automatisch ein.
5. Tippen Sie auf PROG . (B3) auf der Fernbedienung die nächste verfügbare voreingestellte Speichernummer und ein blinkendes PROG .
Das Symbol (B3) wird im LCD-Display angezeigt. (Hinweis: "P01" wird im Display angezeigt, wenn Sie zum ersten Mal eine Voreinstellung
programmieren.)
6. Tippen Sie auf PRE. Taste (B15, B19) am Hauptgerät oder an der Fernbedienung, um die voreingestellte Nummer auszuwählen, der Sie
den Sender zuweisen möchten.
7. Tippen Sie auf PROG . (B3) Taste zur Bestätigung der Einstellung.
8. Wiederholen Sie die obigen Schritte 4 bis 8, um bis zu 30 UKW-Sender einzustellen.
Rückruf von voreingestellten Speicherkanälen
Rufen Sie im Radiomodus die voreingestellten Kanäle auf, indem Sie PRE drücken. Taste (B15, B19) auf der Fernbedienung wiederholt.
CD-SPIELER-BETRIEB
Hinweis:
1. Dieser CD-Player spielt nicht nur kommerzielle CDs ab, sondern auch selbst kompilierte CD-R / RW- und MP3-Discs. Versuchen Sie
nicht, CD-ROM-, CDI-, VCD- , DVD- oder Computer-CDs abzuspielen .
2. MP3 ist eine Form der Komprimierung. Es ist ein Akronym, das für MPEG Audio Layer 3 steht. MP3 ist eine Art Audiocode, der durch
signifikante Komprimierung der ursprünglichen Audioquelle mit sehr geringem Verlust an Klangqualität verarbeitet wird.
● Dieses System unterstützt MPEG 1 Layer 3- und VBR- Dateien.
● Während der Wiedergabe von VBR- Dateien kann der Zeitzähler im Display von der tatsächlichen Wiedergabezeit abweichen.
● Die von MP3 unterstützte Bitrate beträgt 32 bis 320 kbit / s
BITTE LESEN SIE DIESE WICHTIGEN INFORMATIONEN:
CD-Mechanismen, die in solchen Geräten verwendet werden, dienen zum Lesen aller kommerziellen CDs. Es werden auch selbst
kompilierte CD-R / CD-RW- und MP3-Discs gelesen. Es kann jedoch bis zu 10 Sekunden dauern, bis die eigentliche Wiedergabe beginnt.
Wenn die Wiedergabe nicht startet, liegt dies wahrscheinlich an der Qualität der CD-R / RW , MP3-Disc und / oder der Kompatibilität der
CD-Kompilierungssoftware. Der Hersteller ist nicht verantwortlich für die Wiedergabequalität von CD-R / RW- und MP3-Discs.
Bringen Sie kein Etikett oder Siegel an beiden Seiten der CD-R / RW, MP3-Disc an. Dies kann zu Fehlfunktionen führen.
Eine CD abspielen
1. Drücken Sie die POWER / STANDBY-Taste (A1, B1) am Hauptgerät oder an der Fernbedienung, um das Gerät einzuschalten.
2. Tippen Sie auf die SOURCE-Taste (A1, B11) auf der Fernbedienung oder dem Hauptgerät, um den CD-Modus auszuwählen, und
drücken Sie dann auf Öffnen Sie das Disc-Fach.
3. Legen Sie eine Audio-CD mit der Etikettenseite nach außen zur CD-TÜR auf die mittlere Spindel. Schließen Sie das Disc-Fach.
4. Das Gerät beginnt mit dem Lesen der Disc. “---” wird im Display angezeigt und blinkt. Nach einigen Sekunden wird die Gesamtzahl der
Titel eine Sekunde angezeigt, und dann wird die Gesamtzeit der CD auf dem LCD-DISPLAY angezeigt.
5. Drücken Sie die Taste PLAY / PAUSE (A9, B22) am Hauptgerät oder an der Fernbedienung. Die Anzeige PLAY wird im Display
angezeigt. Die CD wird ab dem ersten Titel abgespielt.
6. Drücken Sie den Lautstärkeregler. Stellen Sie die Lautstärke ein. am Hauptgerät oder an der Fernbedienung, um die gewünschte
Lautstärke einzustellen.
7. Um die Wiedergabe anzuhalten, drücken Sie die Taste PLAY / PAUSE (A9, B22) am Hauptgerät oder an der Fernbedienung. Die Track-
Zeit wird angehalten und die PAUSE-Anzeige wird im Display angezeigt. Um die Wiedergabe fortzusetzen, drücken Sie erneut die Taste
CD PLAY / PAUSE (A9, B22).
8. Sie können Ihren Lieblingstitel direkt abspielen, indem Sie entweder Track Down oder Track Up (A10, A11, B8, B18) drücken. Das LCD-
Display zeigt die richtige ausgewählte Titelnummer an.
9. Um einen bestimmten Abschnitt innerhalb einer Spur zu suchen, halten Sie die Spur nach unten und nach oben (A10, A11, B8, B18)
gedrückt, bis der Abschnitt gefunden wurde. Lassen Sie die Taste los, um Ihre Auswahl fortzusetzen.
10. Um die Wiedergabe zu beenden, drücken Sie die STOP-Taste (A8, B25).
VERFAHREN ZUM SPIELEN DER MP3-DISC
Wiedergabe von CD-R / RW, Mp3
1 Drücken Sie die SOURCE-Taste (A1, B11) auf der Fernbedienung und legen Sie eine MP3-Disc ein.
2 Drücken Sie die Taste ORDNER (B15, B19), um den gewünschten Wiedergabeordner auszuwählen.
3 Wählen Sie die gewünschte Datei für die Wiedergabe aus, indem Sie die Taste Track Down, Track Up (A10, A11, B8, B18) drücken.
4 Drücken Sie PLAY / PAUSE (A9, B22). Die Wiedergabe wird gestartet und der Dateiname wird angezeigt.
s Drücken Sie bei der Wiedergabe bei aktiviertem Ordnermodus die Taste ORDNER (B15, B19), und der Ordner kann ausgewählt werden,

15
obwohl er sich im Wiedergabe- / Pausenmodus befindet. Der Wiedergabe- / Pausenmodus wird im ersten Titel des ausgewählten Ordners
fortgesetzt.
USB / MP3-Player mit Ordner zurückspielen
1. Drücken Sie wiederholt die SOURCE-Taste (A1, B11) auf der Fernbedienung oder die SOURCE-Taste (A1, B11) am Hauptgerät, um die
USB-Funktion auszuwählen. Schließen Sie das USB-Speichergerät an, auf dem sich Dateien im MP3-Format befinden. Wenn der USB-
Speicher an das Hauptgerät angeschlossen ist, werden die Geräteinformationen angezeigt.
2. Drücken Sie die ORDNER-Taste (B15, B19), um den gewünschten Wiedergabeordner auszuwählen. Fahren Sie mit Schritt fort, um die
Wiedergabe im aktivierten Ordnermodus zu starten.
3. Wählen Sie die gewünschte Datei für die Wiedergabe aus, indem Sie die Taste Track Down, Track Up (A10, A11, B8, B18) drücken.
4. Drücken Sie PLAY / PAUSE (A9, B22). Die Wiedergabe wird gestartet und der Dateiname wird angezeigt.
HINWEIS:
· Dieses Produkt ist nicht mit MTP- und AAC- Dateisystemen von einem USB-Massenspeichergerät oder MP3-Player kompatibel .
· Dieses Gerät unterstützt FAT16 und FAT32, einige USB-Speichermedien unterstützen jedoch möglicherweise nicht beide Dateisysteme.
Einzelheiten finden Sie in der Bedienungsanleitung des betreffenden USB-Speichergeräts oder wenden Sie sich an den Hersteller.
SKIP- UND SUCHMODUS
1. Tippen Sie im Wiedergabe- oder Pausenmodus auf die Schaltfläche Track Down, Track Up (A10, A11, B8, B18), um zum nächsten Titel
oder zum Anfang des aktuellen Titels zurückzukehren.
2. Halten Sie während der Wiedergabe die Taste Track Down, Track Up (A10, A11, B8, B18) gedrückt, um innerhalb des aktuellen Titels mit
hörbarer Hochgeschwindigkeitswiedergabe zu suchen.
VERSCHIEDENE SPIELMODI (NUR FERNBEDIENUNG)
Drücken Sie wiederholt die REPEAT-Taste (B6) auf der Fernbedienung, um während der CD-Wiedergabe verschiedene Wiedergabemodi
auszuwählen.
Beim Abspielen von CD werden die Wiedergabemodi wie folgt angezeigt:
Wiederholen
Wiederhole alles
Normal
REPEAT 1 - Der Titel wird gerade abgespielt und wiederholt sich kontinuierlich. Wiederholen Sie ein Symbol, das im Display angezeigt
wird.
REPEAT ALL - Alle Tracks werden kontinuierlich wiederholt. Das Symbol "Alle wiederholen" im Display wird angezeigt.
ZUFÄLLIGES SPIEL
Wenn die Taste RANDOM (B20) drei Mal gedrückt wird, leuchtet die Anzeige „ RDM “ im LCD-Display. Die Titel auf der Disc können
automatisch in zufälliger Reihenfolge abgespielt werden.
So brechen Sie das zufällige Spiel ab:
Drücken Sie erneut die Taste RANDOM (B20). Die Anzeige „ RDM “ verschwindet.
HINWEIS:
Wenn Sie während der zufälligen Wiedergabe die Taste drücken, können Sie zu dem Titel wechseln, der durch die zufällige Operation als
nächstes ausgewählt wurde. Auf der anderen Seite können Sie mit der Schaltfläche nicht zum vorherigen Titel wechseln. Der Anfang des
abgespielten Titels befindet sich.
Bei der zufälligen Wiedergabe wählt das Gerät Titel automatisch aus und spielt sie ab. (Sie können die Reihenfolge der Titel nicht
auswählen.)
INTRO PLAYBACK
1. Drücken Sie INTRO (B20) auf der Fernbedienung. Die Anzeige „INTRO (B20)“ wird auf dem Display angezeigt. Das Gerät spielt die
ersten 10 Sekunden jedes Titels ab.
2. Drücken Sie erneut INTRO (B20) auf der Fernbedienung, um die normale Wiedergabe fortzusetzen.
SPIEL-SEQUENZ-PROGRAMMIERUNG SPIELEN
Mit dieser Funktion können die Titel in einer programmierten Reihenfolge abgespielt werden. Der Benutzer kann bis zu 32 Titel im CD-
Modus oder 99 Titel in MP3 programmieren
HINWEIS: Das Programm kann nur im STOP-Modus eingestellt werden.
1. Tippen Sie auf PROG . Taste (B3) auf der Fernbedienung, die Programmnummer „1“ wird im Display angezeigt, das Symbol „ PROG “
und die CD- Titelnummer „- -“ blinken ebenfalls im LCD-Display. (Hinweis: "1 -" wird im Display angezeigt, wenn Sie zum ersten Mal
programmieren.)
2. Verwenden Sie Track Down, Track Up (A10, A11, B8, B18) am Hauptgerät oder an der Fernbedienung, um den gewünschten Track
auszuwählen. Die Titelnummer wird im Display angezeigt.
3. Tippen Sie auf PROG . Taste (B3) am Hauptgerät oder an der Fernbedienung zum Speichern des ausgewählten Titels im Speicher. Die
nächste Programmnummer stellt eine (dh „2“) im LCD-Display vor.
4. Wiederholen Sie die Schritte 2 bis 3, um weitere Titel im Speicher zu speichern. Sie können bis zu CD 32-Titel und MP3 99-Titel
speichern. Das Display zeigt „ FUL “ an, nachdem die Tracks programmiert wurden.
5. Tippen Sie auf PLAY / PAUSE (A9, B22). auf dem Hauptgerät oder der Fernbedienung, um die CD in der programmierten Reihenfolge
abzuspielen.
6. Drücken Sie die REPEAT-Taste (B6) auf der Fernbedienung, um bei Bedarf Repeat 1 / All auszuwählen.
7. Um die Wiedergabe zu beenden, drücken Sie die STOP-Taste (A8, B25) am Hauptgerät oder an der Fernbedienung.
Um die Programmwiedergabe abzubrechen, drücken Sie zweimal die STOP-Taste (A8, B25) am Hauptgerät oder an der Fernbedienung.
Das Symbol „ PROG “ verschwindet aus der Anzeige.
BLUETOOTH-BETRIEB
Drücken Sie die POWER / STANDBY-Taste (A1, B1), um das Gerät einzuschalten, und befolgen Sie die nachstehenden Anweisungen, um
eine Verbindung über Bluetooth herzustellen.

16
PAIREN (Verknüpfen) eines BLUETOOTH-AKTIVIERTEN Mobiltelefons oder eines anderen BLUETOOTH-AKTIVIERTEN GERÄTS mit
dem Gerät
Wenn der CR 1173 noch nie mit einem Bluetooth-Gerät gekoppelt wurde. Sie müssen die folgenden Pairing-Anweisungen befolgen, um
das Gerät mit Ihrem Bluetooth-Gerät zu verbinden.
1. Drücken Sie die POWER / STANDBY-Taste (A1, B1) am Hauptgerät oder an der Fernbedienung, um das Gerät einzuschalten.
2. Tippen Sie auf die SOURCE-Taste (A1, B11) auf der Haupt- oder Fernbedienung, um den Bluetooth-Modus auszuwählen. Die Bluetooth-
Meldung „ bt “ wird im Display angezeigt und blinkt.
3. Wenn der CR 1173 noch nie mit einem Bluetooth-Gerät gekoppelt wurde oder das zuletzt gekoppelte Gerät nicht finden kann, zeigt das
blinkende „ bt “ auf dem LCD an, dass sich das XXX im Suchmodus befindet. Sie müssen die folgenden Pairing-Anweisungen befolgen, um
das Gerät mit Ihrem Bluetooth-Gerät zu verbinden.
· Schalten Sie die Bluetooth-Funktion Ihres Bluetooth-Geräts ein und aktivieren Sie die Such- oder Scanfunktion, um den CR 1173 zu
finden.
· Wählen Sie "CR 1173" aus der Geräteliste, wenn es auf Ihrem Gerätebildschirm angezeigt wird. Geben Sie bei Bedarf den Passcode
„0000“ ein, um den CR 1173 mit Ihrem Gerät zu koppeln (zu verknüpfen).
4. Nach erfolgreichem Pairing (Verknüpfen) ändert sich die Anzeige und zeigt ständig „ bt “ an. Das Bluetooth-Symbol wird auch im Display
angezeigt. Sie können Musik von Ihrem Bluetooth-Gerät drahtlos über den Lautsprecher abspielen.
5. Drücken Sie nach Auswahl Ihres Lieblingssongs die Taste PLAY PAUSE (B22, A9) auf dem Gerät oder der Fernbedienung, um den Song
abzuspielen oder anzuhalten.
6. Drücken Sie den Lautstärkeregler am Hauptgerät oder an der Fernbedienung, um den gewünschten Lautstärkepegel einzustellen.
7. Drücken Sie die Taste Track Down, Track Up (B8, B9) am Hauptgerät oder an der Fernbedienung, um zum vorherigen oder nächsten
Titel zu springen.
8. Wenn Sie das Gerät mit einem anderen Bluetooth-fähigen Gerät koppeln möchten, halten Sie die PAIR (B10) -Taste 3 Sekunden lang
gedrückt oder deaktivieren Sie die Bluetooth-Funktion des aktuell mit dem Gerät gekoppelten Geräts. Wiederholen Sie dann Schritt 3 oben.
Anmerkungen:
1.) Informationen zum Bluetooth-Betrieb finden Sie im Handbuch Ihres Mobiltelefons, Tablet-PCs, Computers oder anderer Bluetooth-
fähiger Geräte, da diese von Modell zu Modell variieren können.
2.) Wenn Ihr Bluetooth-fähiges Gerät das A2DP-Profil nicht unterstützt, wird die Musik nicht über den Lautsprecher abgespielt, selbst wenn
sie gekoppelt (verbunden) ist.
3.) Wenn Sie Ihren Computer über Bluetooth mit dem Gerät koppeln (verbinden), müssen Sie möglicherweise den Lautsprecher als
Standard-Audiogerät Ihres Computers einstellen.
ZUSÄTZLICHER EINGANGSBETRIEB
Dieses Gerät verfügt über eine zusätzliche Audiosignaleingangsbuchse, über die externe Audiogeräte wie MP3-Player und digitale
Audiogeräte angeschlossen und über die Lautsprecher dieses Geräts wiedergegeben werden können.
1. Verwenden Sie ein Audiokabel (nicht im Lieferumfang enthalten) mit einem 3,5-mm-Stereostecker an jedem Ende des Kabels.
2. Stecken Sie ein Ende in die AUX IN JACK (A5) am Hauptgerät und das andere Ende des Kabels in die Line-Out-Buchse oder die
Kopfhörerbuchse Ihres externen Audiogeräts.
3. Schalten Sie das Gerät und das externe Audiogerät ein.
4. Tippen Sie auf die SOURCE-Taste (A1, B11) auf der Haupt- oder Fernbedienung, um den AUX-Modus auszuwählen. Das Symbol „AUX“
leuchtet auf und das Display zeigt die Meldung „AUX“ an.
5. Der Lautstärkepegel kann jetzt über das Hauptgerät gesteuert werden. Bedienen Sie alle anderen Funktionen des Zusatzgeräts wie
gewohnt.
Hinweis :
· Wenn Sie dieses Gerät an die Line-Out-Buchse Ihres externen Geräts anschließen, müssen Sie nur den Lautstärkeregler dieses Geräts
einstellen. Wenn Sie die Kopfhörerbuchse Ihres externen Geräts anschließen, müssen Sie möglicherweise sowohl die Lautstärkeregler
Ihres externen Geräts als auch dieses Geräts anpassen, um die gewünschte Lautstärkeeinstellung zu erhalten.
PRESET EQ (NUR FERNBEDIENUNG)
Dieses Gerät bietet 4 verschiedene EQ-Modi, um Ihr Hörerlebnis zu verbessern. Sie können den gewünschten Effekt auswählen, indem Sie
die EQ-Taste (B5) auf der Fernbedienung wiederholt in der folgenden Reihenfolge drücken:
ROCK POP JAZZ CLASSIC OFF
MUTE-TASTE (NUR FERNBEDIENUNG)
· Drücken Sie die MUTE-Taste (B21) auf der Fernbedienung, um die Tonausgabe vom Lautsprecher vorübergehend stummzuschalten. Das
„V 00“ erscheint im Display.
· Drücken Sie erneut die MUTE-Taste (B21) oder die VOLUME CONTROL (B23, A12), um die normale Lautsprecherwiedergabe
fortzusetzen.
SCHLAFBETRIEB (NUR FERNBEDIENUNG)
Mit dem Sleep-Timer können Sie das Gerät nach Erreichen einer festgelegten Zeit ausschalten.
1. Um den Sleep-Timer zu aktivieren, schalten Sie das Gerät ein und tippen Sie auf die SOURCE-Taste (A1, B11), um FM-Radio, CD, USB,
Bluetooth auszuwählen oder Musik über AUX IN zu hören.
2. Tippen Sie auf der Fernbedienung auf die Taste SLEEP (B14). Das Symbol für die Ruhezeit „SLEEP“ wird im Display angezeigt.
3. Tippen Sie wiederholt auf die SLEEP-Taste (B14), um eine Ruhezeit auszuwählen. Das Gerät schaltet sich nach 10, 20, 30, 40, 50, 60,
70, 80 oder 90 Minuten aus. Warten Sie nach Ihrer Auswahl 3 Sekunden, bis das Gerät die Auswahl bestätigt hat. Das Gerät spielt für die
ausgewählte Zeitspanne und schaltet sich dann automatisch aus.
4. Um den Sleep-Timer abzubrechen, tippen Sie wiederholt auf die SLEEP-Taste (B14), bis der Timer „OFF“ anzeigt. Das Sleep-Time-
Symbol „SLEEP“ verschwindet auf dem Display
5. Um das Gerät vor der ausgewählten Zeitspanne auszuschalten, drücken Sie jederzeit die POWER / STANDBY-Taste (A1, B1).
Anmerkungen:

17
1.) Um die verbleibende Schlafzeit zu überprüfen, tippen Sie einmal auf die SLEEP-Taste (B14).
2.) Wenn Sie bei Musik von einem externen Gerät einschlafen, das an den AUX-Eingang angeschlossen ist, schaltet der Sleep-Timer die
Stromversorgung dieses Systems aus, das externe Gerät jedoch nicht aus.
VERWENDUNG VON KOPFHÖRERN (NICHT INBEGRIFFEN)
Wenn Sie den Stecker Ihres Kopfhörers in die Stereo-Kopfhörerbuchse (A17) stecken, können Sie die CD- oder Radiomusik privat
anhören. Bei Verwendung von Kopfhörern werden die eingebauten Lautsprecher getrennt.
LESEN SIE DIESE WICHTIGEN INFORMATIONEN, BEVOR SIE IHRE KOPFHÖRER VERWENDEN
1. Vermeiden Sie längeres Spielen bei sehr hoher Lautstärke, da dies Ihr Gehör beeinträchtigen kann.
2. Wenn in Ihren Ohren ein Klingeln auftritt, verringern Sie die Lautstärke oder schalten Sie das Gerät aus.
3. Halten Sie die Lautstärke auf einem angemessenen Niveau, auch wenn es sich bei Ihrem Headset um ein Open-Air-Headset handelt,
mit dem Sie Außengeräusche hören können. Bitte beachten Sie, dass eine zu hohe Lautstärke immer noch Außengeräusche blockieren
kann.
ZURÜCKSETZEN
Wenn das System nicht reagiert oder fehlerhaft funktioniert, ist möglicherweise eine elektrostatische Entladung ( ESD ) oder ein Stromstoß
aufgetreten, der dazu führte, dass der interne Computer automatisch heruntergefahren wurde. Ziehen Sie in diesem Fall das Netzkabel von
der Stromquelle ab, warten Sie 60 Sekunden und schließen Sie das Netzkabel erneut an die Stromquelle an. Das Gerät wird
zurückgesetzt. Sie müssen die Uhr, den Alarm und die voreingestellten Funkkanäle einstellen.
PFLEGE UND WARTUNG
1. Setzen Sie das Gerät keinen übermäßigen Kräften, Stößen, Staub oder extremen Temperaturen (über 40 ° C) aus.
2. Manipulieren Sie nicht die internen Komponenten des Geräts.
3. Reinigen Sie Ihr Gerät mit einem trockenen Tuch. Lösungsmittel oder Reinigungsmittel sollten niemals verwendet werden.
4. Lassen Sie Ihr Gerät nicht direktem Sonnenlicht oder an heißen, feuchten oder staubigen Orten stehen.
5. Halten Sie Ihr Gerät von Heizgeräten und elektrischen Störquellen wie Leuchtstofflampen oder Motoren fern.
6. Wenn während der CD-Wiedergabe Aussetzer oder Unterbrechungen in der Musik auftreten oder wenn die CD überhaupt nicht
abgespielt werden kann, muss die Unterseite möglicherweise gereinigt werden. Wischen Sie die Disc vor dem Abspielen von der Mitte nach
außen mit einem guten weichen Reinigungstuch ab.
REINIGUNG DER EINHEIT
· Um Brand- oder Stromschlaggefahr zu vermeiden, trennen Sie Ihr Gerät beim Reinigen von der Wechselstromquelle.
· Die Oberfläche des Geräts kann mit einem Staubtuch gereinigt und wie andere Möbel gepflegt werden. Gehen Sie beim Reinigen und
Abwischen der Kunststoffteile vorsichtig vor.
· Wenn der Schrank staubig wird, wischen Sie ihn mit einem weichen, trockenen Staubtuch ab. Verwenden Sie keine Wachs- oder
Poliersprays auf dem Schrank.
· Wenn die Frontplatte verschmutzt oder mit Fingerabdrücken verschmiert ist, kann sie mit einem weichen Tuch gereinigt werden, das leicht
mit einer milden Seifen- und Wasserlösung angefeuchtet ist. Verwenden Sie niemals Scheuertücher oder Polituren, da diese das Finish
Ihres Geräts beschädigen.
VORSICHT: Lassen Sie während der Reinigung niemals Wasser oder andere Flüssigkeiten in das Gerät gelangen
Technische Daten:
Leistungsbedarf:
Haupteinheit: 230V ~ 50Hz
Fernbedienung: CR2025 3V
DISC-Player-Bereich
System: Eigenschaften der CD-Disc und des digitalen Audiosystems Laserdiode
Emissionsdauer: Kontinuierlich
Laserausgang: Weniger als 44,6 Μ w (Dieser Ausgang ist die Wertmessung in einem Abstand von 200 mm von der
Objektivoberflächenoberfläche des optischen Aufnahmeblocks mit 7 mm Apertur.)
Frequenzbereich
FM-Tuner-Bereich:
Abstimmbereich: 87,5 MHz - 108,0 MHz (50-kHz-Schritt)
Lautsprecherleistung: 2x 5W
Max: 28W
Den Pappkarton im Altpapier entsorgen. Polyäthylenbeutel (PE) in dem Behälter für Kunststoff entsorgen. Das abgenutzte Gerät zum
Recycling zu einer offiziellen Sammelstelle bringen, da es gefährliche Substanzen enthält, die die Umwelt gefährden können. Das Gerät sollte
in einer Form abgegeben werden, die eine weitere Nutzung unmöglich macht. Wenn es Batterien enthält, sollten diese rausgenommen und
separat an einer Sammelstelle abgegeben werden. Das Gerät darf nicht in den Hausmüll rausgeworfen werden!!
Dieses Gerät verfügt über die Schutzklasse II und benötigt keine Erdung.
Das Gerät entspricht den Anforderungen der Richtlinien:
Niederspannungsrichtlinie (LVD)
Elektromagnetische Verträglichkeit (EMV)
Das Produkt wurde mit der CE-Kennzeichnung auf dem Typenschild
gekennzeichnet.

18
FRANÇAIS
CONDITIONS DE SÉCURITÉ INSTRUCTIONS IMPORTANTES SUR LA SÉCURITÉ
D'UTILISATION VEUILLEZ LIRE ATTENTIVEMENT ET CONSERVER POUR RÉFÉRENCE
FUTURE
Les conditions de garantie sont différentes si l’appareil est utilisé à des fins commerciales.
1.Avant d'utiliser le produit, veuillez lire attentivement et respecter les instructions suivantes.
Le fabricant n'est pas responsable des dommages résultant d'une mauvaise utilisation.
2.Le produit doit être utilisé uniquement à l'intérieur. N'utilisez pas le produit à des fins
incompatibles avec son application.
3.La tension applicable est 230V, ~ 50Hz. Pour des raisons de sécurité, il n'est pas approprié
de connecter plusieurs périphériques à une même prise de courant.
4. Soyez prudent lorsque vous utilisez autour des enfants. Ne laissez pas les enfants jouer
avec le produit. Ne laissez pas les enfants ou les personnes ne connaissant pas l’appareil
l’utiliser sans surveillance.
5.AVERTISSEMENT: Cet appareil peut être utilisé par des enfants de plus de 8 ans et des
personnes ayant des capacités physiques, sensorielles ou mentales réduites, ou des
personnes sans expérience ou connaissance de l'appareil, uniquement sous la surveillance
d'une personne responsable de leur sécurité, ou s’ils ont appris à utiliser le dispositif en toute
sécurité et qu’ils sont conscients des dangers liés à son utilisation. Les enfants ne doivent
pas jouer avec l'appareil. Les enfants ne doivent pas nettoyer ni entretenir l'appareil, sauf
s'ils ont plus de 8 ans et si ces activités sont effectuées sous surveillance.
6.Une fois que vous avez fini d'utiliser le produit, n'oubliez pas de retirer délicatement la fiche
de la prise secteur en tenant la prise avec votre main. Ne tirez jamais sur le câble
d'alimentation !!!
7.Ne mettez jamais le câble d'alimentation, la fiche ou tout l'appareil dans l'eau. N'exposez
jamais le produit aux conditions atmosphériques telles que la lumière directe du soleil ou la
pluie, etc. N'utilisez jamais le produit dans des conditions humides.
8.Vérifiez régulièrement l'état du câble d'alimentation. Si le câble d'alimentation est
endommagé, le produit doit être tourné vers un centre de réparation agréé pour être
remplacé afin d'éviter toute situation dangereuse.
9.N'utilisez jamais le produit avec un câble d'alimentation endommagé, s'il est tombé ou s'il a
été endommagé d'une autre manière ou s'il ne fonctionne pas correctement. N'essayez pas
de réparer vous-même le produit défectueux, car cela pourrait entraîner un choc électrique.
Placez toujours l’appareil endommagé dans un centre de service après-vente professionnel
afin de le réparer. Toutes les réparations ne peuvent être effectuées que par des
professionnels agréés. La réparation effectuée de manière incorrecte peut entraîner des
situations dangereuses pour l'utilisateur.
10.Ne placez jamais le produit sur ou à proximité de surfaces chaudes ou chaudes ou
d'appareils de cuisine comme le four électrique ou le brûleur à gaz.
11.Ne jamais utiliser le produit à proximité de matières combustibles.
12.Ne laissez pas le cordon pendre du bord du comptoir ou toucher des surfaces chaudes.
13. Ne laissez jamais le produit connecté à la source d'alimentation sans surveillance. Même
lorsque l'utilisation est interrompue pendant une courte période, mettez-la hors tension,
débranchez le cordon d'alimentation.
14.Afin de fournir une protection supplémentaire, il est recommandé d'installer un dispositif
de courant résiduel (RCD) dans le circuit d'alimentation, avec un courant nominal résiduel ne
dépassant pas 30 mA. Contactez un électricien professionnel à ce sujet.
15. Évitez de mouiller la radio.
16. La radio ne peut être essuyée qu'avec un chiffon sec. Ne pas utiliser d’eau ou de liquide
de nettoyage.
17. La radio doit être conservée dans un endroit sec.

19
DISPOSITIF:
1. INDICATEUR DE VEILLE MARCHE / ARRÊT 2. SOURCE 3. BOUTON RÉGLAGE TEMPOREL / MÉMOIRE
4. TUNER CHANNEL - 5.AUX IN 6.USB 7.TUNER CHANNEL +
8. BOUTON D'ARRÊT DU CD / BOUTON DE PAIRE BLUETOOTH
9. TOUCHE CD / BLUETOOTH PLAY / PAUSE / RADIO AUTO SEARCH
10. CD / BLUETOOTH SKIP PRÉCÉDENT / TUNE - BOUTON
11. CD / BLUETOOTH SKIP NEXT / TUNE + BUTTON
12. BOUTON DE COMMANDE DE VOLUME 13.AFFICHAGE LCD
14. BOUTON CD PORTE OUVERTE / FERMÉE 15.CD DOOR 16.FM ANTENNA
17. PRISE DE CASQUE 18.CONNECTEUR HAUT-PARLEUR DROIT 19.CONNECTEUR HAUT-PARLEUR GAUCHE
20. CORDON D'ALIMENTATION CA 21. PORTE DU COMPARTIMENT DES PILES
TÉLÉCOMMANDE:
1. INDICATEUR DE VEILLE MARCHE / ARRÊT 2. BOUTON DE RECHERCHE DIRECTE DISQUE
3. PROG . BOUTON 4. BOUTON DE RECHERCHE CD / USB OU TEMPORISATEUR BAS, BOUTON TUNER DOWN.
5. BOUTON D'ÉGALISATION 6.BOUTON DE RÉPÉTITION 7.BOUTON X-BASS 8.BOUTON DE SUIVI
9. TOUCHE CD / BLUETOOTH PLAY / PAUSE / RADIO AUTO SEARCH
10. CD / BLUETOOTH SKIP PRÉCÉDENT / TUNE - BOUTON
11. CD / BLUETOOTH SKIP NEXT / TUNE + BUTTON
12.CLOCK SET 13.LCD DISPLAY 14.CD DOOR OPEN / CLOSE BUTTON
15. PORTE CD 16. ANTENNE FM 17. PRISE DE CASQUE
18. CONNECTEUR HAUT-PARLEUR DROIT 19.CONNECTEUR HAUT-PARLEUR GAUCHE
20. BOUTON ALÉATOIRE ET BOUTON INTRO 21.Porte de compartiment de batterie
22. BOUTON BT PLAY / PAUSE 23.VOLUM UP UN DOWN DOWN
24. BOUTON LECTURE / PAUSE CD 25.BOUTON ARRET CD
CONNEXIONS DU SYSTÈME
Assurez-vous de débrancher le cordon d'alimentation secteur de la prise murale avant d'effectuer toute connexion.
Connexion d'alimentation CA
Branchez le cordon d'alimentation CA sur une prise CA 230 V ~ 50 Hz disponible. Assurez-vous que la fiche est correctement insérée dans
la prise secteur.
Installation des batteries pour la sauvegarde des batteries
1. Retirez le couvercle du compartiment des piles situé au bas de l'unité principale.
2. Suivez les repères de polarité à l'intérieur du compartiment des piles et insérez 2 piles AAA (non incluses) dans les deux logements de
piles situés dans le compartiment des piles.
3. Remettez le couvercle de la batterie en place.
REMARQUES:
· Lors du remplacement des piles de sauvegarde, ne débranchez pas le cordon d'alimentation secteur de la prise murale. Si vous le faites,
tous les paramètres de date et d'heure actuels seront effacés.
· Si l'appareil reste débranché pendant une longue période, retirez les piles pour éviter tout dommage pouvant survenir si les piles fuient et
provoquent de la corrosion.
Télécommande
La télécommande fonctionne sur une pile au lithium CR2025 3V (incluse dans la télécommande). Pour activer la télécommande, retirez la
languette isolante insérée dans le compartiment des piles.
Si le fonctionnement à distance devient intermittent ou insatisfaisant, remplacez la pile d'origine par une nouvelle pile au lithium CR2025
3V.
1.Appuyez sur le couvercle du compartiment, faites glisser le support de la batterie du boîtier de la télécommande.
2.Remplacez la batterie en vous assurant qu'elle est correctement installée. La télécommande ne fonctionnera pas si la batterie est
installée avec une mauvaise polarité.
MISE EN GARDE:
1.) Danger d'explosion si la batterie n'est pas remplacée correctement.
2.) Remplacez uniquement par une batterie de type identique ou équivalent.
3.) Réinsérez le support de batterie dans le logement de batterie.
ALLUMER / ÉTEINDRE L'UNITÉ
1. En mode Off (veille), appuyez sur le bouton POWER / STANDBY (A1, B1) sur l'unité principale ou la télécommande pour allumer l'unité.
L'unité s'allumera, la dernière icône du mode d'entrée sélectionné s'affichera sur l'écran LCD.
2. Pour éteindre l'unité (veille), appuyez à nouveau sur le bouton POWER ON POWER / STANDBY (A1, B1) de l'unité principale ou de la
télécommande. L'ÉCRAN LCD va s'assombrir et afficher l'heure actuelle. Le voyant du mode veille s'allume.
RÉGLAGE DE L'HORLOGE
Après avoir branché l'alimentation secteur, «00:00» apparaît et commence à clignoter sur l'écran LCD.
1. En mode hors tension (veille), appuyez sur le bouton CLOCK SET (B13) de la télécommande ou de l'unité principale et maintenez-le
enfoncé, le format 24 HEURES «24H» s'affiche à l'écran.
2. Appuyez sur le bouton Précédent / Suivant (B4, B18) de la télécommande ou de l'unité principale pour sélectionner le format 24 heures
si nécessaire. Sinon, appuyez sur le bouton CLOCK SET (B12) pour confirmer le format d'horloge 12 heures et passer en mode de

20
configuration d'horloge, les chiffres des heures clignotent.
3. Appuyez sur le bouton Précédent / Suivant (B4, B18) de la télécommande ou de l'unité principale pour régler l'heure. Appuyez sur le
bouton et maintenez-le enfoncé pour un réglage rapide de l'avance / retour
Remarque: Assurez-vous que l'heure est réglée pour que l'indicateur PM s'affiche correctement.
4. Appuyez sur le bouton CLOCK SET (B12) de la télécommande pour confirmer le réglage de l'heure, les chiffres des minutes clignoteront
pour vous demander d'entrer.
5. Appuyez sur le bouton Précédent / Suivant (B4, B18) de la télécommande ou de l'unité principale pour régler les minutes. Appuyez sur le
bouton et maintenez-le enfoncé pour un réglage rapide d'avance / retour.
6. Appuyez à nouveau sur le bouton CLOCK SET (B12) de la télécommande pour terminer le réglage.
REMARQUE: Les préréglages de l'horloge et de la station de radio devront être réinitialisés si l'alimentation est coupée ou en cas de panne
de courant. "00:00" apparaîtra et commencera à clignoter sur l'écran LCD pour vous informer que l'alimentation a été interrompue et que
l'horloge devra être réinitialisée. Veuillez suivre les étapes 1 à 6 ci-dessus pour réinitialiser l'horloge.
VERIFICATION DE L'HORLOGE
L'unité affichera l'heure actuelle en mode veille. Pour vérifier l'heure actuelle en mode Power ON, appuyez sur le bouton CLOCK SET (B12)
de l'unité principale ou de la télécommande et maintenez-le enfoncé pendant 3 secondes, l'heure actuelle s'affichera pendant 5 secondes,
puis reviendra à l'écran précédent.
FONCTIONNEMENT DE L'ALARME (TÉLÉCOMMANDE UNIQUEMENT)
RÉGLAGE DE L'HORLOGE D'ALARME
Cette fonction permet au système de s'allumer automatiquement et de vous réveiller en utilisant une alarme sonore, le CD, USB ou BU la
RADIO.
1. Appuyez sur le bouton TIMER (B13) de la télécommande et maintenez-le enfoncé jusqu'à ce que l'écran affiche «On» et que les chiffres
des heures clignotent.
2. Appuyez sur les boutons Précédent / Suivant (B4, B18) pour régler les chiffres des heures, puis appuyez sur le bouton TIMER pour
confirmer. Les chiffres des minutes clignotent à l'écran.
3. Appuyez sur les boutons Précédent / Suivant (B4, B18) pour régler les chiffres des minutes, puis appuyez sur le bouton TIMER (B13)
pour confirmer.
4. Lorsque le bouton Précédent / Suivant (B4, B18) On Timer Clock set est réglé, l'écran affiche «OFF» et les chiffres des heures
clignotent.
5. Appuyez sur les boutons Précédent / Suivant (B4, B18) pour régler les chiffres des heures, puis appuyez sur le bouton TIMER (B13)
pour confirmer. Les chiffres des minutes clignotent à l'écran.
6. Appuyez sur les boutons Précédent / Suivant (B4, B18) de la télécommande pour régler les chiffres des minutes, puis appuyez sur le
bouton TIMER pour confirmer.
7. Appuyez sur les boutons pour sélectionner le mode CD, USB, BT ou FM, puis appuyez sur le bouton TIMER (B13) pour confirmer.
L'écran affichera «VOL #» et clignotera.
Appuyez sur les boutons Précédent / Suivant (B4, B18) pour régler le volume, puis appuyez sur le bouton TIMER pour confirmer.
8. Appuyez sur le bouton TIMER (B13) pour sélectionner "Timer On", et le Timer est maintenant
ensemble.
9. En mode veille, l'icône de la minuterie s'affiche à l'écran pour indiquer que la minuterie est activée.
REMARQUE:
1.) Si «Wake to CD, USB» est sélectionné mais qu'aucun CD n'est inséré, l'alarme se mettra automatiquement en alarme sonore lorsque
l'heure de réveil de l'alarme sera atteinte.
2.) Pour «Wake to Radio», le système revient par défaut à la dernière station de radio FM écoutée avant de s'éteindre.
3.) L'alarme de crescendo augmentera jusqu'au niveau de volume que vous avez réglé.
FONCTION D'ALARME ACTIVE / DE-ACTIVE
1. Pour activer ALARME, appuyez une fois sur le bouton MINUTERIE (B13) et l'icône d'alarme apparaîtra sur l'écran LCD.
2. Annulez la fonction ALARME en appuyant à nouveau sur le bouton TIMER (B13). L'icône d'alarme s'éteint.
Réveil radio, CD, USB ou alarme BUZZER
· Lorsque l'heure de l'alarme est atteinte, l'alarme sonore CD, USB ou radio retentit pendant 60 minutes, puis s'éteint et se réinitialise pour
le jour suivant (sans appuyer sur le bouton de répétition).
· Pour arrêter l'alarme immédiatement après qu'elle a retenti, appuyez une fois sur le bouton POWER / STANDBY (A1, B1) de la
télécommande ou de l'unité principale. Il se réinitialise le lendemain.
· Pour annuler l'alarme du lendemain, appuyez une fois sur le BOUTON DE LA MINUTERIE (B13), l'icône ALARME s'éteint.
FONCTIONNEMENT RADIO
1. Appuyez sur le bouton POWER / STANDBY (A1, B1) sur l'unité principale ou la télécommande pour allumer l'unité.
2. Appuyez sur le bouton SOURCE (A1, B11) sur l'unité principale ou la télécommande pour sélectionner le mode FM, la fréquence radio
FM apparaît sur l'affichage.
3. Pour syntoniser manuellement une station de radio spécifique, appuyez plusieurs fois sur Track Down, Track up (A10, A11, B8, B18) sur
l'unité principale ou la télécommande. Utilisez la méthode de réglage manuel pour régler les stations les plus faibles qui sont contournées
pendant le réglage automatique.
4. Pour syntoniser automatiquement la prochaine station de radio disponible, maintenez enfoncé le bouton Track Down (A10, A11, B8, B18)
de l'unité principale ou de la télécommande pendant 1-2 secondes jusqu'à ce que la lecture de la fréquence sur l'écran commence à
balayer relâchez le bouton. Le syntoniseur arrêtera le balayage lorsqu'il recevra la prochaine station de radiodiffusion avec une puissance
de signal adéquate.
5. Appuyez sur la commande de volume de l'unité principale ou de la télécommande pour régler la commande de volume au niveau de
volume souhaité.
Leht laaditakse ...
Leht laaditakse ...
Leht laaditakse ...
Leht laaditakse ...
Leht laaditakse ...
Leht laaditakse ...
Leht laaditakse ...
Leht laaditakse ...
Leht laaditakse ...
Leht laaditakse ...
Leht laaditakse ...
Leht laaditakse ...
Leht laaditakse ...
Leht laaditakse ...
Leht laaditakse ...
Leht laaditakse ...
Leht laaditakse ...
Leht laaditakse ...
Leht laaditakse ...
Leht laaditakse ...
Leht laaditakse ...
Leht laaditakse ...
Leht laaditakse ...
Leht laaditakse ...
Leht laaditakse ...
Leht laaditakse ...
Leht laaditakse ...
Leht laaditakse ...
Leht laaditakse ...
Leht laaditakse ...
Leht laaditakse ...
Leht laaditakse ...
Leht laaditakse ...
Leht laaditakse ...
Leht laaditakse ...
Leht laaditakse ...
Leht laaditakse ...
Leht laaditakse ...
Leht laaditakse ...
Leht laaditakse ...
Leht laaditakse ...
Leht laaditakse ...
Leht laaditakse ...
Leht laaditakse ...
Leht laaditakse ...
Leht laaditakse ...
Leht laaditakse ...
Leht laaditakse ...
Leht laaditakse ...
Leht laaditakse ...
Leht laaditakse ...
Leht laaditakse ...
Leht laaditakse ...
Leht laaditakse ...
Leht laaditakse ...
Leht laaditakse ...
Leht laaditakse ...
Leht laaditakse ...
Leht laaditakse ...
Leht laaditakse ...
Leht laaditakse ...
Leht laaditakse ...
Leht laaditakse ...
Leht laaditakse ...
Leht laaditakse ...
Leht laaditakse ...
Leht laaditakse ...
Leht laaditakse ...
Leht laaditakse ...
Leht laaditakse ...
Leht laaditakse ...
Leht laaditakse ...
Leht laaditakse ...
Leht laaditakse ...
Leht laaditakse ...
Leht laaditakse ...
Leht laaditakse ...
Leht laaditakse ...
Leht laaditakse ...
Leht laaditakse ...
Leht laaditakse ...
Leht laaditakse ...
Leht laaditakse ...
Leht laaditakse ...
Leht laaditakse ...
Leht laaditakse ...
Leht laaditakse ...
Leht laaditakse ...
Leht laaditakse ...
Leht laaditakse ...
Leht laaditakse ...
Leht laaditakse ...
Leht laaditakse ...
Leht laaditakse ...
Leht laaditakse ...
Leht laaditakse ...
Leht laaditakse ...
Leht laaditakse ...
Leht laaditakse ...
Leht laaditakse ...
Leht laaditakse ...
Leht laaditakse ...
Leht laaditakse ...
Leht laaditakse ...
Leht laaditakse ...
Leht laaditakse ...
Leht laaditakse ...
Leht laaditakse ...
Leht laaditakse ...
Leht laaditakse ...
Leht laaditakse ...
Leht laaditakse ...
Leht laaditakse ...
Leht laaditakse ...
Leht laaditakse ...
Leht laaditakse ...
Leht laaditakse ...
Leht laaditakse ...
Leht laaditakse ...
Leht laaditakse ...
Leht laaditakse ...
Leht laaditakse ...
Leht laaditakse ...
Leht laaditakse ...
Leht laaditakse ...
Leht laaditakse ...
Leht laaditakse ...
Leht laaditakse ...
Leht laaditakse ...
Leht laaditakse ...
Leht laaditakse ...
Leht laaditakse ...
Leht laaditakse ...
Leht laaditakse ...
Leht laaditakse ...
Leht laaditakse ...
Leht laaditakse ...
Leht laaditakse ...
Leht laaditakse ...
Leht laaditakse ...
Leht laaditakse ...
Leht laaditakse ...
Leht laaditakse ...
Leht laaditakse ...
Leht laaditakse ...
Leht laaditakse ...
Leht laaditakse ...
Leht laaditakse ...
Leht laaditakse ...
Leht laaditakse ...
Leht laaditakse ...
Leht laaditakse ...
Leht laaditakse ...
Leht laaditakse ...
Leht laaditakse ...
Leht laaditakse ...
Leht laaditakse ...
Leht laaditakse ...
Leht laaditakse ...
Leht laaditakse ...
Leht laaditakse ...
Leht laaditakse ...
Leht laaditakse ...
Leht laaditakse ...
Leht laaditakse ...
Leht laaditakse ...
Leht laaditakse ...
Leht laaditakse ...
-
 1
1
-
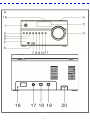 2
2
-
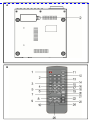 3
3
-
 4
4
-
 5
5
-
 6
6
-
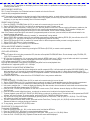 7
7
-
 8
8
-
 9
9
-
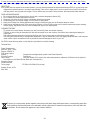 10
10
-
 11
11
-
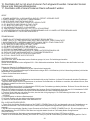 12
12
-
 13
13
-
 14
14
-
 15
15
-
 16
16
-
 17
17
-
 18
18
-
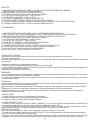 19
19
-
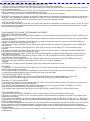 20
20
-
 21
21
-
 22
22
-
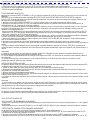 23
23
-
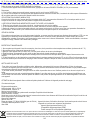 24
24
-
 25
25
-
 26
26
-
 27
27
-
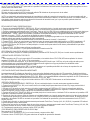 28
28
-
 29
29
-
 30
30
-
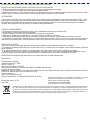 31
31
-
 32
32
-
 33
33
-
 34
34
-
 35
35
-
 36
36
-
 37
37
-
 38
38
-
 39
39
-
 40
40
-
 41
41
-
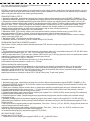 42
42
-
 43
43
-
 44
44
-
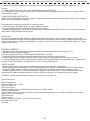 45
45
-
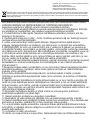 46
46
-
 47
47
-
 48
48
-
 49
49
-
 50
50
-
 51
51
-
 52
52
-
 53
53
-
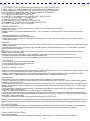 54
54
-
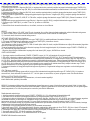 55
55
-
 56
56
-
 57
57
-
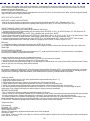 58
58
-
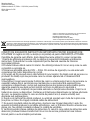 59
59
-
 60
60
-
 61
61
-
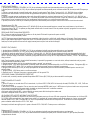 62
62
-
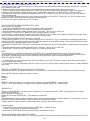 63
63
-
 64
64
-
 65
65
-
 66
66
-
 67
67
-
 68
68
-
 69
69
-
 70
70
-
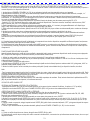 71
71
-
 72
72
-
 73
73
-
 74
74
-
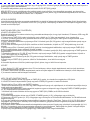 75
75
-
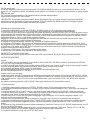 76
76
-
 77
77
-
 78
78
-
 79
79
-
 80
80
-
 81
81
-
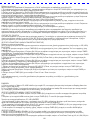 82
82
-
 83
83
-
 84
84
-
 85
85
-
 86
86
-
 87
87
-
 88
88
-
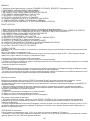 89
89
-
 90
90
-
 91
91
-
 92
92
-
 93
93
-
 94
94
-
 95
95
-
 96
96
-
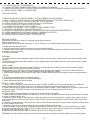 97
97
-
 98
98
-
 99
99
-
 100
100
-
 101
101
-
 102
102
-
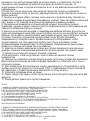 103
103
-
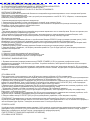 104
104
-
 105
105
-
 106
106
-
 107
107
-
 108
108
-
 109
109
-
 110
110
-
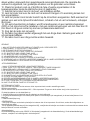 111
111
-
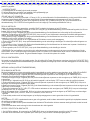 112
112
-
 113
113
-
 114
114
-
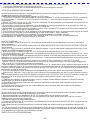 115
115
-
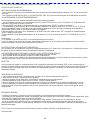 116
116
-
 117
117
-
 118
118
-
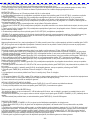 119
119
-
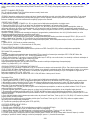 120
120
-
 121
121
-
 122
122
-
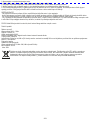 123
123
-
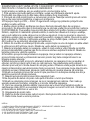 124
124
-
 125
125
-
 126
126
-
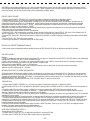 127
127
-
 128
128
-
 129
129
-
 130
130
-
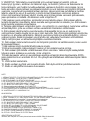 131
131
-
 132
132
-
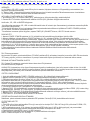 133
133
-
 134
134
-
 135
135
-
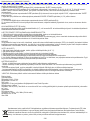 136
136
-
 137
137
-
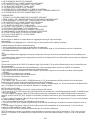 138
138
-
 139
139
-
 140
140
-
 141
141
-
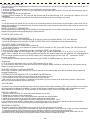 142
142
-
 143
143
-
 144
144
-
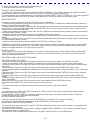 145
145
-
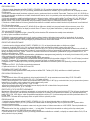 146
146
-
 147
147
-
 148
148
-
 149
149
-
 150
150
-
 151
151
-
 152
152
-
 153
153
-
 154
154
-
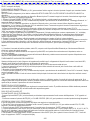 155
155
-
 156
156
-
 157
157
-
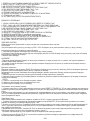 158
158
-
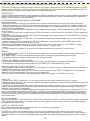 159
159
-
 160
160
-
 161
161
-
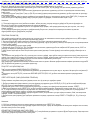 162
162
-
 163
163
-
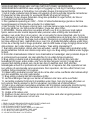 164
164
-
 165
165
-
 166
166
-
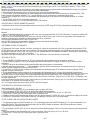 167
167
-
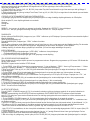 168
168
-
 169
169
-
 170
170
-
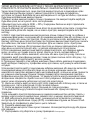 171
171
-
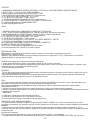 172
172
-
 173
173
-
 174
174
-
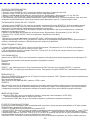 175
175
-
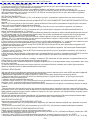 176
176
-
 177
177
-
 178
178
-
 179
179
-
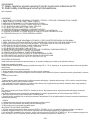 180
180
-
 181
181
-
 182
182
-
 183
183
-
 184
184
-
 185
185
-
 186
186
-
 187
187
-
 188
188


teistes keeltes
- slovenčina: Camry CR 1173 Návod na používanie
- română: Camry CR 1173 Instrucțiuni de utilizare
Seotud paberid
Muud dokumendid
-
Blaupunkt MS22BT Omaniku manuaal
-
Philips AX7201/00C Kasutusjuhend
-
Sharp XL-B710(BK) Lühike juhend
-
Lenco SCD-580SI Kasutusjuhend
-
Lenco SCD-580SI Portable radio CD player Bluetooth USB Kasutusjuhend
-
Denver TCL-212BTPINK Kasutusjuhend
-
Pioneer X-CM56D Kasutusjuhend
-
Sharp XL-B715D(BK) Lühike juhend
-
Tangent Pebble Radio White Kasutusjuhend
-
Adler AD 1169 Kasutusjuhend