Philips QP2520/20 Kasutusjuhend

Kategooria
Kehahooldajad / pardlid
Tüüp
Kasutusjuhend

See käsiraamat sobib ka

QP2531, QP2530,
QP2522, QP2521,
QP2520
11
12
13
3
1
4
5
6
7
8
9
10
2
empty page before TOC
English 6
Čeština 23
Crnogorski 40
Eesti 56
Hrvatski 73
Latviešu 90
Lietuviškai 107
Magyar 124
Polski 143
Română 162
Shqip 180
Slovenščina 196
Slovensky 213
Български 231
Македонски 250
Русский 268
Українська 287
Қазақша
304
English
Introduction
Congratulations on your purchase and welcome to
Philips! To fully benefit from the support that
Philips offers, register your product at
www.philips.com/welcome.
General description (Fig. 1)
1 Protection cap
2 Blade
3 Blade release slide
4 On/off button
5 Battery status indicator (QP2531, QP2530 only)
6 Small plug
7 Battery charge indicator (QP2522, QP2521,
QP2520 only)
8 Supply unit (QP2531, QP2530: adapter type
HQ850. QP2522, QP2521, QP2520: adapter type
A00390.)
9 Replacement blade (QP2531, QP2522 only)
10 Click-on stubble comb 5mm
11 Click-on stubble comb 3mm (QP2531, QP2530,
QP2520 only)
12 Click-on stubble comb 2mm (QP2531, QP2530
only)
13 Click- on stubble comb 1mm
Important safety information
Read this important information carefully before
you use the appliance and its accessories and save
it for future reference. The accessories supplied
may vary for different products.
6
English
Danger
- Keep the supply unit dry.
Warning
- To charge the battery, only use the
detachable supply unit provided with the
appliance. For the type number of the
original supply unit, please see ' General
description' in the manual.
- The supply unit contains a transformer. Do
not cut off the supply unit to replace it with
another plug, as this causes a hazardous
situation.
7
English
- This appliance can be used by children aged
from 8 years and above and persons with
reduced physical, sensory or mental
capabilities or lack of experience and
knowledge if they have been given
supervision or instruction concerning use of
the appliance in a safe way and understand
the hazards involved. Children shall not play
with the appliance. Cleaning and user
maintenance shall not be made by children
without supervision.
- Always unplug the appliance before you
clean it under the tap.
- Always check the appliance before you use
it. Do not use the appliance if it is damaged,
as this may cause injury. Always replace a
damaged part with one of the original type.
- Do not open the appliance to replace the
rechargeable battery.
Caution
- Never immerse the charging
stand in water and do not rinse
it under the tap.
8
English
- Do not use the supply unit in or
near wall sockets that contain
an electric air freshener to
prevent irreparable damage to
the supply unit.
- Only use this appliance for its
intended purpose as shown in
the user manual.
- For hygienic reasons, the
appliance should only be used
by one person.
- Never use water hotter than
60°C to rinse the appliance.
- Never use compressed air,
scouring pads, abrasive
cleaning agents or aggressive
liquids such as petrol or
acetone to clean the appliance.
Electromagnetic fields (EMF)
This Philips appliance complies with all applicable
standards and regulations regarding exposure to
electromagnetic fields.
9
English
General
- This appliance is waterproof. It is suitable for
use in the bath or shower and for cleaning
under the tap. For safety reasons, the appliance
can therefore only be used without cord.
- The supply unit is suitable for mains voltages
ranging from 100 to 240 volts.
- The supply unit transforms 100-240 volts to a
safe low voltage of less than 24 volts.
- Maximum noise level: Lc = 75dB(A).
Charging
Note: This appliance can only be used without
cord.
QP2531, QP2530: Charging normally takes approx.
4 hours.
QP2522, QP2521, QP2520: Charging normally takes
approx. 8 hours.
A fully charged appliance has an operating time of
up to 60 minutes (QP2531, QP2530) or 45 minutes
(QP2522, QP2521, QP2520).
Charge the appliance before you use it for the first
time and when the battery charge indicator
indicates that the battery is almost empty.
Battery status indicator QP2531, QP2530:
When the battery status indicator flashes orange,
the battery is almost empty.
10
English
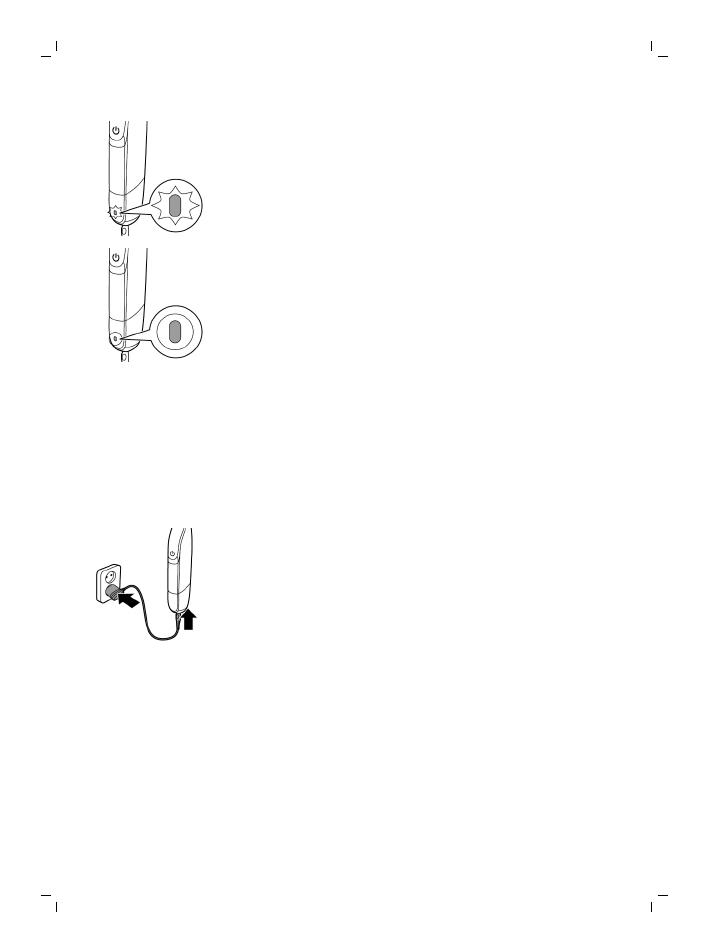
When the appliance is charging, the battery status
indicator light flashes green.
When the battery is fully charged, thebattery
statusindicator lights up green continuously.
Approx. 30 minutes after the battery is fully
charged or when you disconnect the appliance
from the mains, the light of the battery status
indicator switches off automatically.
Battery charge indicator QP2522, QP2521, QP2520:
The battery status is indicated by the performance
of the appliance. When the appliance starts
working more slowly, the battery is almost empty
and needs to be charged for optimal performance.
Charging with the adapter
1 Insert the small plug into the appliance and put
the supply unit in the wall socket.
2 QP2522, QP2521, QP2520 only: The battery
charge indicator on the adapter lights up
continuously, when the appliance is connected
to the mains.
3 After charging, remove the supply unit from the
wall socket and pull the small plug out of the
appliance.
Using the appliance
You can use the appliance to trim, edge or shave
facial hair (beard, moustache and sideburns).
Shave for a smooth result, trim to obtain a certain
length and edge to create perfect edges and sharp
lines. This appliance is not intended for shaving,
11
English
edging or trimming hairs on lower body parts or
scalp hair. Take your time when you first start to
use the appliance. You have to acquire practice
with the appliance.
Note: This appliance can only be used without
cord.
Switching the appliance on and off
1 To switch on the appliance, press the on/off
button once.
2 To switch off the appliance, press the on/off
button once.
Shaving
Warning: Before you use the appliance,
always check the blade for damage or wear.
If the blade is damaged or worn, do not use
the appliance, as injury may occur. Replace
a damaged blade before you use the
appliance (see chapter ‘Replacement’).
Shaving
- Make sure that the blade is in full contact with
the skin by placing it flat on the skin.
- For the best result, move the appliance against
the grain.
- Make long strokes while pressing lightly.
- You can use the appliance dry or wet with gel or
foam. You can even use the appliance in the
shower.
12
English
- Shaving a clean beard and face gives the best
results.
1 Switch on the appliance.
2 Place the blade on the skin and move the
appliance up or against the grain in long strokes
while you press it lightly.
Note: Make sure you hold the surface of the
blade flat against your skin.
3 Switch off and clean the appliance after every
use (see ‘Cleaning and maintenance’).
Edging
You can also use both edges of the blade to create
sharp lines and perfect edges. Hold the appliance
in such a way that the blade is perpendicular to
the skin and one of its edges touches the skin. This
allows more precise detailing of sideburns and the
area around the mouth and nose.
1 To create sharp edges and lines, you can use
either edge of the blade.
2 Switch on the appliance.
3 Place the edge of the blade perpendicular onto
the skin.
13
English
-
Make straight strokes while applying gentle
pressure.
4 Switch off and clean the appliance after every
use (see ‘Cleaning and maintenance’).
Trimming with comb
The click-on stubble combs allow you to trim hair
to different lengths.
QP2531, QP2530 come with 4 click-on stubble
combs: 5mm, 3mm, 2mm and 1mm.
QP2520 comes with 3 click-on stubble combs:
5mm, 3mm and 1mm.
QP2522, QP2521 come with 2 click-on stubble
combs: 5mm and 1mm.
Start with the 5mm comb to acquire practice with
this appliance.
The indication on each comb corresponds to the
hair length in millimeters.
Tips
-
Always make sure that the tips of the click-
on stubble comb point in the direction in
which you move the appliance.
-
Make sure that the flat part of the comb is
always in full contact with the skin to obtain
an even trimming result.
-
Since hair grows in different directions, you
need to move the appliance in different
directions as well (upward, downward or
across).
-
Trimming is easier when the skin and hair are
dry.
14
English
1 Place the comb onto the blade, with the teeth
of the comb pointing upwards.
Note: Always trim in the direction of the teeth of
the comb. This will give you the best results.
2 Switch on the appliance.
3 Place the comb onto the skin and move the
appliance in the direction of the teeth of the
comb.
Note: For the best result, move it against the
grain.
4 Switch off and clean the appliance after every
use (see ‘Cleaning and maintenance’).
5 To remove the comb, hold it on both sides and
pull it off the blade.
Cleaning and maintenance
Clean the appliance after every use.
Caution: Never use compressed air, scouring
pads, abrasive cleaning agents or aggressive
liquids such as petrol or acetone to clean the
appliance.
Caution: Do not tap the appliance against a
surface to remove water from it, as this may
cause damage. Replace the blade if it is
damaged.
15
English
Cleaning the appliance
1 Remove the comb from the blade. Always turn
the appliance off before putting on or taking off
combs.
2 If a lot of hairs have accumulated on the comb,
first blow them off.
3 If a lot of hairs have accumulated on the
appliance, first blow them off.
4 Then switch on the appliance and rinse the
blade with lukewarm water.
Caution: Do not dry the blade with a towel or a
tissue as this may cause damage.
5 Then rinse the comb with lukewarm water.
6 Let the appliance and comb dry.
Note: The blade is fragile. Handle it carefully.
Replace the blade if it is damaged.
16
English
Storage
Always attach the protection cap on the blade to
protect the blade from damage during travelling or
storage.
We advise you to let the appliance and its
attachments dry before you store them for the
next use.
1 Place the protection cap onto the edge of the
blade.
2 Close the protection cap.
Replacement
Usage indicator
For optimal cutting and gliding performance, we
advise you to replace the blade every 4 months,
when it no longer provides the shaving or trimming
results you expect.
The blade is equipped with a usage indicator. A
green bar will gradually appear on the blade as
you use it. When it is highly visible, it is
recommended to replace your blade for the best
OneBlade experience. Always replace the blade
with original Philips blade.
Depending on your usage behavior, the exact
lifetime of the blade could be longer or shorter.
17
English
Similar to a manual blade, the blade becomes
blunt over time, which results in increased hair
pulling and reduced cutting performance.
Replacing the blade
1 Switch off the appliance.
1
2
2 Push the blade release slide upwards carefully,
and hold the blade on both sides to remove the
blade. This will prevent the blade from flying off
the handle.
3 Hold the new blade on its sides and press it
onto the handle (‘click’).
Note: When you hear a click, the new blade is
placed correctly and ready for use.
Ordering accessories
To buy accessories or spare parts, visit
www.shop.philips.com/service or go to your
Philips dealer. You can also contact the Philips
Consumer Care Center in your country (see the
international warranty leaflet for contact details).
The following parts are available:
- QP210 Blade 1-pack
- QP220 Blade 2-pack
Recycling
- This symbol means that this product shall not
be disposed of with normal household waste
(2012/19/EU).
18
English
- This symbol means that this product contains a
built-in rechargeable battery which shall not be
disposed of with normal household waste
(2006/66/EC). Please take your product to an
official collection point or a Philips service
center to have a professional remove the
rechargeable battery.
- Follow your country’s rules for the separate
collection of electrical and electronic products
and rechargeable batteries. Correct disposal
helps prevent negative consequences for the
environment and human health.
Removing the rechargeable battery
Only remove the rechargeable battery when
you discard the appliance. Before you
remove the battery, make sure that the
appliance is disconnected from the mains
and that the battery is completely empty.
Take any necessary safety precautions
when you handle tools to open the
appliance.
Note: We strongly advise you to have a
professional remove the rechargeable battery.
1 Disconnect the appliance from the mains and
let the appliance run until the motor stops.
2 Remove the blade from the appliance.
3 Remove the bottom of the appliance by
bending it downwards and pull it off.
19
English
4 Take out the battery compartment by
separating the bottom part from the top part.
5 Separate the battery section from the bottom
part.
6 Lift the battery out of the inner body with the
screwdriver. The battery is connected with
double-sided tape.
Warning: Be careful, the battery strips are
very sharp.
Warranty and support
If you need information or support, please visit
www.philips.com/support or read the
international warranty leaflet.
Guarantee restrictions
The blade is not covered by the terms of the
international guarantee because it is subject to
wear.
Troubleshooting
This chapter summarizes the most common
problems you could encounter with the appliance.
If you are unable to solve the problem with the
information below, visit www.philips.com/support
for a list of frequently asked questions or contact
the Consumer Care Center in your country.
20
English
1 / 1

Philips QP2520/20 Kasutusjuhend

Kategooria
Kehahooldajad / pardlid
Tüüp
Kasutusjuhend
See käsiraamat sobib ka