
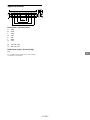
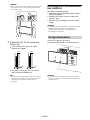
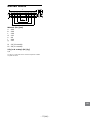
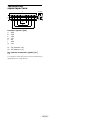
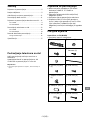
D-525-100-11(1)
SU-WL450
Wall-Mount
Bracket
Installation Information
GB
Informations d’installation
FR
Información de instalación
ES
Installationsinformationen
DE
Installatie-informatie
NL
Informazioni sull’installazione
IT
Installationsinformation
SE
Informacje dotyczące instalacji
PL
Informações de instalação
PT
Oplysninger om montering
DK
Asennustiedot
FI
Installasjonsveiledning
NO
Πληροφορίες εγκατάστασης
GR
Montaj Bilgileri
TR
Szerelési információk
HU
Instalační informace
CZ
Informácie týkajúce sa montáže
SK
Informaţii de instalare
RO
Информация за монтаж
BG
Информация по установке
RU
Інформація про встановлення
UA
Paigaldusteave
EE
Uzstādīšanas informācija
LV
Montavimo informacija
LT
Navodila za uporabo
SI
Informacije za instalaciju
HR
Орнату ақпараты
KZ
Informacije za montažu
SR
הנקתה תוארוה
HE

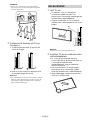
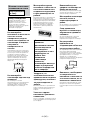
− 2 (GB) −
Installation Information for
Using Sony Wall-Mount Bracket (SU-WL450)
Supported models:
KD-77AG9 / 65AG9 / 55AG9
To Customers
For product protection and safety reasons, Sony strongly recommends that installation of your TV
be performed by Sony dealers or licensed contractors. Do not attempt to install it yourself.
To Sony Dealers and Contractors
Provide full attention to safety during the installation, periodic maintenance and examination of this
product.
Sufficient expertise is required for installing this product, especially to determine the
strength of the wall for withstanding the TV’s weight. Be sure to entrust the attachment
of this product to the wall to Sony dealers or licensed contractors and pay adequate
attention to safety during the installation. Sony is not liable for any damage or injury
caused by mishandling or improper installation.
For Safety and proper installation, follow the Wall-mount Bracket Operation Instructions, TV Setup
Guide and the directions in this manual.

− 3 (GB) −
GB
On Safety
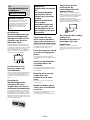
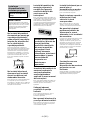
Thank you for purchasing this product.
To Customers
Sufficient expertise is required for
installing this product. Be sure to
subcontract the installation to Sony
dealers or licensed contractors and pay
special attention to safety during the
installation. Sony is not liable for any
damages or injury caused by
mishandling or improper installation, or
installing any other than the specified
product. Your Statutory Rights (if any) are
not affected.
To Sony dealers
Sufficient expertise is required for
installing this product. Be sure to read
this instruction manual thoroughly to do
the installation work safely. Sony is not
liable for any damages or injury caused
by mishandling or improper installation.
Please give this manual to the customer
after installation.
This instruction manual shows the correct
handling of the product and important
precautions necessary to prevent accidents.
Be sure to read this manual thoroughly and
use the product correctly. Keep this manual
available for future reference.
Products by Sony are designed with safety in
mind. If the products are used incorrectly,
however, it may result in a serious injury
through fire, electric shock, the product
toppling over, or the product dropping. Be
sure to observe the precautions for safety to
prevent such accidents.
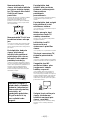
CAUTION
Specified products
This Wall-Mount Bracket is designed for use
with the products specified TVs. For TVs,
refer to their Reference Guide to verify that
the Wall-Mount Bracket can be used.
To Customers
WARNING
If the following precautions are not
observed, serious injury or death
through fire, electric shock, or the
product dropping can result.
Be sure to subcontract
the installation to
licensed contractors and
keep small children away
during the installation.
If the Wall-Mount Bracket or the TV is not
installed correctly, the following accidents
may occur. Be sure licensed contractors carry
out installation.
The TV may fall and cause a serious injury
such as a bruise or a fracture.
If the wall on which the Wall-Mount
Bracket is installed is unstable, uneven, or
not perpendicular to the floor, the unit
may fall and cause injury or property
damage. The wall should be capable of
supporting a weight of at least four times
the TV weight.
(Refer to your TV’s Reference Guide for its
weight.)
If the installation of the Wall-Mount
Bracket on the wall is not sufficiently
sturdy, the unit may fall and cause injury or
property damage.
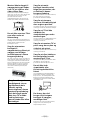
Be sure to subcontract
moving or dismounting
of the TV to licensed
contractors.
If persons other than licensed contractors
transport or dismount the TV, it may fall and
cause injury or property damage. Be sure
that two or more persons (three or more
persons for 75 inches and above TV set) carry
or dismount the TV.
Do not remove screws,
etc., after mounting the
TV.
If you do so, the TV may fall and cause injury
or property damage.
Do not make alterations
to the parts of the Wall-
Mount Bracket.
If you do so, the Wall-Mount Bracket may fall
and cause injury or property damage.
Do not mount any
equipment other than
the specified product.
This Wall-Mount Bracket is designed for use
with the specified product only. If you mount
equipment other than specified, it may fall or
break, and cause injury or property damage.
Do not apply any load
other than the TV on the
Wall-Mount Bracket.
Do not shake the TV left/
right, up/down.
If you do so, the TV may fall and cause injury
or property damage.
Do not lean on or hang
from the TV.
Do not lean on or hang from the TV as it may
fall on you and cause serious injury.
CAUTION
If the following precautions are not
observed, injury or property damage
may occur.
Do not handle the
product with excessive
force during cleaning or
maintenance.
Do not apply excessive force on the topside
of the TV. If you do so, the TV may fall and
cause injury or property damage.
Precautions
If you use the TV installed on the
Wall-Mount Bracket for a long time, the
wall behind or above the TV may become
discolored or the wallpaper may come
unstuck, depending on the material of the
wall.
If the Wall-Mount Bracket is removed after
installing it on the wall, the screw holes are
left.
Do not use the Wall-Mount Bracket in a
place where it is subjected to mechanical
vibrations.
Installing the Wall-
Mount Bracket
To Sony Dealers
WARNING
The following instructions are for Sony
dealers only. Be sure to read safety
precautions described above and pay
special attention to safety during the
installation, maintenance and checking
of this product.
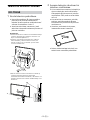
Do not install the Wall-
Mount Bracket on wall
surfaces where the
corners or the sides of
the TV protrude away
from the wall surface.

− 4 (GB) −
Do not install the Wall-Mount Bracket on wall
surfaces such as a pillar, where the corners
or the sides of the TV protrude away from
the wall surface. If a person or object
happens to hit the protruded corner or side
of the TV, it may cause injury or property
damage.
Do not install the TV over
or under an air-
conditioner.
If the TV is exposed to water leaks or air
current from an air conditioner for a long
time, it may cause a fire, an electric shock or
a malfunction of the TV.
Be sure to install the
Wall-Mount Bracket
securely to the wall
following the instructions
in this instruction
manual.
If any of the screws are loose or fall out, the
Wall-Mount Bracket may fall and cause injury
or property damage. Be sure to use the
appropriate screws for the material of the
wall and install the unit securely using four
or more screws of 8 mm diameter (or
equivalent).
Be sure to use the
supplied screws and
attachment parts
properly following the
instructions given in
this instruction
manual. If you use
substitute items, the
TV may fall and cause
bodily injury to
someone or damage to
the TV.
Be sure to assemble the
bracket properly
following the instructed
procedure explained in
this instruction manual.
If any of the screws are loose or fall out, the
TV may fall and cause bodily injury to
someone or damage to the TV.
Be sure to tighten the
screws securely in the
designated position.
If you fail to do so, the TV may fall and cause
bodily injury to someone or damage to the
TV.
Be careful not to subject
the TV to shock during
installation.
If the TV is exposed to shock, it may fall or
break apart. This may cause injury.
Be sure to install the TV
on a wall that is both
perpendicular and flat.
If you fail to do so, the TV may fall and cause
injury.
After proper installation
of the TV, secure the
cables properly.
If people or objects get tangled with cables,
this may result in injury or damage to the TV.
Do not allow the mains
lead or the connecting
cable to be pinched.
If the mains lead or the connecting cable is
pinched between the unit and the wall or is
bent or twisted by force, the internal
conductors may become exposed and cause
a short circuit or an electrical break. This may
cause a fire or an electric shock.
The screws needed to
secure the Wall-Mount
Bracket to the wall are
not supplied.
Use the appropriate screws for the wall
material and structure when mounting the
Wall-Mount Bracket.

− 5 (GB) −
GB
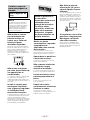
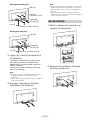
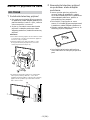
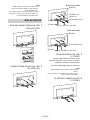
Installing the TV onto the wall
Installation procedure differs, depending on
your TV.
Use the Wall-Mount Bracket SU-WL450 to
install the TV to the wall.
Note
Be sure to store the removed screws in a safe place,
keeping them away from children.
Preparing for installation
Have the TV’s Reference Guide and Setup
Guide at hand before installation.
Be sure to have a Phillips screwdriver that
fits the screws prior to the assembly.
Confirm the installing position of your TV.
Prepare four or more screws of 8 mm
diameter and one screw of 5 mm or
equivalent (not supplied). Select screws
suitable for the material of the wall.
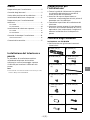
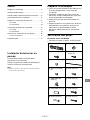
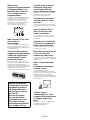
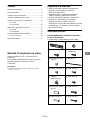
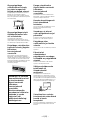
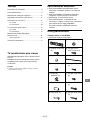
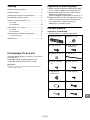
Checking the parts
Supplied with SU-WL450
Verify that all the parts are included.
Base (20) (1) Pulley (2)
PSW 6x20 (4) PSW 4x20 with
Bush (2)
Spacer (20) (2) Belt (1)
Bush (20) (M4) (2) PSW 4x20 (2)
Base Adaptor (2) PSW 4x10 (8)
Spacer (60) (2) PSW 6x50 (2)
Bush (M4) (2) PSW 4x50 (2)
Table of Contents
Preparing for installation ................................. 5
Checking the parts ........................................... 5
Deciding on the installation location .............. 6
Installing the Base on the wall ........................ 8
Preparing for the installation of the TV ........... 9
KD-77AG9 ..............................................................9
KD-65/55AG9 ...................................................... 10
Installing the TV on the wall ........................... 12
KD-77AG9 ............................................................12
KD-65/55AG9 ...................................................... 14
Confirming the completion of the
installation ......................................................16
Other information ............................................... 16
Specifications ..................................................17

− 6 (GB) −
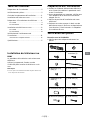
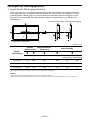
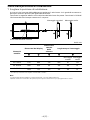
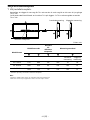
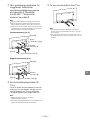
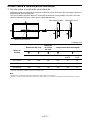
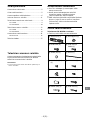
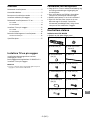
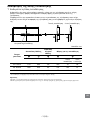
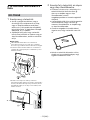
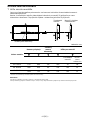
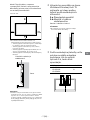
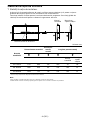
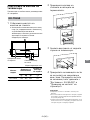
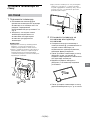
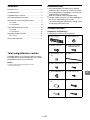
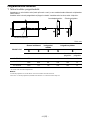
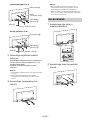
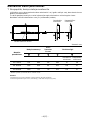
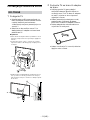
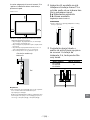
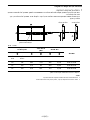
Deciding on the installation location
1 Decide on the installation location.
Make sure that the wall has enough space for the TV and is capable of supporting a weight of at
least four times that of the TV.
Refer to the following table on installing the TV to the wall. Refer to your TV’s Reference Guide
for the TV’s weight.
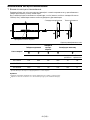
Screen centre point
Standard mounting Slim mounting
Unit: mm
Model Name
Display dimensions
Screen
centre
dimension
Length for mounting
Standard
mounting
Slim
mounting
KD-77AG9 1,721 996 -24* 482 111 69
KD-65AG9
1,447 834 48 476 103 61
KD-55AG9
1,226 710 110 476 103 61
* Bracket positioning is below the screen centre point.
Note
Figures in the table may differ slightly depending on the installation.
When your TV is installed on the wall, the upper side of the TV slightly leans forward.

− 7 (GB) −
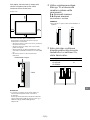
GB
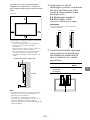
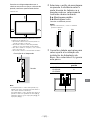
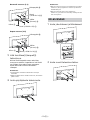
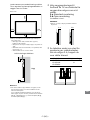
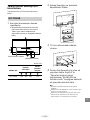
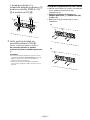
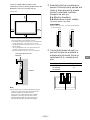
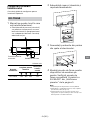
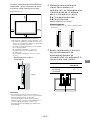
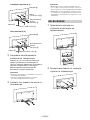
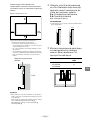
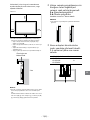
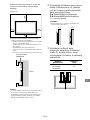
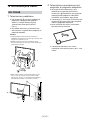
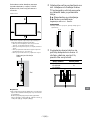
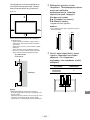
Allow for suitable clearance between the
TV and the ceiling and protruding parts of
the wall as shown below.
Unit: mm
300100
100 100
To ensure proper ventilation and prevent the
collection of dirt or dust:
ˋ Do not lay the TV set flat, install upside down,
backwards, or sideways.
ˋ Do not place the TV set on a shelf, rug, bed or in a
closet.
ˋ Do not cover the TV set with a cloth, such as
curtains, or items such as newspapers, etc.
ˋ Do not install the TV set as shown below.
Air circulation is blocked.
Wall
Note
If you intend to route the cables in the wall, make a
hole in the wall to insert the cables before beginning
the installation.
To prevent pinching the cables, prepare a hole in the
wall somewhere outside the perimeter of the Base
(20) , Base Adaptor and Spacer (20) , Spacer
(60) .
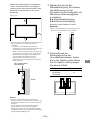
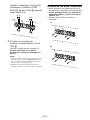
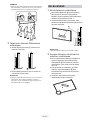
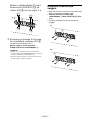
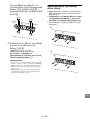
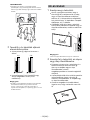
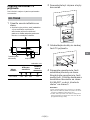
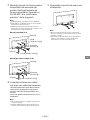
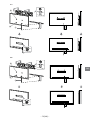
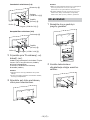
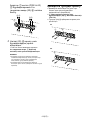
2 Select Wall mounting style. It is
selectable as shown below.
2-a Standard mount
2-b Slim mount
Refer to the table of step 1.
WARNING
When 2-b is selected, rear terminal access is limited.
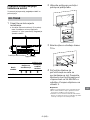
2-a 2-b
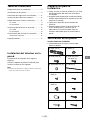
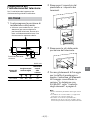
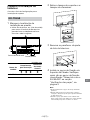
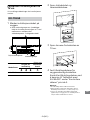
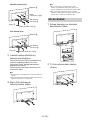
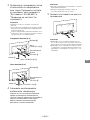
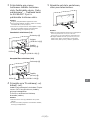
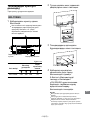
3 Refer to the below table about
the Base Adaptor fitting
location. In case of selecting
2-b, then skip this step.
Model Name Hook location
KD-77AG9
KD-65AG9
KD-55AG9
b
a
d
b
c

− 8 (GB) −
Fit Base Adaptor by using
Screw (PSW 4x10) to Base
(20) when selecting 2-a.
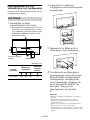
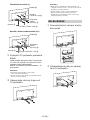
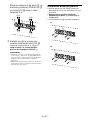
4 Decide the positions of the
screws for installing the Base
(20) .
Refer to the specifications on page 17.
When selecting 2-a, please use the hole
positions of Base Adaptor .
WARNING
The wall that the TV will be mounted on should be
able to support a weight of at least four times that of
the TV (Refer to your TV’s Reference Guide for its
weight.).
Determine the strength of the wall the TV will be
mounted on. Reinforce the wall sufficiently, if
necessary.
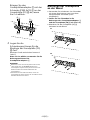
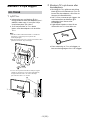
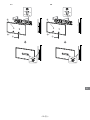
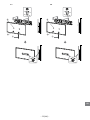
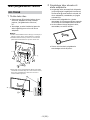
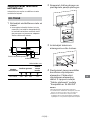
Installing the Base on the
wall
Use four or more screws of 8 mm diameter
or equivalent (not supplied).
Fit four screws to the holes of Base
Adaptor with Base (20) (2-a only).
Install the Base (20) on the wall
horizontally.
2-a
2-b

− 9 (GB) −
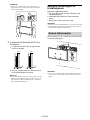
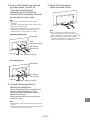
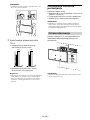
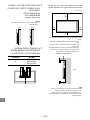
GB
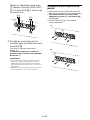
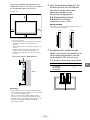
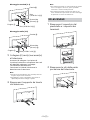
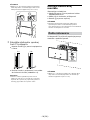
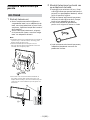
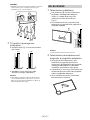
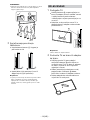
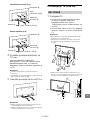
2 Remove the stand cover and
terminal covers.
3 Remove the screws from the
rear of the TV.
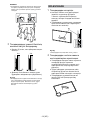
4 Attach the Attachment parts for
Wall-Mount Bracket. Check the
Attachment parts by referring to
“Supplied with SU-WL450” in
“Checking the parts” on page
5.
Note
Firmly secure the Attachment parts using screws.
When using an electric screwdriver, set the torque
setting to approximately 1.5 N·m {15 kgf·cm}.
Be sure to store the used or unused parts in a safe
place for future use. Retain this manual for future
reference.
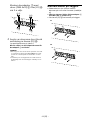
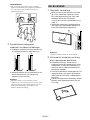
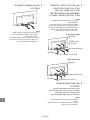
Preparing for the installation
of the TV
Refer to the Setup Guide for stand installation.
KD-77AG9
1 Mark the installation location on
the wall.
Use masking tape, etc. (not supplied) to
mark the location of the TV near the
Base or Base Adaptor. Refer to the
following table.
(300)
Screen centre point
Masking tape
(1,000)
Unit: mm
Model Name
Length for
marking
Screen
centre
dimension
KD-77AG9 1,721 362 150 24

− 10 (GB) −
Note
Be careful when lifting the TV as the Table-Top Stand
is detached, the Table-Top Stand may topple over
and cause personal injury.
Take care when removing the Table-Top Stand from
the TV to prevent it from falling over and damaging
the surface that the TV is sitting on.
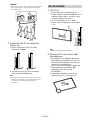
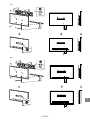
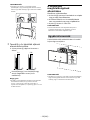
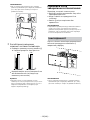
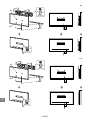
KD-65/55AG9
1 Remove the stand cover and
terminal covers.
2 Remove the screws from the
rear of the TV.
3 Attach the Attachment parts for
Wall-Mount Bracket. Check the
Attachment parts by referring to
“Supplied with SU-WL450” in
“Checking the parts” on page
5.
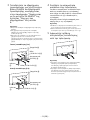
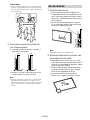
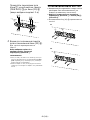
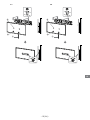
Standard mounting (2-a)
Belt
Spacer
(60 mm)
Screw (+PSW 6 x 50)
Pulley
Screw
(+PSW 6 x 20)
Slim mounting (2-b)
Belt
Screw (+PSW 6 x 20)
Pulley
Spacer (20 mm)
5 Connect the necessary cable(s)
to the TV.
Make sure to connect the cables before
installing the TV on the wall. You will be
unable to connect the cables when the TV
is installed.
Refer to the Reference Guide supplied with
your TV.
Note
Subcontract the cable routing in the wall to a licensed
contractor.
Bundle the connecting cables to prevent stepping on
them before wall mounting.
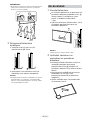
6 Detach the Table-Top Stand
from the TV.

− 11 (GB) −
GB
5 Detach the Table-Top Stand
from the TV.
Note
Be careful when lifting the TV as the Table-Top Stand
is detached, the Table-Top Stand may topple over
and cause personal injury.
Take care when removing the Table-Top Stand from
the TV to prevent it from falling over and damaging
the surface that the TV is sitting on.
Note
Firmly secure the Attachment parts using screws.
When using an electric screwdriver, set the torque
setting to approximately 1.5 N·m {15 kgf·cm}.
Be sure to store the used or unused parts in a safe
place for future use. Retain this manual for future
reference.
Standard mounting (2-a)
Belt
Spacer
(60 mm)
Screw (+PSW 6 x 50)
Pulley
Screw
(+PSW 6 x 20)
Slim mounting (2-b)
Belt
Screw (+PSW 6 x 20)
Pulley
Spacer (20 mm)
4 Connect the necessary cable(s)
to the TV.
Make sure to connect the cables before
installing the TV on the wall. You will be
unable to connect the cables when the TV
is installed.
Refer to the Reference Guide supplied with
your TV.
Note
Subcontract the cable routing in the wall to a licensed
contractor.
Bundle the connecting cables to prevent stepping on
them before wall mounting.

− 12 (GB) −
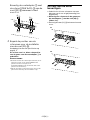
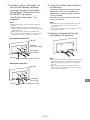
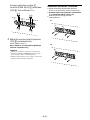
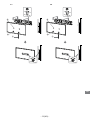
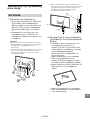
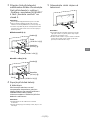
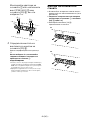
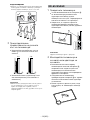
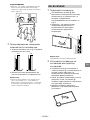
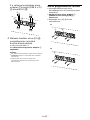
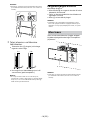
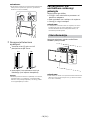
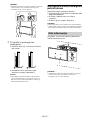
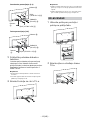
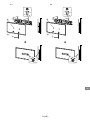
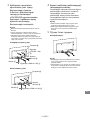
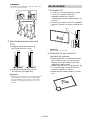
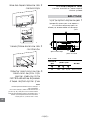
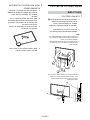
Installing the TV on the wall
KD-77AG9
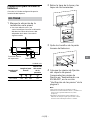
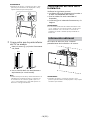
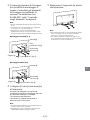
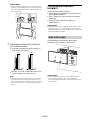
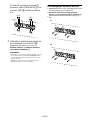
1 Lift the TV.
For the location of the Pulleys to the
hang on the Base or Base Adaptor, refer
to the table of step 3 in “Deciding on the
installation location” on page 7.
Make sure that the rear of the TV
touches the Base or Base Adaptor when
holding the TV.
Note
Hold the TV securely with both hands and make sure
the Belt and the bottom of the TV align with the
masking tape.
Carry the TV with three people and the person who is
in front of the TV leads the others to adjust the
position.
Take great care when installing the TV to the wall
especially for the person who is supporting the TV
from below, the television set may fall, causing
serious bodily injury or even death.
2 Install the TV onto the Base or
Base Adaptor.
Gently slide down the TV and hang the
Pulleys attached to the rear of the TV
to the Base or Base Adaptor, making
sure to confirm the shape of the holes.
After installing the TV on the wall,
confirm the Pulleys are firmly latched
into the Base or Base Adaptor.
Release both hands slowly to ensure
that the TV does not fall.
After installing the TV on the wall,
remove the masking tape, etc. from the
wall.

− 13 (GB) −
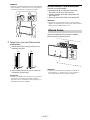
GB
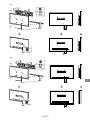
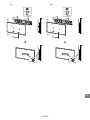
2-a
2-b

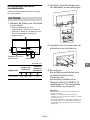
− 14 (GB) −
WARNING
Be sure that two or more persons (three or more
persons for 75 inches and above TV set) hold the TV
when carrying it.
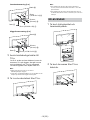
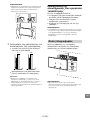
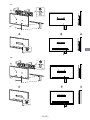
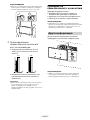
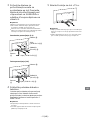
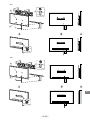
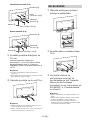
3 Preventing the bottom of the TV
from shifting.
Take up the slack of Belt and attach it
to the wall tightly.
2-a 2-b
Use a 5 mm diameter screw or
equivalent (not supplied).
Note
Try to pull the bottom of the TV towards yourself
slightly, to make sure that it does not move forward.
If there is any movement, it is not fixed correctly, and
the Belt should be secured firmly again.
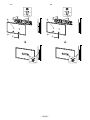
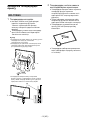
KD-65/55AG9
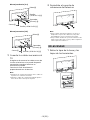
1 Lift the TV.
For the location of the Pulleys to the
hang on the Base or Base Adaptor, refer
to the table of step 3 in “Deciding on the
installation location” on page 7.
Make sure that the rear of the TV
touches the Base or Base Adaptor when
holding the TV.
Note
Hold the TV securely with both hands.
2 Install the TV onto the Base or
Base Adaptor.
Gently slide down the TV and hang the
Pulleys attached to the rear of the TV
to the Base or Base Adaptor, making
sure to confirm the shape of the holes.
After installing the TV on the wall,
confirm the Pulleys are firmly latched
into the Base or Base Adaptor.
Release both hands slowly to ensure
that the TV does not fall.

− 15 (GB) −
GB
2-a
2-b

− 16 (GB) −
WARNING
Be sure that two or more persons (three or more
persons for 75 inches and above TV set) hold the TV
when carrying it.
3 Preventing the bottom of the TV
from shifting.
Take up the slack of Belt and attach it
to the wall tightly.
2-a 2-b
Use a 5 mm diameter screw or
equivalent (not supplied).
Note
Try to pull the bottom of the TV towards yourself
slightly, to make sure that it does not move forward.
If there is any movement, it is not fixed correctly, and
the Belt should be secured firmly again.
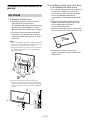
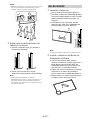
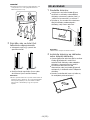
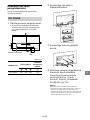
Confirming the completion of
the installation
Check the following points.
The Pulleys are firmly hung onto the Base
or Base Adaptor.
The cord and the cable are not twisted or
pinched.
The Belt is tight with no slack.
WARNING
Improper placement of the mains lead, etc. may cause fire
or electric shock through a short circuit. Be sure to
confirm the completion of the installation for safety.
Other information
When removing the TV, reverse the previous
installation procedure.
WARNING
Be sure that two or more persons (three or more persons
for 75 inches and above TV set) hold the TV when
removing it.

− 17 (GB) −
GB
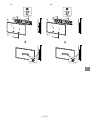
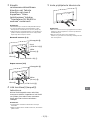
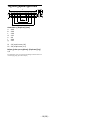
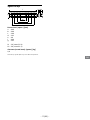
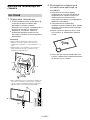
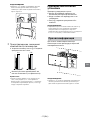
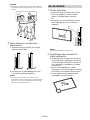
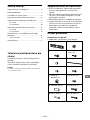
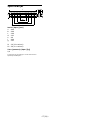
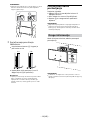
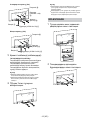
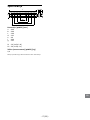
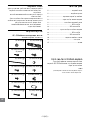
Specifications
f
c
d
b
a
g
e
h2h1
Dimensions: (Approx.) [mm]
a : 400
b : 300
c : 200
d : 100
e : 80
f : 480
g : 100
h1 : 20 (case 2-b)
h2 : 60 (case 2-a)
Weight (base only): (Approx.) [kg]
0.8
Design and specifications are subject to change without
notice.

− 2 (FR) −
Informations d’installation pour l’utilisation
du support de fixation murale Sony
(SU-WL450)
Modèles pris en charge :
KD-77AG9 / 65AG9 / 55AG9
À l’attention des clients
Pour des raisons de sécurité et de protection du produit, Sony recommande vivement de confier
l’installation de votre téléviseur à des revendeurs ou installateurs agréés Sony. N’essayez pas de
l’installer vous-même.
A l’attention des installateurs et revendeurs Sony
Soyez particulièrement attentif à la sécurité pendant l’installation, l’entretien périodique et l’examen
du produit.
L’installation de ce produit exige un certain savoir-faire, notamment pour vérifier la
résistance du mur qui devra soutenir le poids du téléviseur. Veillez à confier la fixation
de ce produit au mur à des revendeurs ou installateurs agréés Sony et portez une
attention suffisante aux consignes de sécurité pendant l’installation. Sony ne saurait
être tenue responsable de tout dommage ou de toute blessure découlant d’une
mauvaise utilisation ou d’une installation incorrecte.
Pour la sécurité et une installation correcte, suivez le Mode d’emploi du support de fixation murale,
le Guide d’installation du téléviseur et les consignes de ce manuel.

− 3 (FR) −
FR
Sécurité
Nous vous remercions d’avoir fait
l’acquisition de ce produit.
À l’attention des clients
L’installation de ce produit exige un
certain savoir-faire. Veillez à confier
l’installation à des revendeurs Sony ou à
des installateurs agréés et portez une
attention particulière aux consignes de
sécurité pendant l’installation. Sony ne
saurait être tenue responsable de tout
dommage ou de toute blessure
découlant d’une mauvaise utilisation ou
d’une installation incorrecte, ou encore
de l’installation d’un produit autre que
celui spécifié. Vos droits légaux
(éventuels) ne sont pas affectés.
À l’attention des
détaillants Sony
L’installation de ce produit exige un
certain savoir-faire. Lisez ce mode
d’emploi attentivement afin de procéder
à l’installation en toute sécurité. Sony ne
saurait être tenue responsable de tout
dommage ou de toute blessure
découlant d’une mauvaise utilisation ou
d’une installation incorrecte. Une fois
l’installation terminée, veuillez remettre
ce manuel d’installation au client.
Ce mode d’emploi indique comment
manipuler le produit correctement et
contient des précautions essentielles à
prendre pour éviter tout accident. Lisez
attentivement ce mode d’emploi et veillez à
utiliser le produit correctement. Conservez ce
mode d’emploi pour toute référence
ultérieure.
Les produits Sony sont conçus pour vous
offrir le maximum de sécurité. Toutefois, si
les produits sont utilisés de façon incorrecte,
ils peuvent entraîner des blessures graves en
provoquant un incendie ou l’électrocution,
ou encore la chute de l’appareil hors de son
support. Veillez à observer les consignes de
sécurité préconisées pour éviter de tels
accidents.
ATTENTION
Produits spécifiés
Ce support de fixation murale est conçu pour
être utilisé avec les téléviseurs spécifiés.
Pour plus d’informations sur les téléviseurs,
reportez-vous à leur Guide de référence pour
vous assurer que vous pouvez bien utiliser le
support de fixation murale.
À l’attention des clients
AVERTISSEMENT
Le non-respect des consignes suivantes
peut être fatal ou entraîner des blessures
graves en provoquant un incendie,
l’électrocution ou la chute de l’appareil.
Veillez à confier
l’installation à du
personnel agréé en
tenant les petits enfants à
l’écart pendant
l’installation.
Si le support de fixation murale ou le
téléviseur n’est pas installé correctement, les
accidents suivants peuvent se produire.
Veillez à confier l’installation à des
installateurs agréés.
Le téléviseur peut tomber et causer des
blessures graves comme des hématomes
ou des fractures.
Si le mur sur lequel le support de fixation
murale est fixé est instable, inégal ou non
perpendiculaire au sol, l’appareil risque de
tomber et de provoquer des blessures ou
des dommages matériels. Le mur doit
pouvoir supporter un poids équivalent à
au moins quatre fois celui du téléviseur.
(Pour connaître le poids du téléviseur,
reportez-vous à son Guide de référence.)
Si l’installation du support de fixation
murale n’est pas assez solide, l’appareil
risque de tomber et de provoquer des
blessures ou des dommages matériels.
Veillez à confier le
déplacement ou le
démontage du téléviseur
à des installateurs agréés.
Si des personnes autres que des installateurs
agréés transportent ou démontent le
téléviseur, celui-ci peut tomber et provoquer
des blessures ou des dommages matériels.
Deux personnes au moins (trois personnes
ou plus pour les téléviseurs de 75 pouces ou
plus) doivent porter ou démonter le
téléviseur.
Ne retirez pas les vis, etc.
après l’installation du
téléviseur.
Dans ce cas, le téléviseur pourrait tomber et
provoquer des blessures ou des dommages
matériels.
Ne modifiez pas les
pièces du support de
fixation murale.
Dans ce cas, le support de fixation murale
pourrait tomber et provoquer des blessures
ou des dommages matériels.
N’installez aucun appareil
autre que ceux spécifiés.
Ce support de fixation murale est conçu pour
être utilisé avec les produits spécifiés
uniquement. Si vous installez un appareil
autre que ceux qui sont spécifiés, il pourrait
tomber ou se briser et provoquer des
blessures ou des dommages matériels.
N’installez aucune charge
autre que le téléviseur
sur le support de fixation
murale.
Ne secouez pas le
téléviseur vers la gauche/
droite, le haut/bas.
Dans ce cas, le téléviseur pourrait tomber et
provoquer des blessures ou des dommages
matériels.
Ne vous appuyez pas sur
le téléviseur et ne vous y
suspendez pas.
Ne vous appuyez pas sur le téléviseur et ne
vous y suspendez pas, car il risque de
tomber et de causer des blessures graves.
ATTENTION
Le non-respect des consignes suivantes
peut entraîner des blessures ou des
dommages matériels.
N’appliquez aucune force
excessive sur le produit
au cours de l’entretien ou
du nettoyage de
l’appareil.
N’exercez aucune pression excessive sur le
dessus du téléviseur. Dans ce cas, le
téléviseur pourrait tomber et provoquer des
blessures ou des dommages matériels.
Précautions
Si vous utilisez le téléviseur fixé au support
de fixation murale pendant une longue
période, le mur situé derrière le téléviseur
ou au-dessus de celui-ci peut se décolorer,
ou encore le papier peint peut se décoller,
selon le matériau du mur.
Les trous des vis restent apparents si vous
démontez le support de fixation murale
après son installation.
N'utilisez pas le support de fixation murale
dans un endroit soumis à des vibrations
mécaniques.

− 4 (FR) −
Installation du
support de fixation
murale
À l’attention des
détaillants Sony
AVERTISSEMENT
Les instructions suivantes concernent les
détaillants Sony uniquement. Lisez
attentivement les consignes de sécurité
ci-dessus et accordez une attention
particulière à la sécurité lors de
l’installation, de l’entretien et de la
vérification de ce produit.
N’installez pas le support
de fixation murale sur
une surface où les coins
ou les côtés du téléviseur
dépasseraient.
N’installez pas le support de fixation murale
sur une surface verticale telle qu’une
colonne, où les coins ou les côtés du
téléviseur dépasseraient de la surface
murale. Si une personne ou un objet venait à
heurter le coin ou les côtés du téléviseur, ceci
risquerait de provoquer des blessures ou des
dommages matériels.
N’installez pas le
téléviseur sur ou sous un
climatiseur.
L’exposition prolongée du téléviseur à des
fuites d’eau ou à des courants d’air
provenant du climatiseur pourrait provoquer
un incendie, l’électrocution ou des
problèmes de fonctionnement du téléviseur.
Veillez à installer le
support de fixation
murale solidement en
suivant les instructions
de ce mode d’emploi.
S’il manque des vis ou si elles sont
desserrées, le support de fixation murale
pourrait tomber et provoquer des blessures
ou des dommages matériels. Veillez à utiliser
les vis appropriées selon le matériau du mur
et installez le téléviseur solidement en
utilisant au moins quatre vis de 8 mm de
diamètre (ou équivalentes).
Veillez à utiliser
correctement les vis et
les pièces de fixation
fournies conformément
aux instructions du
mode d’emploi. Si vous
utilisez d’autres
éléments de fixation, le
téléviseur pourrait
tomber et causer des
blessures corporelles
ou être endommagé.
Veillez à monter le
support correctement en
suivant la procédure
décrite dans ce mode
d’emploi.
S’il manque des vis ou si elles sont
desserrées, le téléviseur pourrait tomber et
causer des blessures corporelles ou être
endommagé.
Veillez à serrer les vis
solidement dans la
position indiquée.
Si vous oubliez, le téléviseur pourrait tomber
et causer des blessures corporelles ou être
endommagé.
Veillez à ne pas
soumettre le téléviseur à
des chocs pendant
l’installation.
Si le téléviseur subit des chocs, il pourrait
tomber ou se briser. Ceci pourrait causer des
blessures.
Veillez à installer le
téléviseur sur un mur
parfaitement vertical et
plat.
Dans le cas contraire, le téléviseur pourrait
tomber et provoquer des blessures.
Une fois le téléviseur
installé correctement,
fixez solidement les
câbles.
Si des personnes ou des objets s’accrochent
aux câbles, ceci risque de provoquer des
blessures ou d’endommager le téléviseur.
Veillez à ce que le cordon
d’alimentation CA ou le
câble de raccordement ne
soit pas coincé ni écrasé.
Si le cordon d’alimentation CA ou le câble de
raccordement est coincé entre l’appareil et le
mur, ou s’il est plié ou tordu, les conducteurs
internes peuvent être exposés et provoquer
un court-circuit ou une coupure électrique.
Un incendie ou l’électrocution pourrait en
résulter.
Les vis nécessaires à
l’installation du support
de fixation murale au
mur ne sont pas fournies.
Utilisez les vis appropriées selon le matériau
et la structure du mur lors du montage du
support de fixation murale.
Leht laaditakse ...
Leht laaditakse ...
Leht laaditakse ...
Leht laaditakse ...
Leht laaditakse ...
Leht laaditakse ...
Leht laaditakse ...
Leht laaditakse ...
Leht laaditakse ...
Leht laaditakse ...
Leht laaditakse ...
Leht laaditakse ...
Leht laaditakse ...
Leht laaditakse ...
Leht laaditakse ...
Leht laaditakse ...
Leht laaditakse ...
Leht laaditakse ...
Leht laaditakse ...
Leht laaditakse ...
Leht laaditakse ...
Leht laaditakse ...
Leht laaditakse ...
Leht laaditakse ...
Leht laaditakse ...
Leht laaditakse ...
Leht laaditakse ...
Leht laaditakse ...
Leht laaditakse ...
Leht laaditakse ...
Leht laaditakse ...
Leht laaditakse ...
Leht laaditakse ...
Leht laaditakse ...
Leht laaditakse ...
Leht laaditakse ...
Leht laaditakse ...
Leht laaditakse ...
Leht laaditakse ...
Leht laaditakse ...
Leht laaditakse ...
Leht laaditakse ...
Leht laaditakse ...
Leht laaditakse ...
Leht laaditakse ...
Leht laaditakse ...
Leht laaditakse ...
Leht laaditakse ...
Leht laaditakse ...
Leht laaditakse ...
Leht laaditakse ...
Leht laaditakse ...
Leht laaditakse ...
Leht laaditakse ...
Leht laaditakse ...
Leht laaditakse ...
Leht laaditakse ...
Leht laaditakse ...
Leht laaditakse ...
Leht laaditakse ...
Leht laaditakse ...
Leht laaditakse ...
Leht laaditakse ...
Leht laaditakse ...
Leht laaditakse ...
Leht laaditakse ...
Leht laaditakse ...
Leht laaditakse ...
Leht laaditakse ...
Leht laaditakse ...
Leht laaditakse ...
Leht laaditakse ...
Leht laaditakse ...
Leht laaditakse ...
Leht laaditakse ...
Leht laaditakse ...
Leht laaditakse ...
Leht laaditakse ...
Leht laaditakse ...
Leht laaditakse ...
Leht laaditakse ...
Leht laaditakse ...
Leht laaditakse ...
Leht laaditakse ...
Leht laaditakse ...
Leht laaditakse ...
Leht laaditakse ...
Leht laaditakse ...
Leht laaditakse ...
Leht laaditakse ...
Leht laaditakse ...
Leht laaditakse ...
Leht laaditakse ...
Leht laaditakse ...
Leht laaditakse ...
Leht laaditakse ...
Leht laaditakse ...
Leht laaditakse ...
Leht laaditakse ...
Leht laaditakse ...
Leht laaditakse ...
Leht laaditakse ...
Leht laaditakse ...
Leht laaditakse ...
Leht laaditakse ...
Leht laaditakse ...
Leht laaditakse ...
Leht laaditakse ...
Leht laaditakse ...
Leht laaditakse ...
Leht laaditakse ...
Leht laaditakse ...
Leht laaditakse ...
Leht laaditakse ...
Leht laaditakse ...
Leht laaditakse ...
Leht laaditakse ...
Leht laaditakse ...
Leht laaditakse ...
Leht laaditakse ...
Leht laaditakse ...
Leht laaditakse ...
Leht laaditakse ...
Leht laaditakse ...
Leht laaditakse ...
Leht laaditakse ...
Leht laaditakse ...
Leht laaditakse ...
Leht laaditakse ...
Leht laaditakse ...
Leht laaditakse ...
Leht laaditakse ...
Leht laaditakse ...
Leht laaditakse ...
Leht laaditakse ...
Leht laaditakse ...
Leht laaditakse ...
Leht laaditakse ...
Leht laaditakse ...
Leht laaditakse ...
Leht laaditakse ...
Leht laaditakse ...
Leht laaditakse ...
Leht laaditakse ...
Leht laaditakse ...
Leht laaditakse ...
Leht laaditakse ...
Leht laaditakse ...
Leht laaditakse ...
Leht laaditakse ...
Leht laaditakse ...
Leht laaditakse ...
Leht laaditakse ...
Leht laaditakse ...
Leht laaditakse ...
Leht laaditakse ...
Leht laaditakse ...
Leht laaditakse ...
Leht laaditakse ...
Leht laaditakse ...
Leht laaditakse ...
Leht laaditakse ...
Leht laaditakse ...
Leht laaditakse ...
Leht laaditakse ...
Leht laaditakse ...
Leht laaditakse ...
Leht laaditakse ...
Leht laaditakse ...
Leht laaditakse ...
Leht laaditakse ...
Leht laaditakse ...
Leht laaditakse ...
Leht laaditakse ...
Leht laaditakse ...
Leht laaditakse ...
Leht laaditakse ...
Leht laaditakse ...
Leht laaditakse ...
Leht laaditakse ...
Leht laaditakse ...
Leht laaditakse ...
Leht laaditakse ...
Leht laaditakse ...
Leht laaditakse ...
Leht laaditakse ...
Leht laaditakse ...
Leht laaditakse ...
Leht laaditakse ...
Leht laaditakse ...
Leht laaditakse ...
Leht laaditakse ...
Leht laaditakse ...
Leht laaditakse ...
Leht laaditakse ...
Leht laaditakse ...
Leht laaditakse ...
Leht laaditakse ...
Leht laaditakse ...
Leht laaditakse ...
Leht laaditakse ...
Leht laaditakse ...
Leht laaditakse ...
Leht laaditakse ...
Leht laaditakse ...
Leht laaditakse ...
Leht laaditakse ...
Leht laaditakse ...
Leht laaditakse ...
Leht laaditakse ...
Leht laaditakse ...
Leht laaditakse ...
Leht laaditakse ...
Leht laaditakse ...
Leht laaditakse ...
Leht laaditakse ...
Leht laaditakse ...
Leht laaditakse ...
Leht laaditakse ...
Leht laaditakse ...
Leht laaditakse ...
Leht laaditakse ...
Leht laaditakse ...
Leht laaditakse ...
Leht laaditakse ...
Leht laaditakse ...
Leht laaditakse ...
Leht laaditakse ...
Leht laaditakse ...
Leht laaditakse ...
Leht laaditakse ...
Leht laaditakse ...
Leht laaditakse ...
Leht laaditakse ...
Leht laaditakse ...
Leht laaditakse ...
Leht laaditakse ...
Leht laaditakse ...
Leht laaditakse ...
Leht laaditakse ...
Leht laaditakse ...
Leht laaditakse ...
Leht laaditakse ...
Leht laaditakse ...
Leht laaditakse ...
Leht laaditakse ...
Leht laaditakse ...
Leht laaditakse ...
Leht laaditakse ...
Leht laaditakse ...
Leht laaditakse ...
Leht laaditakse ...
Leht laaditakse ...
Leht laaditakse ...
Leht laaditakse ...
Leht laaditakse ...
Leht laaditakse ...
Leht laaditakse ...
Leht laaditakse ...
Leht laaditakse ...
Leht laaditakse ...
Leht laaditakse ...
Leht laaditakse ...
Leht laaditakse ...
Leht laaditakse ...
Leht laaditakse ...
Leht laaditakse ...
Leht laaditakse ...
Leht laaditakse ...
Leht laaditakse ...
Leht laaditakse ...
Leht laaditakse ...
Leht laaditakse ...
Leht laaditakse ...
Leht laaditakse ...
Leht laaditakse ...
Leht laaditakse ...
Leht laaditakse ...
Leht laaditakse ...
Leht laaditakse ...
Leht laaditakse ...
Leht laaditakse ...
Leht laaditakse ...
Leht laaditakse ...
Leht laaditakse ...
Leht laaditakse ...
Leht laaditakse ...
Leht laaditakse ...
Leht laaditakse ...
Leht laaditakse ...
Leht laaditakse ...
Leht laaditakse ...
Leht laaditakse ...
Leht laaditakse ...
Leht laaditakse ...
Leht laaditakse ...
Leht laaditakse ...
Leht laaditakse ...
Leht laaditakse ...
Leht laaditakse ...
Leht laaditakse ...
Leht laaditakse ...
Leht laaditakse ...
Leht laaditakse ...
Leht laaditakse ...
Leht laaditakse ...
Leht laaditakse ...
Leht laaditakse ...
Leht laaditakse ...
Leht laaditakse ...
Leht laaditakse ...
Leht laaditakse ...
Leht laaditakse ...
Leht laaditakse ...
Leht laaditakse ...
Leht laaditakse ...
Leht laaditakse ...
Leht laaditakse ...
Leht laaditakse ...
Leht laaditakse ...
Leht laaditakse ...
Leht laaditakse ...
Leht laaditakse ...
Leht laaditakse ...
Leht laaditakse ...
Leht laaditakse ...
Leht laaditakse ...
Leht laaditakse ...
Leht laaditakse ...
Leht laaditakse ...
Leht laaditakse ...
Leht laaditakse ...
Leht laaditakse ...
Leht laaditakse ...
Leht laaditakse ...
Leht laaditakse ...
Leht laaditakse ...
Leht laaditakse ...
Leht laaditakse ...
Leht laaditakse ...
Leht laaditakse ...
Leht laaditakse ...
Leht laaditakse ...
Leht laaditakse ...
Leht laaditakse ...
Leht laaditakse ...
Leht laaditakse ...
Leht laaditakse ...
Leht laaditakse ...
Leht laaditakse ...
Leht laaditakse ...
Leht laaditakse ...
Leht laaditakse ...
Leht laaditakse ...
Leht laaditakse ...
Leht laaditakse ...
Leht laaditakse ...
Leht laaditakse ...
Leht laaditakse ...
Leht laaditakse ...
Leht laaditakse ...
Leht laaditakse ...
Leht laaditakse ...
Leht laaditakse ...
Leht laaditakse ...
Leht laaditakse ...
Leht laaditakse ...
Leht laaditakse ...
Leht laaditakse ...
Leht laaditakse ...
Leht laaditakse ...
Leht laaditakse ...
Leht laaditakse ...
Leht laaditakse ...
Leht laaditakse ...
Leht laaditakse ...
Leht laaditakse ...
Leht laaditakse ...
Leht laaditakse ...
Leht laaditakse ...
Leht laaditakse ...
Leht laaditakse ...
Leht laaditakse ...
Leht laaditakse ...
Leht laaditakse ...
Leht laaditakse ...
Leht laaditakse ...
Leht laaditakse ...
Leht laaditakse ...
Leht laaditakse ...
Leht laaditakse ...
Leht laaditakse ...
Leht laaditakse ...
Leht laaditakse ...
Leht laaditakse ...
Leht laaditakse ...
Leht laaditakse ...
Leht laaditakse ...
Leht laaditakse ...
Leht laaditakse ...
Leht laaditakse ...
Leht laaditakse ...
Leht laaditakse ...
Leht laaditakse ...
Leht laaditakse ...
Leht laaditakse ...
Leht laaditakse ...
Leht laaditakse ...
Leht laaditakse ...
Leht laaditakse ...
Leht laaditakse ...
Leht laaditakse ...
Leht laaditakse ...
Leht laaditakse ...
Leht laaditakse ...
Leht laaditakse ...
Leht laaditakse ...
Leht laaditakse ...
Leht laaditakse ...
Leht laaditakse ...
Leht laaditakse ...
Leht laaditakse ...
Leht laaditakse ...
Leht laaditakse ...
Leht laaditakse ...
Leht laaditakse ...
Leht laaditakse ...
Leht laaditakse ...
Leht laaditakse ...
Leht laaditakse ...
Leht laaditakse ...
Leht laaditakse ...
Leht laaditakse ...
Leht laaditakse ...
Leht laaditakse ...
Leht laaditakse ...
Leht laaditakse ...
Leht laaditakse ...
Leht laaditakse ...
Leht laaditakse ...
Leht laaditakse ...
Leht laaditakse ...
Leht laaditakse ...
Leht laaditakse ...
Leht laaditakse ...
Leht laaditakse ...
Leht laaditakse ...
-
 1
1
-
 2
2
-
 3
3
-
 4
4
-
 5
5
-
 6
6
-
 7
7
-
 8
8
-
 9
9
-
 10
10
-
 11
11
-
 12
12
-
 13
13
-
 14
14
-
 15
15
-
 16
16
-
 17
17
-
 18
18
-
 19
19
-
 20
20
-
 21
21
-
 22
22
-
 23
23
-
 24
24
-
 25
25
-
 26
26
-
 27
27
-
 28
28
-
 29
29
-
 30
30
-
 31
31
-
 32
32
-
 33
33
-
 34
34
-
 35
35
-
 36
36
-
 37
37
-
 38
38
-
 39
39
-
 40
40
-
 41
41
-
 42
42
-
 43
43
-
 44
44
-
 45
45
-
 46
46
-
 47
47
-
 48
48
-
 49
49
-
 50
50
-
 51
51
-
 52
52
-
 53
53
-
 54
54
-
 55
55
-
 56
56
-
 57
57
-
 58
58
-
 59
59
-
 60
60
-
 61
61
-
 62
62
-
 63
63
-
 64
64
-
 65
65
-
 66
66
-
 67
67
-
 68
68
-
 69
69
-
 70
70
-
 71
71
-
 72
72
-
 73
73
-
 74
74
-
 75
75
-
 76
76
-
 77
77
-
 78
78
-
 79
79
-
 80
80
-
 81
81
-
 82
82
-
 83
83
-
 84
84
-
 85
85
-
 86
86
-
 87
87
-
 88
88
-
 89
89
-
 90
90
-
 91
91
-
 92
92
-
 93
93
-
 94
94
-
 95
95
-
 96
96
-
 97
97
-
 98
98
-
 99
99
-
 100
100
-
 101
101
-
 102
102
-
 103
103
-
 104
104
-
 105
105
-
 106
106
-
 107
107
-
 108
108
-
 109
109
-
 110
110
-
 111
111
-
 112
112
-
 113
113
-
 114
114
-
 115
115
-
 116
116
-
 117
117
-
 118
118
-
 119
119
-
 120
120
-
 121
121
-
 122
122
-
 123
123
-
 124
124
-
 125
125
-
 126
126
-
 127
127
-
 128
128
-
 129
129
-
 130
130
-
 131
131
-
 132
132
-
 133
133
-
 134
134
-
 135
135
-
 136
136
-
 137
137
-
 138
138
-
 139
139
-
 140
140
-
 141
141
-
 142
142
-
 143
143
-
 144
144
-
 145
145
-
 146
146
-
 147
147
-
 148
148
-
 149
149
-
 150
150
-
 151
151
-
 152
152
-
 153
153
-
 154
154
-
 155
155
-
 156
156
-
 157
157
-
 158
158
-
 159
159
-
 160
160
-
 161
161
-
 162
162
-
 163
163
-
 164
164
-
 165
165
-
 166
166
-
 167
167
-
 168
168
-
 169
169
-
 170
170
-
 171
171
-
 172
172
-
 173
173
-
 174
174
-
 175
175
-
 176
176
-
 177
177
-
 178
178
-
 179
179
-
 180
180
-
 181
181
-
 182
182
-
 183
183
-
 184
184
-
 185
185
-
 186
186
-
 187
187
-
 188
188
-
 189
189
-
 190
190
-
 191
191
-
 192
192
-
 193
193
-
 194
194
-
 195
195
-
 196
196
-
 197
197
-
 198
198
-
 199
199
-
 200
200
-
 201
201
-
 202
202
-
 203
203
-
 204
204
-
 205
205
-
 206
206
-
 207
207
-
 208
208
-
 209
209
-
 210
210
-
 211
211
-
 212
212
-
 213
213
-
 214
214
-
 215
215
-
 216
216
-
 217
217
-
 218
218
-
 219
219
-
 220
220
-
 221
221
-
 222
222
-
 223
223
-
 224
224
-
 225
225
-
 226
226
-
 227
227
-
 228
228
-
 229
229
-
 230
230
-
 231
231
-
 232
232
-
 233
233
-
 234
234
-
 235
235
-
 236
236
-
 237
237
-
 238
238
-
 239
239
-
 240
240
-
 241
241
-
 242
242
-
 243
243
-
 244
244
-
 245
245
-
 246
246
-
 247
247
-
 248
248
-
 249
249
-
 250
250
-
 251
251
-
 252
252
-
 253
253
-
 254
254
-
 255
255
-
 256
256
-
 257
257
-
 258
258
-
 259
259
-
 260
260
-
 261
261
-
 262
262
-
 263
263
-
 264
264
-
 265
265
-
 266
266
-
 267
267
-
 268
268
-
 269
269
-
 270
270
-
 271
271
-
 272
272
-
 273
273
-
 274
274
-
 275
275
-
 276
276
-
 277
277
-
 278
278
-
 279
279
-
 280
280
-
 281
281
-
 282
282
-
 283
283
-
 284
284
-
 285
285
-
 286
286
-
 287
287
-
 288
288
-
 289
289
-
 290
290
-
 291
291
-
 292
292
-
 293
293
-
 294
294
-
 295
295
-
 296
296
-
 297
297
-
 298
298
-
 299
299
-
 300
300
-
 301
301
-
 302
302
-
 303
303
-
 304
304
-
 305
305
-
 306
306
-
 307
307
-
 308
308
-
 309
309
-
 310
310
-
 311
311
-
 312
312
-
 313
313
-
 314
314
-
 315
315
-
 316
316
-
 317
317
-
 318
318
-
 319
319
-
 320
320
-
 321
321
-
 322
322
-
 323
323
-
 324
324
-
 325
325
-
 326
326
-
 327
327
-
 328
328
-
 329
329
-
 330
330
-
 331
331
-
 332
332
-
 333
333
-
 334
334
-
 335
335
-
 336
336
-
 337
337
-
 338
338
-
 339
339
-
 340
340
-
 341
341
-
 342
342
-
 343
343
-
 344
344
-
 345
345
-
 346
346
-
 347
347
-
 348
348
-
 349
349
-
 350
350
-
 351
351
-
 352
352
-
 353
353
-
 354
354
-
 355
355
-
 356
356
-
 357
357
-
 358
358
-
 359
359
-
 360
360
-
 361
361
-
 362
362
-
 363
363
-
 364
364
-
 365
365
-
 366
366
-
 367
367
-
 368
368
-
 369
369
-
 370
370
-
 371
371
-
 372
372
-
 373
373
-
 374
374
-
 375
375
-
 376
376
-
 377
377
-
 378
378
-
 379
379
-
 380
380
-
 381
381
-
 382
382
-
 383
383
-
 384
384
-
 385
385
-
 386
386
-
 387
387
-
 388
388
-
 389
389
-
 390
390
-
 391
391
-
 392
392
-
 393
393
-
 394
394
-
 395
395
-
 396
396
-
 397
397
-
 398
398
-
 399
399
-
 400
400
-
 401
401
-
 402
402
-
 403
403
-
 404
404
-
 405
405
-
 406
406
-
 407
407
-
 408
408
-
 409
409
-
 410
410
-
 411
411
-
 412
412
-
 413
413
-
 414
414
-
 415
415
-
 416
416
-
 417
417
-
 418
418
-
 419
419
-
 420
420
-
 421
421
-
 422
422
-
 423
423
-
 424
424
-
 425
425
-
 426
426
-
 427
427
-
 428
428
-
 429
429
-
 430
430
-
 431
431
-
 432
432
-
 433
433
-
 434
434
-
 435
435
-
 436
436
-
 437
437
-
 438
438
-
 439
439
-
 440
440
-
 441
441
-
 442
442
-
 443
443
-
 444
444
-
 445
445
-
 446
446
-
 447
447
-
 448
448
-
 449
449
-
 450
450
-
 451
451
-
 452
452
-
 453
453
-
 454
454
-
 455
455
-
 456
456
-
 457
457
-
 458
458
-
 459
459
-
 460
460
-
 461
461
-
 462
462
-
 463
463
-
 464
464
-
 465
465
-
 466
466
-
 467
467


Sony KD-65AG9 Omaniku manuaal
- Tüüp
- Omaniku manuaal
teistes keeltes
Seotud paberid
-
Sony KD-65XG9505 Omaniku manuaal
-
Sony KD-65AG8 Omaniku manuaal
-
Sony KD-49XG9005 Omaniku manuaal
-
Sony KDL-60W605B Omaniku manuaal
-
Sony KD-43XG7096 Omaniku manuaal
-
Sony KDL-50WG663 Omaniku manuaal
-
-
Sony KDL-55W815B paigaldusjuhend
-
Sony KD-70XF8305 Kasutusjuhend
-
Sony KD-65ZF9 Kasutusjuhend