Legrand HPm Kasutusjuhend

Tüüp
Kasutusjuhend
INSTRUCTIONS ON USING THE HPM CONNECT APP
Contents
SECTION A: GENERIC INSTRUCTIONS ON USING THE HPM CONNECT APP
SECTION B: INSTRUCTIONS ON USING THE HPM CONNECT APP FOR SMART DOWNLIGHT
PAIRING THE DOWNLIGHT 6
AUTO SCAN 6
ADD MANUALLY 7
PAIRING MULTIPLE SMART DOWNLIGHTS 8
SET TIMER 8
RESET THE DOWNLIGHT 9
WALL SWITCH FOR DOWNLIGHT 9
PAIRING THE REMOTE CONTROL 10
PAIRING WITHOUT APP 11
UNPAIRING WITHOUT APP 11
UNPAIRING THROUGH APP 11
APP DOWNLOAD 1
REGISTRATION 1
SHARING SMART DEVICE 2
CREATE GROUP 4
ADD SMART DEVICES TO GROUP 5
PAIRING THE SMART FAN 12
AUTO SCAN 12
ADD MANUALLY 13
PAIRING MULTIPLE SMART FANS 14
SET TIMER 15
RESET THE SMART FAN 15
SECTION D: INSTRUCTIONS ON USING THE HPM CONNECT APP FOR SMART FAN
SECTION C: INSTRUCTIONS ON PAIRING/UNPAIRING THE REMOTE CONTROL FOR DOWNLIGHT
SECTION A: GENERIC INSTRUCTIONS ON USING THE HPM
CONNECT APP
SECTION A: GENERIC NSTRUCTIONS ON USING THE HPM CONNECT APP
1
1. HPM Connect App Download
Download the HPM Connect App on your smart device. You can go to the store (App Store or Google Play) directly
or scan the QR code given below, which will automatically take you to the download page.
2. Registration
Open the HPM Connect App on your smart device. For new users, sign up for a new account and for an existing user,
log-in with your username and password.
a) Sign up using email.
b) Verification code will be sent through via email.
c) Set password, then proceed to open App.
Log In
Sign Up
Click on Agree
Ensure your smart device is connected to the internet to follow all the steps.
Get Verification code
Click on Edit for downlight Click on Edit for fan
Click on Share Device Add Log-in details (Only registered
account can share the device)
3. Sharing Smart Device
INDIVIDUAL SHARING
Click on Add Home member
SECTION A: GENERIC NSTRUCTIONS ON USING THE HPM CONNECT APP
2
John
Select the downlight/fan for sharing
Downlight
SECTION A: GENERIC NSTRUCTIONS ON USING THE HPM CONNECT APP
SHARE FROM HOME MANAGEMENT
Click on Me icon Select Home Management Select Create a home Scroll down and Select
Add Member
Once the member is selected, the new member receives a notification from the HPM Connect App.
After accepting the invitation, the new member can now access all devices paired with HPM Connect App.
Note: 1. If only one smart product is installed, it can only be operated by one paired smart device at a time. The other
smart device which is not controlling should close the Hpm Connect App.
2. To operate using multiple smart devices you must have multiple smart products.
3
John
Create a home
Tom
Joe
Pop
Ralf
Add Member
John
Tom
Joe
Pop
Click on Accept
SECTION A: GENERIC NSTRUCTIONS ON USING THE HPM CONNECT APP
4. Create Group
4
Type the name and Press Save
Add Room
Save
Click on Room Management Click on Add Room
Select the group where you want to
add the downlight and click Save.
Click on Edit Click on Location
Save
5
5. Add Smart Devices to Group
Select the downlight/fan for adding
SECTION A: GENERIC NSTRUCTIONS ON USING THE HPM CONNECT APP
Click on Edit for downlight Click on Edit for fan
Downlight
SECTION B: INSTRUCTIONS ON USING THE HPM CONNECT APP
FOR SMART DOWNLIGHT
SECTION B: INSTRUCTIONS ON USING THE HPM CONNECT APP FOR SMART DOWNLIGHT
6
AUTO SCAN
i) Make sure that your smart device is connected to the internet and Bluetooth & Location are turned ON.
ii) Reset the device, first power ON the Downlight then switch OFF/ON 5 times (OFF period should be1-2 seconds).
Then the downlight should start blinking (slowly like breathing 3 times). If the light does not blink and stays ON,
repeat the process.
iii) Click on Add Device or “ ”
iv) Select Lighting and select Auto Scan.
v) Select Next.
+
1. Pairing the Downlight
You may pair up to a max. number of 128 downlights on a single mesh.
Click Done
Click Done
vi) Press Done once detected.
Add Device
Next
Lighting
Done
SECTION B: INSTRUCTIONS ON USING THE HPM CONNECT APP FOR SMART DOWNLIGHT
7
vii) Congratulations!! Your HPM Smart Downlight is now paired with your smart device. You can now control your
downlight from your App.
ADD MANUALLY
i) Make sure that your smart device is connected to the internet and Bluetooth & Location are turned ON.
ii) Click on Add Device or “
iii) Select Lighting
iv) Select Add Manually
+
Click confirmation button and
Next once reset is done.
Click Go to add Click Done
Click Next
Add Device
Next
Lighting
Done
Next
Downlight
SECTION B: INSTRUCTIONS ON USING THE HPM CONNECT APP FOR SMART DOWNLIGHT
8
v) Congratulations!! Your HPM Smart Downlight is now paired
with your smart device. You can now control your downlight
from your App.
Click on Timer Set the Timer and press Confirm
2. Set Timer
PAIRING MULTIPLE SMART DOWNLIGHTS
Click Done Click Done
To pair another downlight repeat the steps for pairing.Once added, paired downlights can be controlled individually by
clicking power button. You can click on “ “ to add more downlights to this list.
By clicking each power button
downlights can be controlled individually
Select the downlight to set timer
Done +
+
Downlight
Timer
Click on Resetting Device. Click on Resetting Devices
Follow the steps for resetting
device. Click confirmation button and
Next once reset is done.
3. Reset the Downlight
4. Wall Switch for Downlight
SECTION B: INSTRUCTIONS ON USING THE HPM CONNECT APP FOR SMART DOWNLIGHT
9
Next
started blinking.
Add Device
Lighting
Next
started blinking.
Next
Step 2
Switch light OFF and back ON
(OFF periods 1- 2 seconds)
Step 1
Power ON the device and confirm the light is O
Step 3
Confirm the light has started blinking. If the light
does not blink and stays ON, repeat the process.
How to reset downlight
N
If the downlight is removed from a smart device - it becomes available for pairing with another smart device.
If you are using wall switch for downlight,
1. First power ON the downlight then switch OFF/ON 5 times (OFF period should be1-2 seconds).Then the downlight
should start blinking (slowly like breathing 3 times).
2. You can now pair the downlight following the instructions on pairing section. Adjust the settings as required.
3. After pairing, once downlight is switched OFF and turned ON the previous settings will prevail.
SECTION C: INSTRUCTIONS ON PAIRING/ UNPAIRING THE
REMOTE CONTROL FOR DOWNLIGHT
i) Make sure that you have a working Remote Control. Ensure 2x AAA batteries are inserted.
ii) Enable networking mode on Remote Control by pressing both ON & OFF buttons simultaneously for 5 seconds until
the indicator on remote starts to flash.
iii) Go to HPM Connect App and click on Add Device or “ ”
iv) Select Lighting and select Auto Scan.
v) Select Go to Add.
vi) Click on Done once paired.
+
SECTION C: INSTRUCTIONS ON PAIRING/UNPAIRING THE REMOTE CONTROL FOR DOWNLIGHT 10
1. Pairing the Remote Control
Click Next
Add Device
ON OFF
Indicator
Lighting
Next
Done
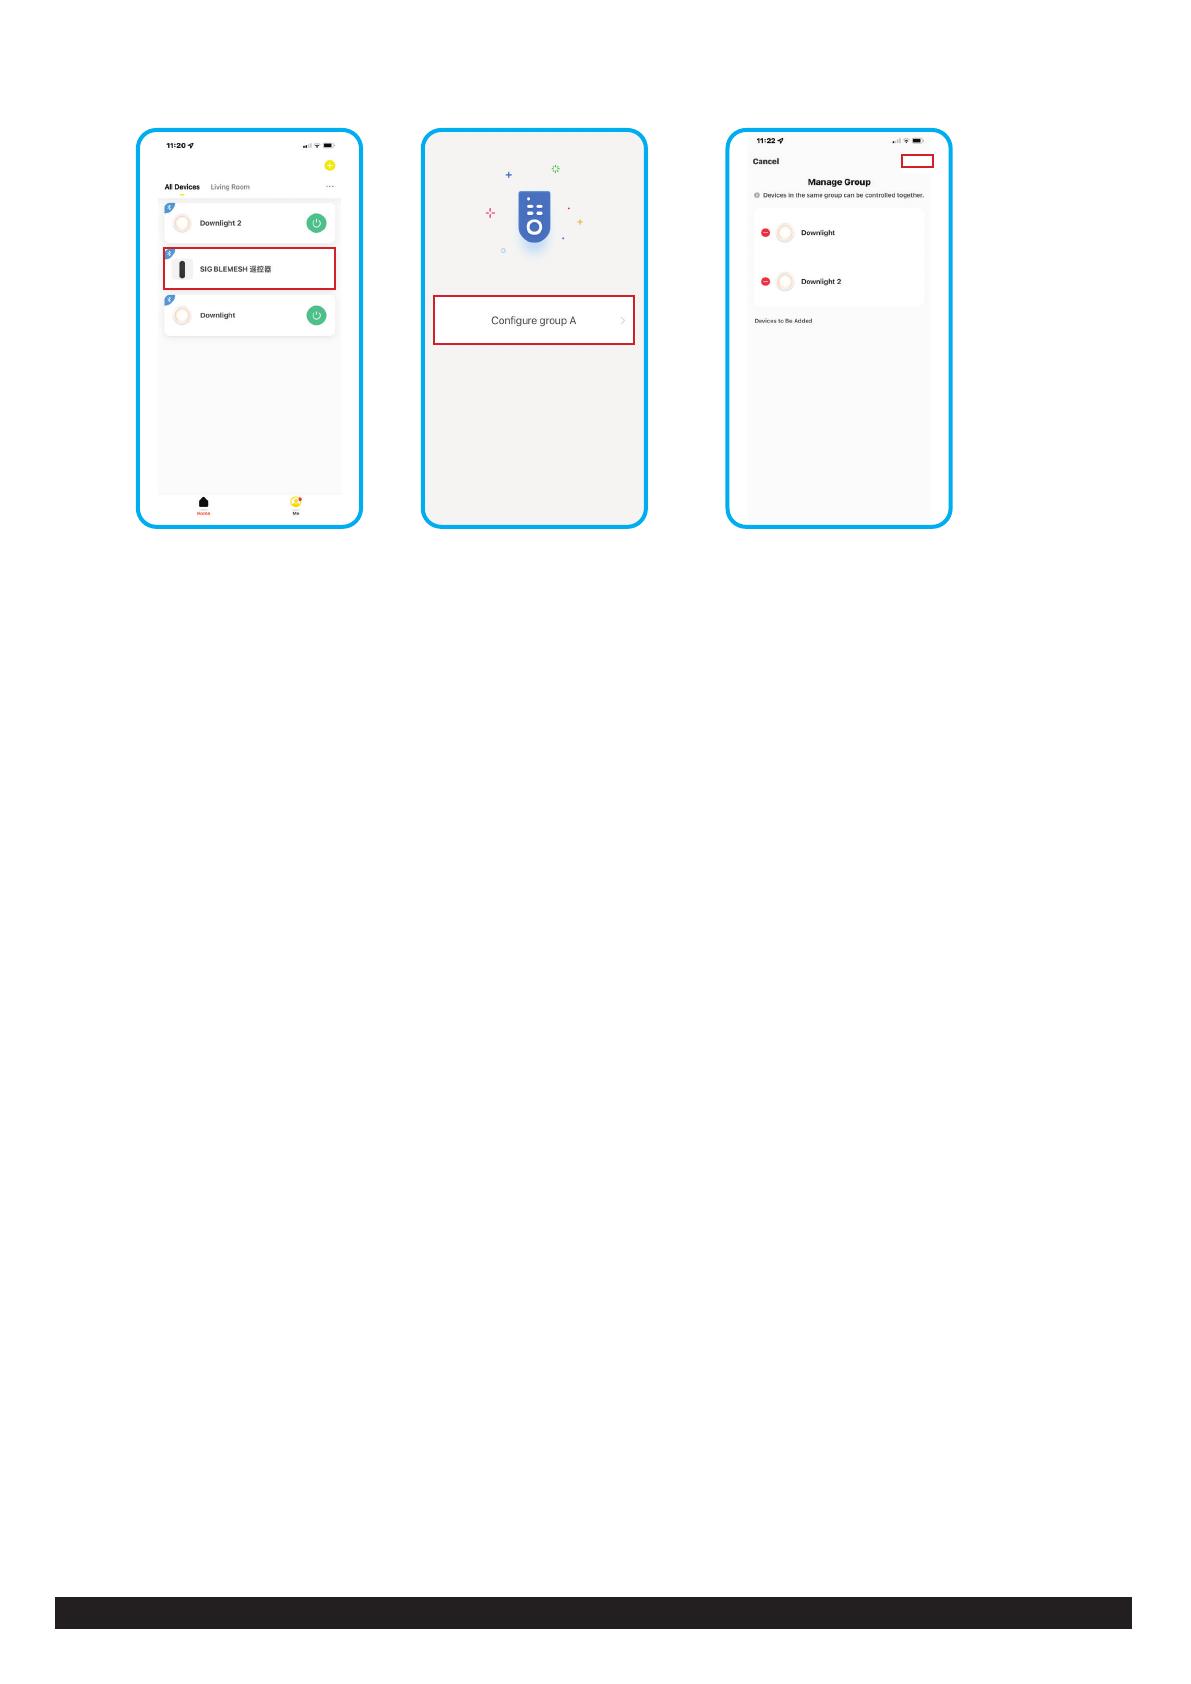
vii) Select the Remote control and add all downlights you want to control with Remote control.
viii) Congratulations!! You can now control your HPM Smart Downlight with Remote control. Follow the same
process if you want to add more devices for pairing.
Click on Remote control Select Configure group A Select the downlights to add and
click Save
PAIRING WITHOUT APP (IF THE DOWNLIGHT & REMOTE CONTROL HAVE BEEN PAIRED BEFORE)
1. When the downlight is powered ON, it automatically enters the pairing mode. This mode is maintained for 10s, during
this time, long-press the ON button of the Remote Control until the indicator light flashes.
2. Remote control now enters the pairing mode. The downlight flashes 3 times to indicate successful pairing otherwise,
the pairing fails.
3. After the pairing is complete, you can adjust the brightness and turn ON/OFF the downlight through Remote Control.
PLEASE NOTE “TO CONTROL THE DOWNLIGHTS WITH REMOTE , ENSURE THAT DOWNLIGHTS AND REMOTE ARE
PAIRED WITH APP FIRST
UNPAIRING WITHOUT APP
1. When the downlight is powered ON, it automatically enters the unpairing mode. This mode is maintained for 10s. during
this time, long-press the OFF button of the Remote control until the indicator flashes.
2. The Remote Control now enters the unpairing mode.
3. The downlight flashes 3 times to indicate successful unpairing. The Remote Control is unpaired and cannot control the
downlight.
UNPAIRING THROUGH APP
1. From the App “Click on Remote Control” to enter the Remote Control panel page.
2. Select “Configure the Remote Control, go to the configuration page, which takes you to a list of paired downlights.
Choose the downlight to be unpaired and hit Save.
3. Downlights that are successfully unpaired will flash 3 times and unpaired downlights are now displayed in the addable
Group.
11
SECTION C: INSTRUCTIONS ON PAIRING/UNPAIRING THE REMOTE CONTROL FOR DOWNLIGHT
Save
SECTION D: INSTRUCTIONS ON USING THE HPM CONNECT APP
FOR SMART FAN
1. Pairing the Smart Fan
Turn ON the wall switch for the fan. The light on the fan will be ON.
Have paired and working Remote control. If the remote is not paired with the fan, press and hold OFF button
until the light on the fan blinks once within 10 seconds.
To pair the fan with your HPM Connect App, press and hold ‘BT’ button on the remote (up to 20 seconds) until
the light on the fan blinks 3 times.
AUTO SCAN
i) Make sure that your smart device is connected to the internet and Bluetooth & Location are turned ON.
ii) Reset the device, hold the “BT” button on the remote control until the light blinks. If the light does not blink
repeat the process.
iii) Select Add Device or “ ”
iv) Select Ventilation and select Auto Scan.
v) Select Done once added.
+
SECTION D: INSTRUCTIONS ON USING THE HPM CONNECT APP FOR SMART FAN
12
Click Next
Add Device
Ventilation
Done
Next
Click on” “ to add the device.
Click on” “
Click confirmation button and
Next once reset is done.
+
+
+
Next
Next
i) Make sure that your smart device is connected to the internet and Bluetooth & Location are turned ON.
ii) Reset the device, hold the BT button on the remote control until the light blinks. If the light does not blink repeat the process.
iii) Select Add Device or “ ”
iv) Select Ventilation and select Add Manually.
+
ADD MANUALLY
vi) Congratulations!! Your HPM Smart fan is now paired with your
smart device. You can now control your fan from your App.
SECTION D: INSTRUCTIONS ON USING THE HPM CONNECT APP FOR SMART FAN
13
Add Device
Ventilation
PAIRING MULTIPLE SMART FANS
To pair another fan repeat the steps for pairing. Once added, paired fans can be controlled individually by cliking the
power button. You can click on “ “ to add more fans to this list.
Click Add All By clicking each power button
fans can be controlled individually
vi) Congratulations!! Your HPM Smart fan is now paired with your smart device. You can now control your fan from your App.
SECTION D: INSTRUCTIONS ON USING THE HPM CONNECT APP FOR SMART FAN
14
v) Select Next once added and press Done.
Next
Done
Done
+
+
+
+
  • Page 1 1
  • Page 2 2
  • Page 3 3
  • Page 4 4
  • Page 5 5
  • Page 6 6
  • Page 7 7
  • Page 8 8
  • Page 9 9
  • Page 10 10
  • Page 11 11
  • Page 12 12
  • Page 13 13
  • Page 14 14
  • Page 15 15
  • Page 16 16
  • Page 17 17
  • Page 18 18
  • Page 19 19
  • Page 20 20
  • Page 21 21

Legrand HPm Kasutusjuhend

Tüüp
Kasutusjuhend

teistes keeltes