Samsung WF1124XAC Kasutusjuhend
- Kategooria
- Pesumasinad
- Tüüp
- Kasutusjuhend

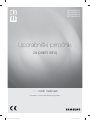
Washing Machine
user manual
imagine the possibilities
Thank you for purchasing this Samsung product.
WF1124ZA(C/U)
WF1124ZB(C/U)
WF1124XA(C/U)
WF1124XB(C/U)
ARNO_DC68-03165H-09_EN.indd 1ARNO_DC68-03165H-09_EN.indd 1 2015-10-21 5:47:302015-10-21 5:47:30

English - 2
contents
SAFETY INFORMATION
3
3 What you need to know about safety
instructions
3 Important safety symbols and precautions
10 Instruction about the WEEE mark
SETTING UP YOUR WASHING
MACHINE
11
11 Checking the parts
12 Meeting installation requirements
12 Electrical supply and grounding
12 Water Supply
13 Drain
13 Flooring
13 Surrounding temperature
13 Alcove or closet installation
13 Installing your washing machine
WASHING A LOAD OF LAUNDRY
19
19 Washing for the fi rst time
19 Basic instructions
20 Using the control panel
23 Eco Display (selected LCD models)
23 Child Lock
23 Sound Off
24 Delay End
24 My Cycle
25 Eco Bubble
26 Washing clothes using the cycle selector
27 Washing clothes manually
27 Laundry guidelines
28 Detergent and additives information
28 Which detergent to use
29 Detergent drawer
29 Liquid Detergent (Selected models)
CLEANING AND MAINTAINING YOUR
WASHING MACHINE
30
30 Eco Drum Clean
31 Draining the washing machine in an
emergency
32 Cleaning the debris fi lter
32 Cleaning the exterior
33 Cleaning the detergent drawer and drawer
recess
33 Cleaning the water hose mesh fi lter
34 Repairing a frozen washing machine
34 Storing your washing machine
TROUBLESHOOTING AND
INFORMATION CODES
35
35 Check these points if your washing machine...
36 Information codes
CALIBRATING YOUR WASHING
MACHINE
37
37 Calibration mode
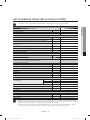
CYCLE CHART
38
38 Cycle chart
APPENDIX
39
39 Fabric care chart
39 Protecting the environment
40 Specifi cations
41 Sheet of household washing machines
ARNO_DC68-03165H-09_EN.indd Sec3:2ARNO_DC68-03165H-09_EN.indd Sec3:2 2015-10-21 5:47:362015-10-21 5:47:36
Leht laadib ...

English - 4
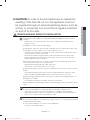
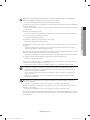
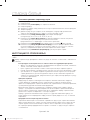
1. This appliance is not to be used by persons (including
children) with reduced physical, sensory or mental
capabilities, or lack of experience and knowledge, unless
they have been given supervision or instruction concerning
use of the appliance by a person responsible for their
safety.
2. For use in Europe: This appliance can be used by
children aged from 8 years and above and persons with
reduced physical, sensory or mental capabilities or lack
of experience and knowledge if they have been given
supervision or instruction concerning use of the appliance
in a safe way and understand the hazards involved.
Children shall not play with the appliance. Cleaning and
user maintenance shall not be made by children without
supervision.
3. Children should be supervised to ensure that they do not
play with the appliance.
4. If the supply cord is damaged, it must be replaced by
the manufacturer, its service agent or similarly qualifi ed
persons in order to avoid a hazard.
5. The new hose-sets supplied with the appliance are to be
used and that old hose-sets should not be reused.
6. For appliances with ventilation openings in the base, that a
carpet must not obstruct the openings.
7. For use in Europe: Children of less than 3 years should
be kept away unless continuously supervised.
safety information
ARNO_DC68-03165H-09_EN.indd Sec10:4ARNO_DC68-03165H-09_EN.indd Sec10:4 2015-10-21 5:47:362015-10-21 5:47:36
Leht laadib ...
Leht laadib ...
Leht laadib ...
Leht laadib ...
Leht laadib ...
Leht laadib ...

English - 11
02 SETTING UP
setting up your washing
machine
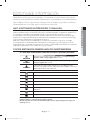
Be sure to have your installer follow these instructions closely so that your new
washing machine works properly and so that you’re not at risk of injury when doing
laundry.
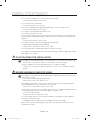
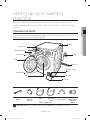
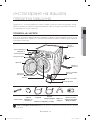
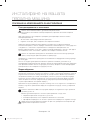
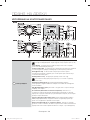
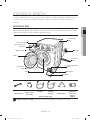
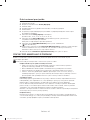
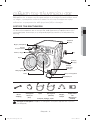
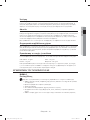
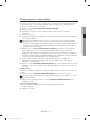
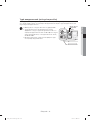
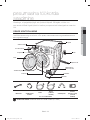
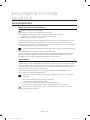
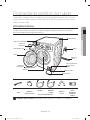
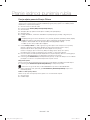
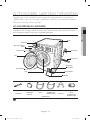
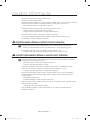
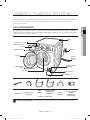
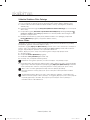
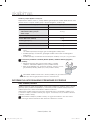
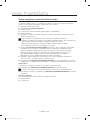
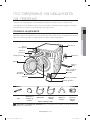
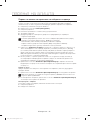
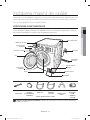
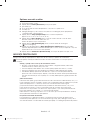
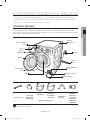
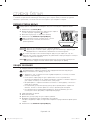
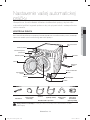
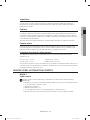
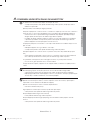
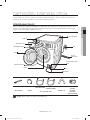
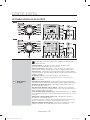
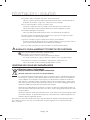
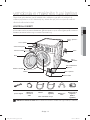
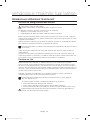
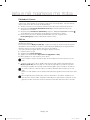
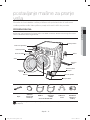
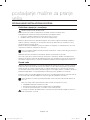
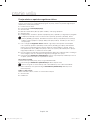
CHECKING THE PARTS
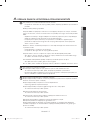
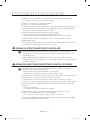
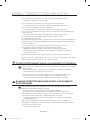
Carefully unpack your washing machine, and make sure you’ve received all of the parts shown below.
If your washing machine was damaged during shipping, or if you do not have all of the parts, contact
Samsung Customer Service or your Samsung dealer.
Spanner
* Bolt hole
covers
Cold
Hot
(Selected
model)
Hose guide
Liquid
detergent box
(Selected
model)
Water supply hose
* Bolt hole covers : The number of bolt hole covers depends on the model (3~6 covers).
Detergent drawer
Control panel
Door
Levelling feet
Work top
Plug
Drain hose
Emergency drain
tube
Debris fi lter
Filter Cover
Tub
Release lever
ARNO_DC68-03165H-09_EN.indd Sec4:11ARNO_DC68-03165H-09_EN.indd Sec4:11 2015-10-21 5:47:372015-10-21 5:47:37

English - 12
setting up your washing
machine
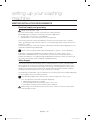
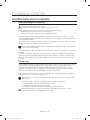
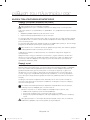
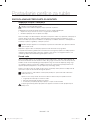
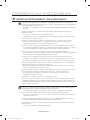
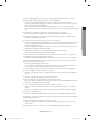
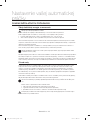
MEETING INSTALLATION REQUIREMENTS
Electrical supply and grounding
Never use an extension cord.
Use only the power cord that comes with your washing machine.
When preparing for installation, ensure that your power supply offers:
• AC 220-240 V / 50 Hz fuse or circuit breaker
• Individual branch circuit serving only your washing machine
Your washing machine must be grounded. If your washing machine malfunctions or breaks
down, grounding will reduce the risk of electric shock by providing a path of least resistance for
the electric current.
Your washing machine comes with a power cord having a three-prong grounding plug for use in
a properly installed and grounded outlet.
Never connect the ground wire to plastic plumbing lines, gas lines, or hot water pipes.
Improperly connecting the equipment-grounding conductor can result in electric shock.
Check with a qualifi ed electrician or serviceman if you are unsure if the washing machine is
properly grounded. Do not modify the plug provided with the washing machine. If it does not fi t
the outlet, have a proper outlet installed by a qualifi ed electrician.
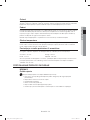
Water Supply
Your washing machine will fi ll properly when your water pressure is 50 kPa ~ 800 kPa. Water
pressure less than 50 kPa may cause water valve failure, not allowing the water valve to shut
off completely. Or, it may take the washing machine longer to fi ll than what the controls allow,
resulting in your washing machine turning off. (A fi ll-time limit, designed to prevent overfl ows/
fl ooding if an internal hose becomes loose, is built into the controls.)
The water taps must be within 120cm of the back of your washing machine for the provided inlet
hoses provided to reach your washing machine.
Most plumbing supply stores sell inlet hoses of various lengths up to 305 cm long.
You can reduce the risk of leaks and water damage by:
• Making water taps easily accessible.
• Turning off taps when the washing machine is not in use.
• Periodically checking for leaks at water inlet hose fi ttings.
Before using your washing machine for the fi rst time, check all connections at the water
valve and taps for leaks.
WARNING
WARNING
ARNO_DC68-03165H-09_EN.indd Sec4:12ARNO_DC68-03165H-09_EN.indd Sec4:12 2015-10-21 5:47:372015-10-21 5:47:37
Leht laadib ...

English - 14
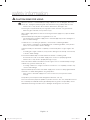
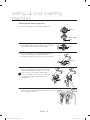
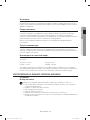
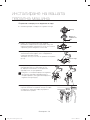
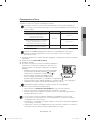
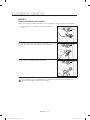
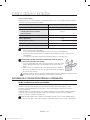
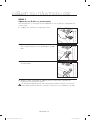
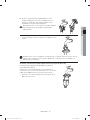
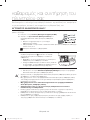
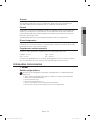
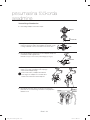
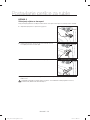
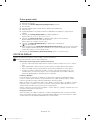
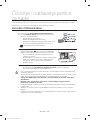
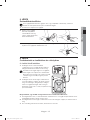
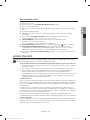
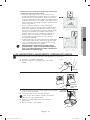
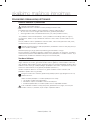
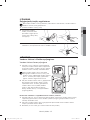
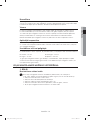
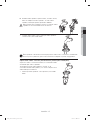
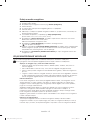
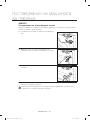
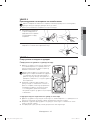
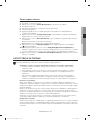
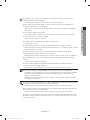
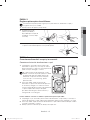
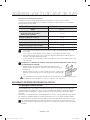
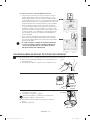
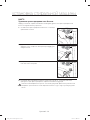
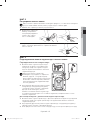
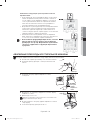
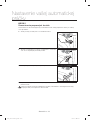
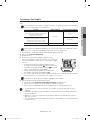
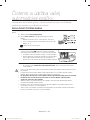
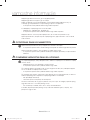
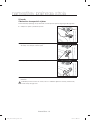
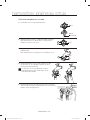
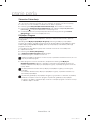
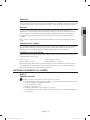
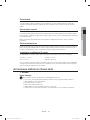
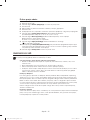
STEP 2
Removing the shipping bolts
Before installing the washing machine, you must remove all shipping bolts from the back of the
unit.
1. Loosen all the bolts with the supplied wrench.
2. Hold the bolt with the spanner and pull it through the wide
section of the hole. Repeat for each bolt.
3. Fill the holes with the supplied plastic covers.
4. Store the shipping bolts away safely in case you have to move the washing machine in the
future.
Packaging materials can be dangerous to children; keep all packaging material (plastic
bags, polystyrene, etc.) well out of the reach of children.
setting up your washing
machine
WARNING
Option
Option
Option
ARNO_DC68-03165H-09_EN.indd Sec4:14ARNO_DC68-03165H-09_EN.indd Sec4:14 2015-10-21 5:47:372015-10-21 5:47:37
Leht laadib ...

English - 16
setting up your washing
machine
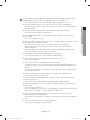
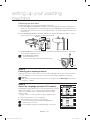
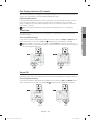
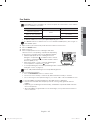
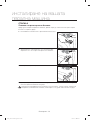
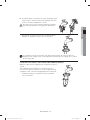
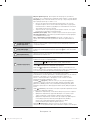
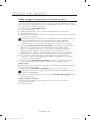
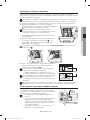
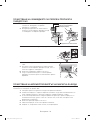
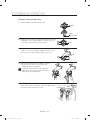
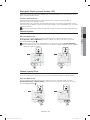
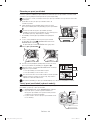
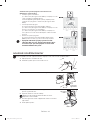
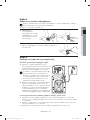
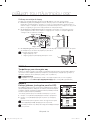
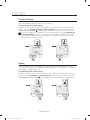
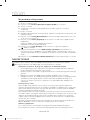
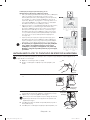
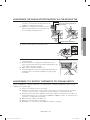
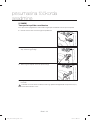
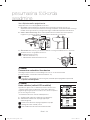
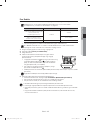
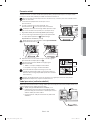
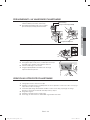
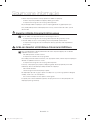
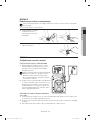
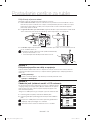
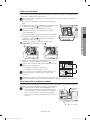
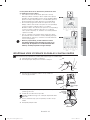
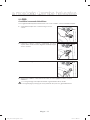
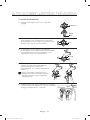
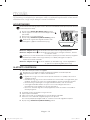
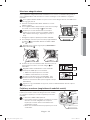
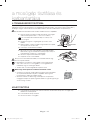
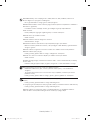
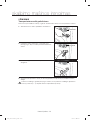
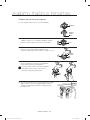
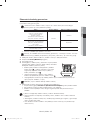
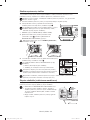
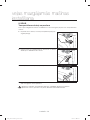
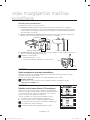
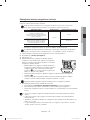
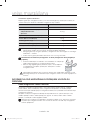
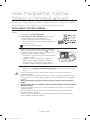
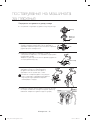
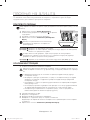
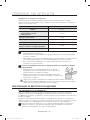
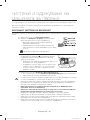
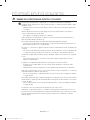
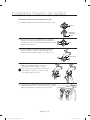
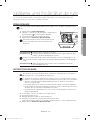
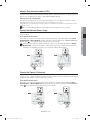
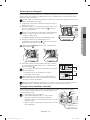
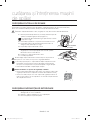
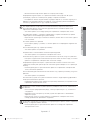
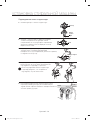
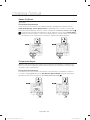
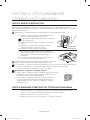
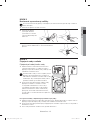
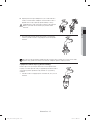
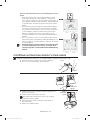
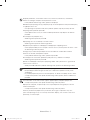
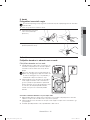
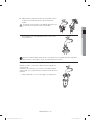
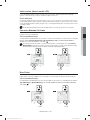
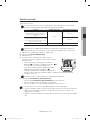
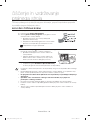
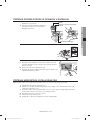
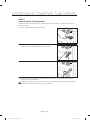
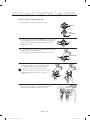
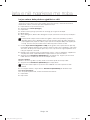
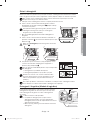
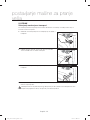
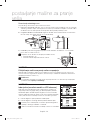
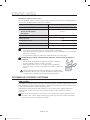
Connecting the water supply hose
1. Remove the adaptor from the water supply hose.
2. First, using a ‘+’ type screwdriver, loosen the four screws
on the adaptor. Next, take the adaptor and turn part (2)
following the arrow until there is a 5 mm gap.
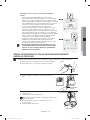
3. Connect the adaptor to the water tap by tightening the
screws fi rmly while lifting the adaptor upwards.
Turn part (2) following the arrow and connect (1) and (2).
4. Connect the water supply hose to the adaptor.
When you release part (3), the hose automatically
connects to the adaptor making a ‘click’ sound.
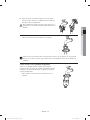
After you have connected the water supply
hose to the adaptor, ensure that it is connected
correctly by pulling the water supply hose
downwards.
5. Connect the other end of the water supply hose to the inlet
water valve at the rear of the washing machine. Screw the
hose clockwise all the way in.
Adaptor
Water supply
hose
1
2
5 mm
1
2
Water tap
Option
3
ARNO_DC68-03165H-09_EN.indd Sec4:16ARNO_DC68-03165H-09_EN.indd Sec4:16 2015-10-21 5:47:382015-10-21 5:47:38

English - 17
02 SETTING UP
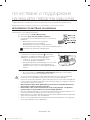
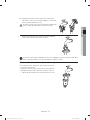
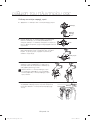
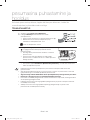
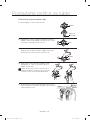
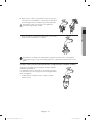
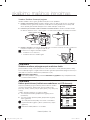
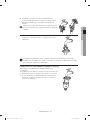
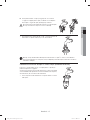
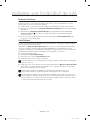
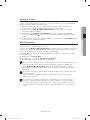
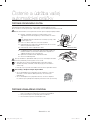
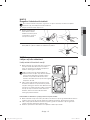
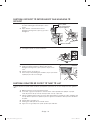
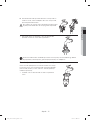
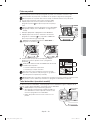
6. Turn on the water supply and ensure that no water leaks
from the water valve, tap or adaptor. If there is a water
leaks, repeat the previous steps.
Do not use your washing machine if there is a water leak.
This may cause electric shock or injury.
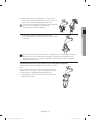
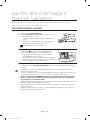
• If the water tap has a screw type tap, connect the water
supply hose to the tap as shown.
Use the most conventional type of tap for the water supply. In case the tap is square or too
big, remove the spacing ring before inserting the tap into the adaptor.
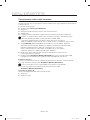
Connecting the Aqua Hose (Selected models)
The Aqua Hose was invented for perfect leakage protection.
It is attached to the water supply hose and automatically cuts
off the water fl ow if the hose is damaged. It also displays a
warning indicator.
• Connect the water supply hose to the tap as shown.
✗
✗
WARNING
ARNO_DC68-03165H-09_EN.indd Sec4:17ARNO_DC68-03165H-09_EN.indd Sec4:17 2015-10-21 5:47:382015-10-21 5:47:38

English - 18
setting up your washing
machine
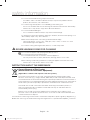
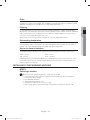
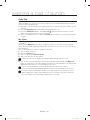
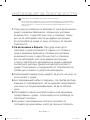
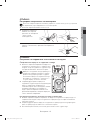
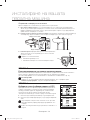
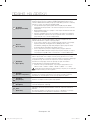
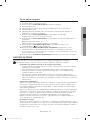
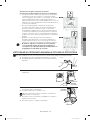
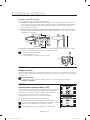
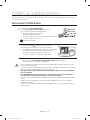
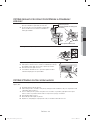
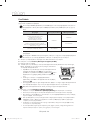
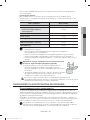
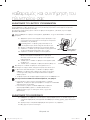
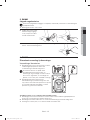
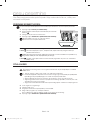
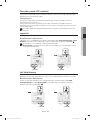
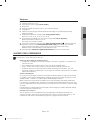
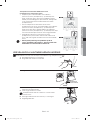
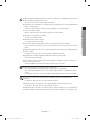
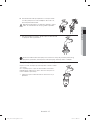
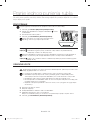
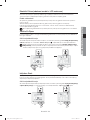
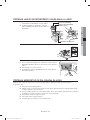
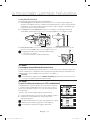
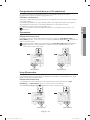
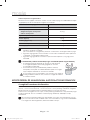
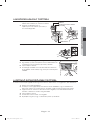
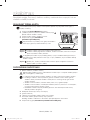
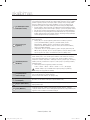
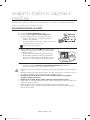
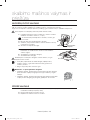
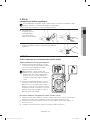
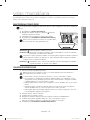
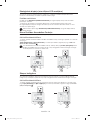
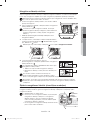
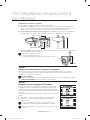
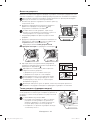
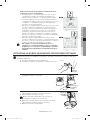
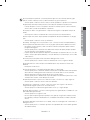
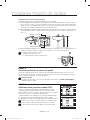
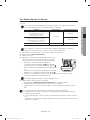
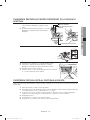
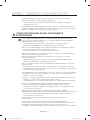
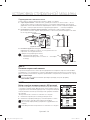
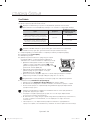
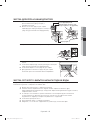
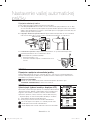
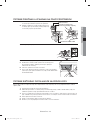
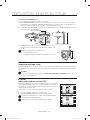
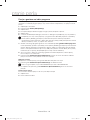
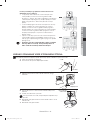
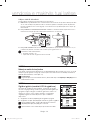
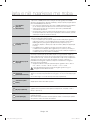
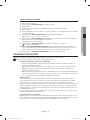
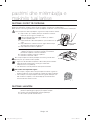
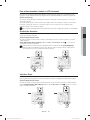
Connecting the drain hose
The end of the drain hose can be positioned in three ways:
1. Over the edge of a wash basin: The drain hose must be placed at a height of between 60
and 90 cm. To keep the drain hose spout bent, use the supplied plastic hose guide. Secure
the guide to the wall with a hook or to the tap with a piece of string to prevent the drain hose
from moving.
2. ln a sink drain pipe branch: The drain pipe branch must be above the sink siphon so that
the end of the hose is at least 60 cm above the ground.
3. ln a drain pipe: We recommend using a 65 cm high vertical pipe; it must be no shorter than
60 cm and no longer than 90 cm.
The standpipe drain requires;
• minimum diameter 5 cm.
• minimum carry-away capacity 60 liter per minute.
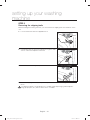
STEP 5
Powering your washing machine
Plug the power cord into a wall sockets, an AC 220-240V / 50Hz approved electrical outlet protected by a
fuse or circuit breaker. (For more information on electrical and grounding requirements, see page 14.)
Test run
Make sure that you install your washing machine correctly by running the Rinse+Spin cycle after the
installation is complete.
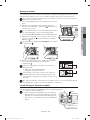
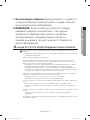
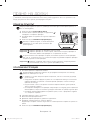
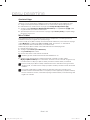
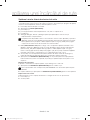
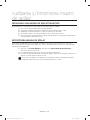
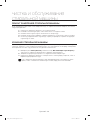
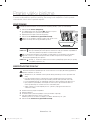
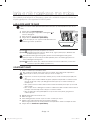
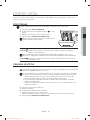
STEP 6
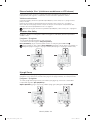
Select the Language (selected LCD models)
At the beginning setting (After power on), the “Language setting” message
appears on the display. you can select one language among English,
French, Dutch, German, Italian, or Spanish.(Polish, Russian, Turkish,
Chinese or Thai.)
* Language selections can be changed according to derived models.
1. Push the Rinse button to choose a language.
2. Push the Spin button to set the chosen language.
To reselect the language, press the Rinse and Spin buttons
simultaneously for 3 seconds.
The LCD display Language may differ depending on the model.
Drain hose
Hose guide
60 ~ 90 cm
60 ~ 90 cm
Türkçe
Polska
Poccию
ᳯᐴ
ARNO_DC68-03165H-09_EN.indd Sec4:18ARNO_DC68-03165H-09_EN.indd Sec4:18 2015-10-21 5:47:382015-10-21 5:47:38
Leht laadib ...

English - 20
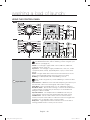
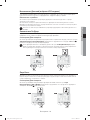
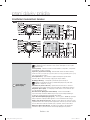
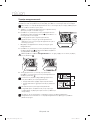
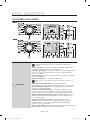
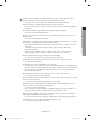
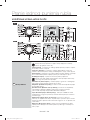
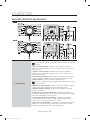
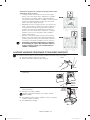
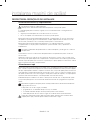
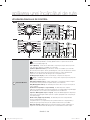
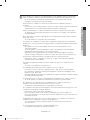
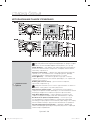
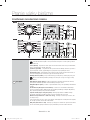
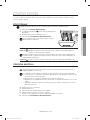
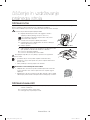
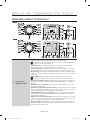
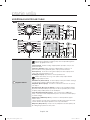
USING THE CONTROL PANEL
2 7
8 9 1110 121 136
5
4
3
2 7
8 9 1110 12
1
136
5
4
3
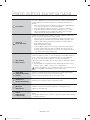
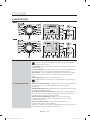
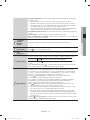
Cycle Selector
Select the tumble pattern and spin speed for the cycle.
For detailed information, refer to “Washing clothes using the cycle
selector”. (see page 28)
Cotton - For average or lightly soiled cottons, bed linen, table linen,
underwear, towels, shirts, etc.
Synthetics - For averagely or lightly soiled blouses, shirts, etc., made
of polyester (diolen, trevira), polyamide (perlon, nylon) or other similar
blends.
Denim - A higher water level in the main wash and extra rinse ensure
that no washing powder remains that may mark your clothing.
Bedding - For bed spread, bed sheet, Bedding cover etc.
Wash under 2.5kg and only 1 kind of Bedding to achieve the best
result.
Dark Garment - Additional rinses and reduced spinning ensure that your
favourite dark clothes are washed gently and rinsed thoroughly.
Daily Wash - Use for everyday items such as underwear and shirts.
Eco Drum Clean - Use for drum cleaning. It cleanses dirt and bacteria
of drum. Regular use (after every 40 washes) is recommended. No
detergent or bleach needed.
Super Eco Wash - Low temperature Eco Bubble ensures that you
achieve perfect wash results while allowing effective energy saving.
Outdoor Care - Use for outdoor wear such as mountain clothes,
skiwear, and sports wear. Fabrics include functional technology fi nishes
and fi bers such as spandex, stretch, and micro-fi ber.
Baby Care - High temperature wash and extra rinses ensure that no
washing powder remains to mark your thin clothes.
washing a load of laundry
1
ARNO_DC68-03165H-09_EN.indd Sec5:20ARNO_DC68-03165H-09_EN.indd Sec5:20 2015-10-21 5:47:392015-10-21 5:47:39
Leht laadib ...
Leht laadib ...

English - 23
03 WASHING A LOAD OF LAUNDRY
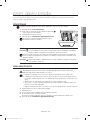
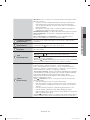
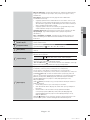
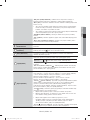
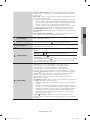
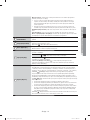
Eco Display (selected LCD models)
This function decreases the brightness of the LCD backlight if you do not use the Cycle Selector
or press any of the buttons for the pre-determined period of time.
Operating Mechanism
If you press the Start/Pause button, the Eco Display function automatically runs after 1 minute.
If you use the Cycle Selector or press any button, the Eco Display function is cancelled.
The Eco Display function will start automatically unless you use the Cycle Selector or press the
button within 1 minute.
Unless the Start/Pause button is pressed, the Eco Display function is not activated.
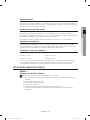
Child Lock
The Child Lock function allows you to lock the buttons so that the wash cycle you’ve chosen
can’t be changed.
Activating/Deactivating
If you want to activate or deactivate the Child Lock function, press the Temp and Rinse buttons
at the same time for 3 seconds. “Child Lock ” will be lit when this feature is activated.
When the Child Lock function is activated, only the Power button works. The Child Lock
function remains on even after the power is turned on and off or after the disconnecting and
reconnecting the power cord.
Sound Off
The Sound Off function can be selected during all courses. When this function is selected, sound is
turned off for all courses. Even if the power is turned on and off repeatedly, the setting is retained.
Activating/Deactivating
If you want to activate or deactivate the Sound Off function, press the Spin and Option buttons
at the same time for 3 seconds. The “Sound Off ” will be lit when this feature is activated.
3 sec. 3 sec.
3 sec. 3 sec.
ARNO_DC68-03165H-09_EN.indd Sec5:23ARNO_DC68-03165H-09_EN.indd Sec5:23 2015-10-21 5:47:402015-10-21 5:47:40
Leht laadib ...

English - 25
03 WASHING A LOAD OF LAUNDRY
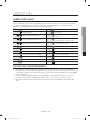
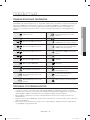
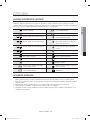
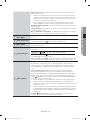
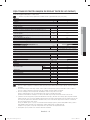
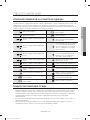
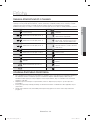
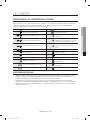
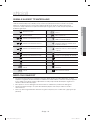
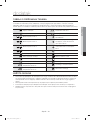
Eco Bubble
Eco Bubble allows detergent to distribute evenly and penetrate fabrics faster and deeper.
The bubble function is available in all courses except for Eco Drum Clean course and the
function availability is as follows.
Course Bubble function Canceling the bubble function
Cotton, Synthetics, Denim, Bedding,
Dark Garment, Daily Wash
Available
Available
Super Eco Wash, Outdoor Care,
Baby Care, Wool, Hand Wash
Not available
Eco Drum Clean Not available -
• A different bubble function may be applied depending the course.
Eco Bubble selection is default. Press it once to deselect bubble option, press it again to
select bubble option.
1. Open the door, place the laundry inside the wash tub and close the door.
2. Press the Power button.
3. Select a function.
4. Place the appropriate amount of detergent and fabric
softener into the corresponding compartments depending
on the amount of laundry and close the detergent drawer.
• Add the appropriate amount of detergent into the
detergent compartment
, and add the fabric softener
to softener compartment just under the fi ber softener
base line (MAX) of “A”).
• When the Prewash course is selected, add detergent
into the prewash compartment as well.
• To use liquid detergent, leave the liquid detergent box in the drawer(refer to “Liquid
Detergent” section on page 31).
Do not add powdered detergent into the liquid detergent box.
5. Press the Start/Pause button.
• Press the Start/Pause button to start the wash.
• The amount of the laundry is automatically detected and the laundry is washed.
• Once a washing machine operation begins, you cannot add or select the bubble function.
• Enough bubbles are generated with the specifi ed amount of detergent.
• Please clean the Debris fi lter frequently. Periodic cleaning helps generate suffi cient
bubbles.
• Depending on the detergent and the laundry, the bubbles may be absorbed and seem
like a small quantity.
• Although bubbles are generated once the wash begins, it may take several minutes for
users to see them.
ARNO_DC68-03165H-09_EN.indd Sec5:25ARNO_DC68-03165H-09_EN.indd Sec5:25 2015-10-21 5:47:412015-10-21 5:47:41
Leht laadib ...
Leht laadib ...

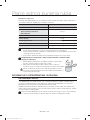
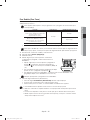
English - 28
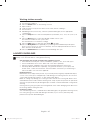
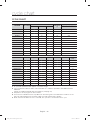
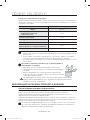
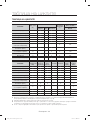
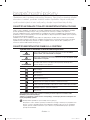
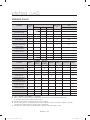
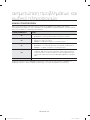
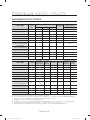
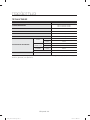
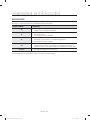
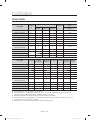
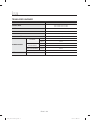
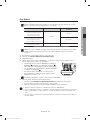
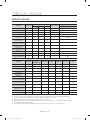
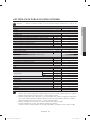
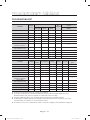
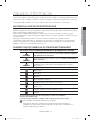
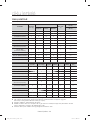
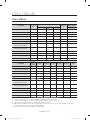
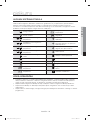
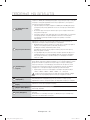
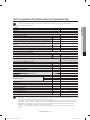
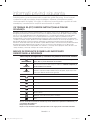
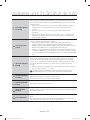
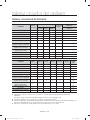
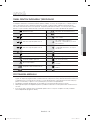
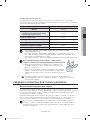
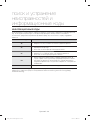
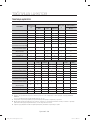
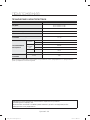
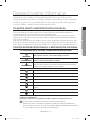
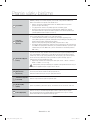
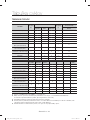
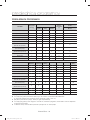
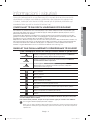
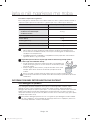
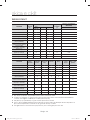
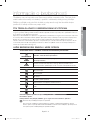
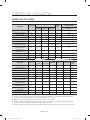
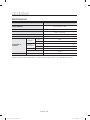
Determining the load capacity
Do not overload the washing machine or your laundry may not wash properly. Use the chart
below to determine the load capacity for the type of laundry you are washing.
Fabric Type Load Capacity
Model
WF1124
Cotton
- average/lightly soiled
- heavily soiled
12.0 kg
Synthetics 5.0 kg
Denim 3.0 kg
Bedding 2.5 kg
Outdoor Care 2.0 kg
Wool 2.0 kg
• When the laundry is unbalanced (“UE” lights up on the display), redistribute the load.
If the laundry is unbalanced, the spin effi ciency may be degraded.
• When washing Bedding or Bedding cover, the wash time may be lengthened or the spin
effi ciency may be degraded.
• For Bedding or Bedding cover, the recommended load capacity is 2.5 kg or less.
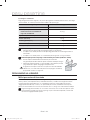
Make sure to insert brassieres (water washable) into a laundry net (to be
purchased additionally).
• The metal parts of the brassieres may break through the material
and damage the laundry. Therefore make sure to place them inside
a fi ne laundry net.
• Small, light clothing such as socks, gloves, stockings and
handkerchiefs may become caught around the door. Place them
inside a fi ne laundry net.
Do not wash the laundry net by itself without other laundry. This may cause abnormal
vibrations that could move the washing machine and cause an accident resulting in
injury.
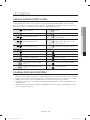
DETERGENT AND ADDITIVES INFORMATION
Which detergent to use
The type of detergent you should use is based on the type of fabric (cotton, synthetic, delicate
items, wool), colour, wash temperature, and degree of soiling. Always use “low suds” laundry
detergent, which is designed for automatic washing machines.
Follow the detergent manufacturer’s recommendations based on the weight of the laundry, the
degree of soiling, and the hardness of the water in your area. If you do not know how hard your
water is, enquire at your local water authority.
Do not use detergent that has hardended or solidifi ed as the detergent may remain in
the rinse cycle. It may cause your washing machine to not rinse properly or result in the
overfl ow becoming blocked.
washing a load of laundry
CAUTION
ARNO_DC68-03165H-09_EN.indd Sec5:28ARNO_DC68-03165H-09_EN.indd Sec5:28 2015-10-21 5:47:412015-10-21 5:47:41
Leht laadib ...
Leht laadib ...

English - 31
04 CLEANING AND MAINTAINING
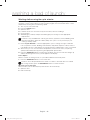
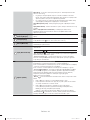
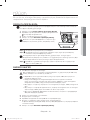
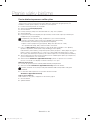
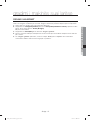
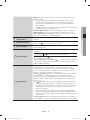
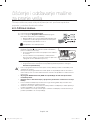
The ECO Drum Clean Auto Alarm Function
• If the “ECO Drum Clean” indicator on the display and the
lamp on the Cycle Selector are lit after a wash, it indicates
that tub (drum) cleaning is required. In this case, remove
the laundry from the washing machine, turn the power
on, and clean the drum by performing the ECO Drum
Clean course.
• If you do not perform the ECO Drum Clean course, the
“ECO Drum Clean” indicator on the display and the lamp
on the Cycle Selector are turned off. However, the “ECO
Drum Clean” indicator on the display and the lamp on the
Cycle Selector are turned on again after two washes are
performed. However, this will not result in a problem with
the washing machine.
• Although generally, the ECO Drum Clean Auto Alarm
appears once a month or so, the frequency may differ
depending on the number of times the washing machine
is used.
• In case of the alarm, please also clean the debris
fi lter (refer to “Cleaning the debris fi lter” section on
page 34). Otherwise the performance of the bubble
function may lower down.
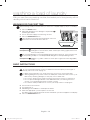
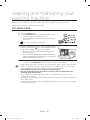
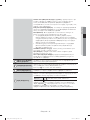
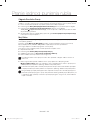
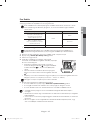
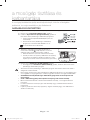
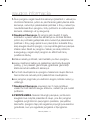
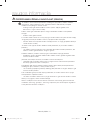
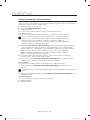
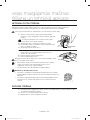
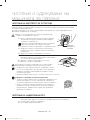
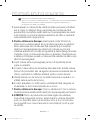
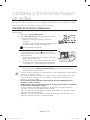
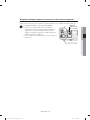
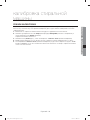
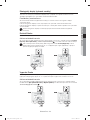
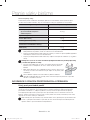
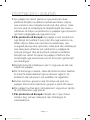
DRAINING THE WASHING MACHINE IN AN EMERGENCY
If there is a power outage, drain all remaining water before removing your laundry.
1. Unplug the washing machine from the power supply.
2. Open the fi lter cover by using a coin or key.
3. Open the emergency drain cap by pulling it.
4. Hold the cap on the end of the emergency drain tube and
slowly pull it out.
5. Allow all the water to fl ow into a bowl.
Remain water maybe more than you expected.
Prepare larger bowl.
6. Reinsert the emergency drain cap and the drain tube.
7. Replace the fi lter-cover.
Filter cover
Emergency
drain tube
Emergency
drain cap
ARNO_DC68-03165H-09_EN.indd Sec6:31ARNO_DC68-03165H-09_EN.indd Sec6:31 2015-10-21 5:47:422015-10-21 5:47:42

English - 32
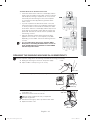
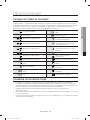
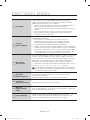
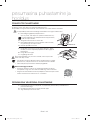
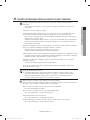
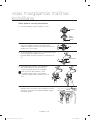
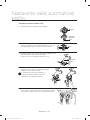
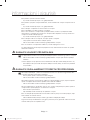
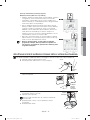
CLEANING THE DEBRIS FILTER
We recommend cleaning the debris fi lter 5 or 6 times a year, or when the error message of “5E” is
displayed. (Refer to “Draining the washing machine in an emergency” in the previous section.)
If foreign substances accumulate debris fi lter, the performance of the bubble function will be degraded.
Before cleaning the debris fi lter, make sure to unplug the power cord.
1. Remove the remaining water fi rst (refer to “Draining the
washing machine in an emergency” on page 33.)
If you separate the fi lter without draining the remaining
water, the remaining water may trickle out.
2. Open the fi lter cover by using a key or coin.
3. Unscrew the emergency drain cap by turning it to the left
and drain off all the water.
4. Unscrew the debris fi lter cap.
5. Wash any dirt or other material from the debris fi lter. Make
sure the drain pump propeller behind the debris fi lter is not
blocked.
6. Replace the debris fi lter cap.
7. Replace the fi lter cover.
Do not open the debris fi lter cap while the machine is running or hot
water may fl ow out.
• Make sure to replace the fi lter cap after the fi lter cleaning. If the fi lter is out of the machine, your
washing machine may malfunction or leak water.
• The fi lter should be fully assembled after the fi lter cleaning.
For models with the safety fi lter cap
• To open, push in, and then turn the safety fi lter cap counterclockwise.
The spring in the cap will make opening the cap easy.
• To close, turn the safety fi lter cap clockwise. As you turn the cap, the
spring will make a rattling sound. The rattling sound is normal.
CLEANING THE EXTERIOR
1. Wipe the washing machine surfaces, including the control panel, with a soft cloth using a
nonabrasive household detergent.
2. Use a soft cloth to dry the surfaces.
3. Do not pour water onto the washing machine.
cleaning and maintaining your
washing machine
Debris fi lter cap
CAUTION
CAUTION
ARNO_DC68-03165H-09_EN.indd Sec6:32ARNO_DC68-03165H-09_EN.indd Sec6:32 2015-10-21 5:47:422015-10-21 5:47:42

English - 33
04 CLEANING AND MAINTAINING
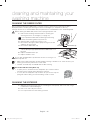
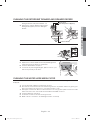
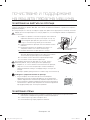
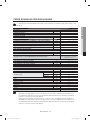
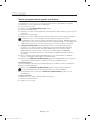
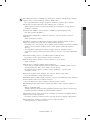
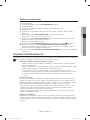
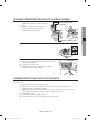
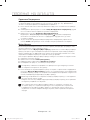
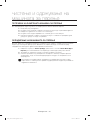
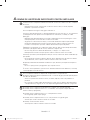
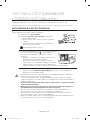
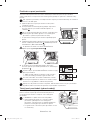
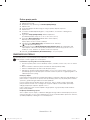
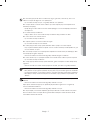
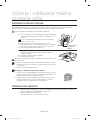
CLEANING THE DETERGENT DRAWER AND DRAWER RECESS
1. Press the release lever on the inside of the
detergent drawer and pull the drawer out.
2. Remove the softener divider and the liquid
detergent box(option) from the detergent
drawer.
3. Wash all parts under running water.
4. Clean the drawer recess with an old toothbrush.
5. Replace the softener divider and the liquid detergent box
(option) by pushing it fi rmly into the drawer.
6. Push the drawer back into place.
7. To remove any remaining detergent, perform a rinse cycle
without any laundry in the drum.
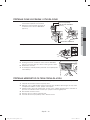
CLEANING THE WATER HOSE MESH FILTER
You should clean the water hose mesh fi lter at least once a year, or when the error message of “4E” is
displayed:
1. Turn off the water supply to the washing machine.
2. Unscrew the hose from the back of the washing machine. To prevent water from gushing out
due to the air pressure in the hose, cover the hose with a cloth.
3. Gently pull out the mesh fi lter from the end of the hose using a pair of pliers and rinse it under
water until clean. Also clean inside and outside the threaded connector.
4. Push the fi lter back into place.
5. Screw the hose back onto the washing machine.
6. Make sure the connections are watertight and turn on the tap.
Release lever
Softener divider
liquid detergent box (Option)
ARNO_DC68-03165H-09_EN.indd Sec6:33ARNO_DC68-03165H-09_EN.indd Sec6:33 2015-10-21 5:47:432015-10-21 5:47:43

English - 34
cleaning and maintaining your
washing machine
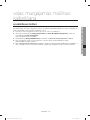
REPAIRING A FROZEN WASHING MACHINE
If the temperature drops below freezing and your washing machine is frozen:
1. Unplug the washing machine.
2. Pour warm water over the tap to loosen the water supply hose.
3. Remove the water supply hose and soak it in warm water.
4. Pour warm water into the washing machine drum and let it sit for 10 minutes.
5. Reconnect the water supply hose to the water tap and check if the water supply and drain
are operating normal.
STORING YOUR WASHING MACHINE
If you need to store your washing machine for an extended time, it’s better to drain and disconnect it.
Washing machines can be damaged if water is left in the hoses and internal components before storage.
1. Select the Cotton cycle and push the Quick Wash button and run your washing machine
through the cycle without a load.
2. Turn the water taps off and disconnect the inlet hoses.
3. Unplug your washing machine from the electrical outlet, and leave your washing machine
door open to allow air to circulate inside the tumbler.
If your washing machine has been stored in below-freezing temperatures, allow time for any
leftover water in your washing machine to thaw out before using it.
ARNO_DC68-03165H-09_EN.indd Sec6:34ARNO_DC68-03165H-09_EN.indd Sec6:34 2015-10-21 5:47:432015-10-21 5:47:43

English - 35
05 TROUBLESHOOTING
troubleshooting and
information codes
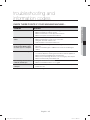
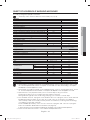
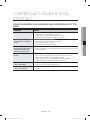
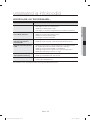
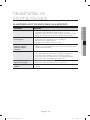
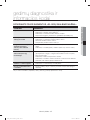
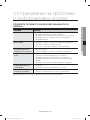
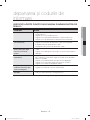
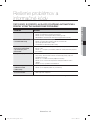
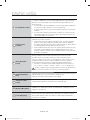
CHECK THESE POINTS IF YOUR WASHING MACHINE...
PROBLEM SOLUTION
Will not start • Make sure your washing machine is plugged in.
• Make sure the door is fi rmly closed.
• Make sure the water source tap(s) are turned on.
• Make sure to press the Start/Pause button.
Has no water or not enough
water
• Turn the water tap on fully.
• Make sure the water source hose is not frozen.
• Straighten the water intake hoses.
• Clean the fi lter on the water intake hose.
Has detergent remaining in
the detergent drawer after
the wash cycle is complete
• Make sure your washing machine is running with suffi cient water
pressure.
• Make sure the detergent is added to the center of the detergent
drawer.
Vibrates or is too noisy • Make sure your washing machine is on a level surface. If the surface
is not level, adjust the washing machine feet to level the appliance.
• Make sure that the shipping bolts are removed.
• Make sure your washing machine is not touching any other object.
• Make sure the laundry load is balanced.
The washing machine does
not drain and/or spin
• Straighten the drain hose. Eliminate kinked hoses.
• Make sure the debris fi lter is not clogged.
Door is locked shut or will
not open.
• The door will not open until 3 minutes after the machine stops or the
power turns off.
If the problem persists, contact your local Samsung Customer Service.
ARNO_DC68-03165H-09_EN.indd Sec11:35ARNO_DC68-03165H-09_EN.indd Sec11:35 2015-10-21 5:47:432015-10-21 5:47:43

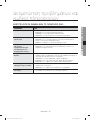
English - 36
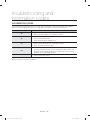
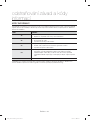
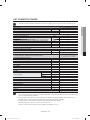
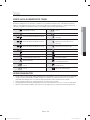
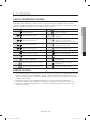
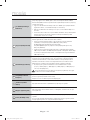
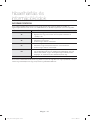
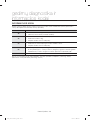
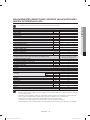
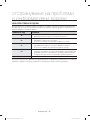
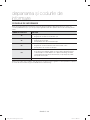
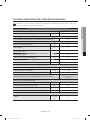
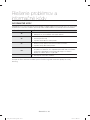
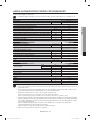
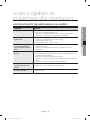
INFORMATION CODES
If your washing machine malfunctions, you may see an information code on the display. If this happens,
please check the table below and try the suggested solution before calling Customer Service.
CODE SYMBOL SOLUTION
dE
• Make sure the door is fi rmly closed.
• Make sure that laundry is not caught in the door.
4E
• Make sure the source water tap is turned on.
• Check the water pressure.
• Clean the mesh fi lters of water hose.
5E
• Clean the debris fi lter.
• Make sure the drainage hose is installed correctly.
• Clean the water hose mesh fi lter.
UE
• The laundry load is unbalanced. Redistribute the load. If only one item
of clothing needs washing, such as a bathrobe or pair of jeans, the
fi nal spin result might be unsatisfactory and an “UE” error message
will be shown in the display window.
cE/3E/Uc
• Call the after-sales service.
For any codes not listed above, or if the suggested solution doesn’t fi x the problem, call your Samsung
Service Centre or local Samsung dealer.
troubleshooting and
information codes
ARNO_DC68-03165H-09_EN.indd Sec11:36ARNO_DC68-03165H-09_EN.indd Sec11:36 2015-10-21 5:47:432015-10-21 5:47:43

English - 37
06 CALIBRATING YOUR WASHING MACHINE
calibrating your washing
machine
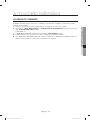
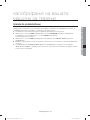
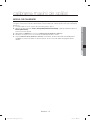
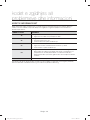
CALIBRATION MODE
Samsung washing machine detects the laundry weight automatically. For more accurate weight detection,
please run Calibration Mode after the installation. Calibration mode is done by following the steps below.
1. Remove laundry or any contents in the machine and turn off the machine.
2. Press the Temp button and Delay End button simultaneously, and press the Power button in addition.
Then the machine turns on.
3. Press the Start button to activate “Calibration Mode”.
4. The drum rotates clockwise and counterclockwise approximately for 3 minutes.
5. When “Calibration Mode” is fi nished, “End/Cycle is complete” appears on the display, and the machine
automatically turns off. The washing machine is now ready for use.
ARNO_DC68-03165H-09_EN.indd Sec8:37ARNO_DC68-03165H-09_EN.indd Sec8:37 2015-10-21 5:47:432015-10-21 5:47:43
Leht laadib ...
Leht laadib ...
Leht laadib ...
Leht laadib ...
Leht laadib ...
Leht laadib ...
Leht laadib ...
Leht laadib ...
Leht laadib ...
Leht laadib ...
Leht laadib ...
Leht laadib ...
Leht laadib ...
Leht laadib ...
Leht laadib ...
Leht laadib ...
Leht laadib ...
Leht laadib ...
Leht laadib ...
Leht laadib ...
Leht laadib ...
Leht laadib ...
Leht laadib ...
Leht laadib ...
Leht laadib ...
Leht laadib ...
Leht laadib ...
Leht laadib ...
Leht laadib ...
Leht laadib ...
Leht laadib ...
Leht laadib ...
Leht laadib ...
Leht laadib ...
Leht laadib ...
Leht laadib ...
Leht laadib ...
Leht laadib ...
Leht laadib ...
Leht laadib ...
Leht laadib ...
Leht laadib ...
Leht laadib ...
Leht laadib ...
Leht laadib ...
Leht laadib ...
Leht laadib ...
Leht laadib ...
Leht laadib ...
Leht laadib ...
Leht laadib ...
Leht laadib ...
Leht laadib ...
Leht laadib ...
Leht laadib ...
Leht laadib ...
Leht laadib ...
Leht laadib ...
Leht laadib ...
Leht laadib ...
Leht laadib ...
Leht laadib ...
Leht laadib ...
Leht laadib ...
Leht laadib ...
Leht laadib ...
Leht laadib ...
Leht laadib ...
Leht laadib ...
Leht laadib ...
Leht laadib ...
Leht laadib ...
Leht laadib ...
Leht laadib ...
Leht laadib ...
Leht laadib ...
Leht laadib ...
Leht laadib ...
Leht laadib ...
Leht laadib ...
Leht laadib ...
Leht laadib ...
Leht laadib ...
Leht laadib ...
Leht laadib ...
Leht laadib ...
Leht laadib ...
Leht laadib ...
Leht laadib ...
Leht laadib ...
Leht laadib ...
Leht laadib ...
Leht laadib ...
Leht laadib ...
Leht laadib ...
Leht laadib ...
Leht laadib ...
Leht laadib ...
Leht laadib ...
Leht laadib ...
Leht laadib ...
Leht laadib ...
Leht laadib ...
Leht laadib ...
Leht laadib ...
Leht laadib ...
Leht laadib ...
Leht laadib ...
Leht laadib ...
Leht laadib ...
Leht laadib ...
Leht laadib ...
Leht laadib ...
Leht laadib ...
Leht laadib ...
Leht laadib ...
Leht laadib ...
Leht laadib ...
Leht laadib ...
Leht laadib ...
Leht laadib ...
Leht laadib ...
Leht laadib ...
Leht laadib ...
Leht laadib ...
Leht laadib ...
Leht laadib ...
Leht laadib ...
Leht laadib ...
Leht laadib ...
Leht laadib ...
Leht laadib ...
Leht laadib ...
Leht laadib ...
Leht laadib ...
Leht laadib ...
Leht laadib ...
Leht laadib ...
Leht laadib ...
Leht laadib ...
Leht laadib ...
Leht laadib ...
Leht laadib ...
Leht laadib ...
Leht laadib ...
Leht laadib ...
Leht laadib ...
Leht laadib ...
Leht laadib ...
Leht laadib ...
Leht laadib ...
Leht laadib ...
Leht laadib ...
Leht laadib ...
Leht laadib ...
Leht laadib ...
Leht laadib ...
Leht laadib ...
Leht laadib ...
Leht laadib ...
Leht laadib ...
Leht laadib ...
Leht laadib ...
Leht laadib ...
Leht laadib ...
Leht laadib ...
Leht laadib ...
Leht laadib ...
Leht laadib ...
Leht laadib ...
Leht laadib ...
Leht laadib ...
Leht laadib ...
Leht laadib ...
Leht laadib ...
Leht laadib ...
Leht laadib ...
Leht laadib ...
Leht laadib ...
Leht laadib ...
Leht laadib ...
Leht laadib ...
Leht laadib ...
Leht laadib ...
Leht laadib ...
Leht laadib ...
Leht laadib ...
Leht laadib ...
Leht laadib ...
Leht laadib ...
Leht laadib ...
Leht laadib ...
Leht laadib ...
Leht laadib ...
Leht laadib ...
Leht laadib ...
Leht laadib ...
Leht laadib ...
Leht laadib ...
Leht laadib ...
Leht laadib ...
Leht laadib ...
Leht laadib ...
Leht laadib ...
Leht laadib ...
Leht laadib ...
Leht laadib ...
Leht laadib ...
Leht laadib ...
Leht laadib ...
Leht laadib ...
Leht laadib ...
Leht laadib ...
Leht laadib ...
Leht laadib ...
Leht laadib ...
Leht laadib ...
Leht laadib ...
Leht laadib ...
Leht laadib ...
Leht laadib ...
Leht laadib ...
Leht laadib ...
Leht laadib ...
Leht laadib ...
Leht laadib ...
Leht laadib ...
Leht laadib ...
Leht laadib ...
Leht laadib ...
Leht laadib ...
Leht laadib ...
Leht laadib ...
Leht laadib ...
Leht laadib ...
Leht laadib ...
Leht laadib ...
Leht laadib ...
Leht laadib ...
Leht laadib ...
Leht laadib ...
Leht laadib ...
Leht laadib ...
Leht laadib ...
Leht laadib ...
Leht laadib ...
Leht laadib ...
Leht laadib ...
Leht laadib ...
Leht laadib ...
Leht laadib ...
Leht laadib ...
Leht laadib ...
Leht laadib ...
Leht laadib ...
Leht laadib ...
Leht laadib ...
Leht laadib ...
Leht laadib ...
Leht laadib ...
Leht laadib ...
Leht laadib ...
Leht laadib ...
Leht laadib ...
Leht laadib ...
Leht laadib ...
Leht laadib ...
Leht laadib ...
Leht laadib ...
Leht laadib ...
Leht laadib ...
Leht laadib ...
Leht laadib ...
Leht laadib ...
Leht laadib ...
Leht laadib ...
Leht laadib ...
Leht laadib ...
Leht laadib ...
Leht laadib ...
Leht laadib ...
Leht laadib ...
Leht laadib ...
Leht laadib ...
Leht laadib ...
Leht laadib ...
Leht laadib ...
Leht laadib ...
Leht laadib ...
Leht laadib ...
Leht laadib ...
Leht laadib ...
Leht laadib ...
Leht laadib ...
Leht laadib ...
Leht laadib ...
Leht laadib ...
Leht laadib ...
Leht laadib ...
Leht laadib ...
Leht laadib ...
Leht laadib ...
Leht laadib ...
Leht laadib ...
Leht laadib ...
Leht laadib ...
Leht laadib ...
Leht laadib ...
Leht laadib ...
Leht laadib ...
Leht laadib ...
Leht laadib ...
Leht laadib ...
Leht laadib ...
Leht laadib ...
Leht laadib ...
Leht laadib ...
Leht laadib ...
Leht laadib ...
Leht laadib ...
Leht laadib ...
Leht laadib ...
Leht laadib ...
Leht laadib ...
Leht laadib ...
Leht laadib ...
Leht laadib ...
Leht laadib ...
Leht laadib ...
Leht laadib ...
Leht laadib ...
Leht laadib ...
Leht laadib ...
Leht laadib ...
Leht laadib ...
Leht laadib ...
Leht laadib ...
Leht laadib ...
Leht laadib ...
Leht laadib ...
Leht laadib ...
Leht laadib ...
Leht laadib ...
Leht laadib ...
Leht laadib ...
Leht laadib ...
Leht laadib ...
Leht laadib ...
Leht laadib ...
Leht laadib ...
Leht laadib ...
Leht laadib ...
Leht laadib ...
Leht laadib ...
Leht laadib ...
Leht laadib ...
Leht laadib ...
Leht laadib ...
Leht laadib ...
Leht laadib ...
Leht laadib ...
Leht laadib ...
Leht laadib ...
Leht laadib ...
Leht laadib ...
Leht laadib ...
Leht laadib ...
Leht laadib ...
Leht laadib ...
Leht laadib ...
Leht laadib ...
Leht laadib ...
Leht laadib ...
Leht laadib ...
Leht laadib ...
Leht laadib ...
Leht laadib ...
Leht laadib ...
Leht laadib ...
Leht laadib ...
Leht laadib ...
Leht laadib ...
Leht laadib ...
Leht laadib ...
Leht laadib ...
Leht laadib ...
Leht laadib ...
Leht laadib ...
Leht laadib ...
Leht laadib ...
Leht laadib ...
Leht laadib ...
Leht laadib ...
Leht laadib ...
Leht laadib ...
Leht laadib ...
Leht laadib ...
Leht laadib ...
Leht laadib ...
Leht laadib ...
Leht laadib ...
Leht laadib ...
Leht laadib ...
Leht laadib ...
Leht laadib ...
Leht laadib ...
Leht laadib ...
Leht laadib ...
Leht laadib ...
Leht laadib ...
Leht laadib ...
Leht laadib ...
Leht laadib ...
Leht laadib ...
Leht laadib ...
Leht laadib ...
Leht laadib ...
Leht laadib ...
Leht laadib ...
Leht laadib ...
Leht laadib ...
Leht laadib ...
Leht laadib ...
Leht laadib ...
Leht laadib ...
Leht laadib ...
Leht laadib ...
Leht laadib ...
Leht laadib ...
Leht laadib ...
Leht laadib ...
Leht laadib ...
Leht laadib ...
Leht laadib ...
Leht laadib ...
Leht laadib ...
Leht laadib ...
Leht laadib ...
Leht laadib ...
Leht laadib ...
Leht laadib ...
Leht laadib ...
Leht laadib ...
Leht laadib ...
Leht laadib ...
Leht laadib ...
Leht laadib ...
Leht laadib ...
Leht laadib ...
Leht laadib ...
Leht laadib ...
Leht laadib ...
Leht laadib ...
Leht laadib ...
Leht laadib ...
Leht laadib ...
Leht laadib ...
Leht laadib ...
Leht laadib ...
Leht laadib ...
Leht laadib ...
Leht laadib ...
Leht laadib ...
Leht laadib ...
Leht laadib ...
Leht laadib ...
Leht laadib ...
Leht laadib ...
Leht laadib ...
Leht laadib ...
Leht laadib ...
Leht laadib ...
Leht laadib ...
Leht laadib ...
Leht laadib ...
Leht laadib ...
Leht laadib ...
Leht laadib ...
Leht laadib ...
Leht laadib ...
Leht laadib ...
Leht laadib ...
Leht laadib ...
Leht laadib ...
Leht laadib ...
Leht laadib ...
Leht laadib ...
Leht laadib ...
Leht laadib ...
Leht laadib ...
Leht laadib ...
Leht laadib ...
Leht laadib ...
Leht laadib ...
Leht laadib ...
Leht laadib ...
Leht laadib ...
Leht laadib ...
Leht laadib ...
Leht laadib ...
Leht laadib ...
Leht laadib ...
Leht laadib ...
Leht laadib ...
Leht laadib ...
Leht laadib ...
Leht laadib ...
Leht laadib ...
Leht laadib ...
Leht laadib ...
Leht laadib ...
Leht laadib ...
Leht laadib ...
Leht laadib ...
Leht laadib ...
Leht laadib ...
Leht laadib ...
Leht laadib ...
Leht laadib ...
Leht laadib ...
Leht laadib ...
Leht laadib ...
Leht laadib ...
Leht laadib ...
Leht laadib ...
Leht laadib ...
Leht laadib ...
Leht laadib ...
Leht laadib ...
Leht laadib ...
Leht laadib ...
Leht laadib ...
Leht laadib ...
Leht laadib ...
Leht laadib ...
Leht laadib ...
Leht laadib ...
Leht laadib ...
Leht laadib ...
Leht laadib ...
Leht laadib ...
Leht laadib ...
Leht laadib ...
Leht laadib ...
Leht laadib ...
Leht laadib ...
Leht laadib ...
Leht laadib ...
Leht laadib ...
Leht laadib ...
Leht laadib ...
Leht laadib ...
Leht laadib ...
Leht laadib ...
Leht laadib ...
Leht laadib ...
Leht laadib ...
Leht laadib ...
Leht laadib ...
Leht laadib ...
Leht laadib ...
Leht laadib ...
Leht laadib ...
Leht laadib ...
Leht laadib ...
Leht laadib ...
Leht laadib ...
Leht laadib ...
Leht laadib ...
Leht laadib ...
Leht laadib ...
Leht laadib ...
Leht laadib ...
Leht laadib ...
Leht laadib ...
Leht laadib ...
Leht laadib ...
Leht laadib ...
Leht laadib ...
Leht laadib ...
Leht laadib ...
Leht laadib ...
Leht laadib ...
Leht laadib ...
Leht laadib ...
Leht laadib ...
Leht laadib ...
Leht laadib ...
Leht laadib ...
Leht laadib ...
Leht laadib ...
Leht laadib ...
Leht laadib ...
Leht laadib ...
Leht laadib ...
Leht laadib ...
Leht laadib ...
Leht laadib ...
Leht laadib ...
Leht laadib ...
Leht laadib ...
Leht laadib ...
Leht laadib ...
Leht laadib ...
Leht laadib ...
Leht laadib ...
Leht laadib ...
Leht laadib ...
Leht laadib ...
Leht laadib ...
Leht laadib ...
Leht laadib ...
Leht laadib ...
Leht laadib ...
Leht laadib ...
Leht laadib ...
Leht laadib ...
Leht laadib ...
Leht laadib ...
Leht laadib ...
Leht laadib ...
Leht laadib ...
Leht laadib ...
Leht laadib ...
Leht laadib ...
Leht laadib ...
Leht laadib ...
Leht laadib ...
Leht laadib ...
Leht laadib ...
Leht laadib ...
Leht laadib ...
Leht laadib ...
Leht laadib ...
Leht laadib ...
Leht laadib ...
Leht laadib ...
Leht laadib ...
Leht laadib ...
Leht laadib ...
Leht laadib ...
Leht laadib ...
Leht laadib ...
Leht laadib ...
Leht laadib ...
Leht laadib ...
Leht laadib ...
Leht laadib ...
Leht laadib ...
Leht laadib ...
Leht laadib ...
Leht laadib ...
Leht laadib ...
Leht laadib ...
Leht laadib ...
Leht laadib ...
Leht laadib ...
Leht laadib ...
Leht laadib ...
Leht laadib ...
Leht laadib ...
Leht laadib ...
Leht laadib ...
Leht laadib ...
Leht laadib ...
Leht laadib ...
Leht laadib ...
Leht laadib ...
Leht laadib ...
Leht laadib ...
Leht laadib ...
Leht laadib ...
Leht laadib ...
Leht laadib ...
Leht laadib ...
-
 1
1
-
 2
2
-
 3
3
-
 4
4
-
 5
5
-
 6
6
-
 7
7
-
 8
8
-
 9
9
-
 10
10
-
 11
11
-
 12
12
-
 13
13
-
 14
14
-
 15
15
-
 16
16
-
 17
17
-
 18
18
-
 19
19
-
 20
20
-
 21
21
-
 22
22
-
 23
23
-
 24
24
-
 25
25
-
 26
26
-
 27
27
-
 28
28
-
 29
29
-
 30
30
-
 31
31
-
 32
32
-
 33
33
-
 34
34
-
 35
35
-
 36
36
-
 37
37
-
 38
38
-
 39
39
-
 40
40
-
 41
41
-
 42
42
-
 43
43
-
 44
44
-
 45
45
-
 46
46
-
 47
47
-
 48
48
-
 49
49
-
 50
50
-
 51
51
-
 52
52
-
 53
53
-
 54
54
-
 55
55
-
 56
56
-
 57
57
-
 58
58
-
 59
59
-
 60
60
-
 61
61
-
 62
62
-
 63
63
-
 64
64
-
 65
65
-
 66
66
-
 67
67
-
 68
68
-
 69
69
-
 70
70
-
 71
71
-
 72
72
-
 73
73
-
 74
74
-
 75
75
-
 76
76
-
 77
77
-
 78
78
-
 79
79
-
 80
80
-
 81
81
-
 82
82
-
 83
83
-
 84
84
-
 85
85
-
 86
86
-
 87
87
-
 88
88
-
 89
89
-
 90
90
-
 91
91
-
 92
92
-
 93
93
-
 94
94
-
 95
95
-
 96
96
-
 97
97
-
 98
98
-
 99
99
-
 100
100
-
 101
101
-
 102
102
-
 103
103
-
 104
104
-
 105
105
-
 106
106
-
 107
107
-
 108
108
-
 109
109
-
 110
110
-
 111
111
-
 112
112
-
 113
113
-
 114
114
-
 115
115
-
 116
116
-
 117
117
-
 118
118
-
 119
119
-
 120
120
-
 121
121
-
 122
122
-
 123
123
-
 124
124
-
 125
125
-
 126
126
-
 127
127
-
 128
128
-
 129
129
-
 130
130
-
 131
131
-
 132
132
-
 133
133
-
 134
134
-
 135
135
-
 136
136
-
 137
137
-
 138
138
-
 139
139
-
 140
140
-
 141
141
-
 142
142
-
 143
143
-
 144
144
-
 145
145
-
 146
146
-
 147
147
-
 148
148
-
 149
149
-
 150
150
-
 151
151
-
 152
152
-
 153
153
-
 154
154
-
 155
155
-
 156
156
-
 157
157
-
 158
158
-
 159
159
-
 160
160
-
 161
161
-
 162
162
-
 163
163
-
 164
164
-
 165
165
-
 166
166
-
 167
167
-
 168
168
-
 169
169
-
 170
170
-
 171
171
-
 172
172
-
 173
173
-
 174
174
-
 175
175
-
 176
176
-
 177
177
-
 178
178
-
 179
179
-
 180
180
-
 181
181
-
 182
182
-
 183
183
-
 184
184
-
 185
185
-
 186
186
-
 187
187
-
 188
188
-
 189
189
-
 190
190
-
 191
191
-
 192
192
-
 193
193
-
 194
194
-
 195
195
-
 196
196
-
 197
197
-
 198
198
-
 199
199
-
 200
200
-
 201
201
-
 202
202
-
 203
203
-
 204
204
-
 205
205
-
 206
206
-
 207
207
-
 208
208
-
 209
209
-
 210
210
-
 211
211
-
 212
212
-
 213
213
-
 214
214
-
 215
215
-
 216
216
-
 217
217
-
 218
218
-
 219
219
-
 220
220
-
 221
221
-
 222
222
-
 223
223
-
 224
224
-
 225
225
-
 226
226
-
 227
227
-
 228
228
-
 229
229
-
 230
230
-
 231
231
-
 232
232
-
 233
233
-
 234
234
-
 235
235
-
 236
236
-
 237
237
-
 238
238
-
 239
239
-
 240
240
-
 241
241
-
 242
242
-
 243
243
-
 244
244
-
 245
245
-
 246
246
-
 247
247
-
 248
248
-
 249
249
-
 250
250
-
 251
251
-
 252
252
-
 253
253
-
 254
254
-
 255
255
-
 256
256
-
 257
257
-
 258
258
-
 259
259
-
 260
260
-
 261
261
-
 262
262
-
 263
263
-
 264
264
-
 265
265
-
 266
266
-
 267
267
-
 268
268
-
 269
269
-
 270
270
-
 271
271
-
 272
272
-
 273
273
-
 274
274
-
 275
275
-
 276
276
-
 277
277
-
 278
278
-
 279
279
-
 280
280
-
 281
281
-
 282
282
-
 283
283
-
 284
284
-
 285
285
-
 286
286
-
 287
287
-
 288
288
-
 289
289
-
 290
290
-
 291
291
-
 292
292
-
 293
293
-
 294
294
-
 295
295
-
 296
296
-
 297
297
-
 298
298
-
 299
299
-
 300
300
-
 301
301
-
 302
302
-
 303
303
-
 304
304
-
 305
305
-
 306
306
-
 307
307
-
 308
308
-
 309
309
-
 310
310
-
 311
311
-
 312
312
-
 313
313
-
 314
314
-
 315
315
-
 316
316
-
 317
317
-
 318
318
-
 319
319
-
 320
320
-
 321
321
-
 322
322
-
 323
323
-
 324
324
-
 325
325
-
 326
326
-
 327
327
-
 328
328
-
 329
329
-
 330
330
-
 331
331
-
 332
332
-
 333
333
-
 334
334
-
 335
335
-
 336
336
-
 337
337
-
 338
338
-
 339
339
-
 340
340
-
 341
341
-
 342
342
-
 343
343
-
 344
344
-
 345
345
-
 346
346
-
 347
347
-
 348
348
-
 349
349
-
 350
350
-
 351
351
-
 352
352
-
 353
353
-
 354
354
-
 355
355
-
 356
356
-
 357
357
-
 358
358
-
 359
359
-
 360
360
-
 361
361
-
 362
362
-
 363
363
-
 364
364
-
 365
365
-
 366
366
-
 367
367
-
 368
368
-
 369
369
-
 370
370
-
 371
371
-
 372
372
-
 373
373
-
 374
374
-
 375
375
-
 376
376
-
 377
377
-
 378
378
-
 379
379
-
 380
380
-
 381
381
-
 382
382
-
 383
383
-
 384
384
-
 385
385
-
 386
386
-
 387
387
-
 388
388
-
 389
389
-
 390
390
-
 391
391
-
 392
392
-
 393
393
-
 394
394
-
 395
395
-
 396
396
-
 397
397
-
 398
398
-
 399
399
-
 400
400
-
 401
401
-
 402
402
-
 403
403
-
 404
404
-
 405
405
-
 406
406
-
 407
407
-
 408
408
-
 409
409
-
 410
410
-
 411
411
-
 412
412
-
 413
413
-
 414
414
-
 415
415
-
 416
416
-
 417
417
-
 418
418
-
 419
419
-
 420
420
-
 421
421
-
 422
422
-
 423
423
-
 424
424
-
 425
425
-
 426
426
-
 427
427
-
 428
428
-
 429
429
-
 430
430
-
 431
431
-
 432
432
-
 433
433
-
 434
434
-
 435
435
-
 436
436
-
 437
437
-
 438
438
-
 439
439
-
 440
440
-
 441
441
-
 442
442
-
 443
443
-
 444
444
-
 445
445
-
 446
446
-
 447
447
-
 448
448
-
 449
449
-
 450
450
-
 451
451
-
 452
452
-
 453
453
-
 454
454
-
 455
455
-
 456
456
-
 457
457
-
 458
458
-
 459
459
-
 460
460
-
 461
461
-
 462
462
-
 463
463
-
 464
464
-
 465
465
-
 466
466
-
 467
467
-
 468
468
-
 469
469
-
 470
470
-
 471
471
-
 472
472
-
 473
473
-
 474
474
-
 475
475
-
 476
476
-
 477
477
-
 478
478
-
 479
479
-
 480
480
-
 481
481
-
 482
482
-
 483
483
-
 484
484
-
 485
485
-
 486
486
-
 487
487
-
 488
488
-
 489
489
-
 490
490
-
 491
491
-
 492
492
-
 493
493
-
 494
494
-
 495
495
-
 496
496
-
 497
497
-
 498
498
-
 499
499
-
 500
500
-
 501
501
-
 502
502
-
 503
503
-
 504
504
-
 505
505
-
 506
506
-
 507
507
-
 508
508
-
 509
509
-
 510
510
-
 511
511
-
 512
512
-
 513
513
-
 514
514
-
 515
515
-
 516
516
-
 517
517
-
 518
518
-
 519
519
-
 520
520
-
 521
521
-
 522
522
-
 523
523
-
 524
524
-
 525
525
-
 526
526
-
 527
527
-
 528
528
-
 529
529
-
 530
530
-
 531
531
-
 532
532
-
 533
533
-
 534
534
-
 535
535
-
 536
536
-
 537
537
-
 538
538
-
 539
539
-
 540
540
-
 541
541
-
 542
542
-
 543
543
-
 544
544
-
 545
545
-
 546
546
-
 547
547
-
 548
548
-
 549
549
-
 550
550
-
 551
551
-
 552
552
-
 553
553
-
 554
554
-
 555
555
-
 556
556
-
 557
557
-
 558
558
-
 559
559
-
 560
560
-
 561
561
-
 562
562
-
 563
563
-
 564
564
-
 565
565
-
 566
566
-
 567
567
-
 568
568
-
 569
569
-
 570
570
-
 571
571
-
 572
572
-
 573
573
-
 574
574
-
 575
575
-
 576
576
-
 577
577
-
 578
578
-
 579
579
-
 580
580
-
 581
581
-
 582
582
-
 583
583
-
 584
584
-
 585
585
-
 586
586
-
 587
587
-
 588
588
-
 589
589
-
 590
590
-
 591
591
-
 592
592
-
 593
593
-
 594
594
-
 595
595
-
 596
596
-
 597
597
-
 598
598
-
 599
599
-
 600
600
-
 601
601
-
 602
602
-
 603
603
-
 604
604
-
 605
605
-
 606
606
-
 607
607
-
 608
608
-
 609
609
-
 610
610
-
 611
611
-
 612
612
-
 613
613
-
 614
614
-
 615
615
-
 616
616
-
 617
617
-
 618
618
-
 619
619
-
 620
620
-
 621
621
-
 622
622
-
 623
623
-
 624
624
-
 625
625
-
 626
626
-
 627
627
-
 628
628
-
 629
629
-
 630
630
-
 631
631
-
 632
632
-
 633
633
-
 634
634
-
 635
635
-
 636
636
-
 637
637
-
 638
638
-
 639
639
-
 640
640
-
 641
641
-
 642
642
-
 643
643
-
 644
644
-
 645
645
-
 646
646
-
 647
647
-
 648
648
-
 649
649
-
 650
650
-
 651
651
-
 652
652
-
 653
653
-
 654
654
-
 655
655
-
 656
656
-
 657
657
-
 658
658
-
 659
659
-
 660
660
-
 661
661
-
 662
662
-
 663
663
-
 664
664
-
 665
665
-
 666
666
-
 667
667
-
 668
668
-
 669
669
-
 670
670
-
 671
671
-
 672
672
-
 673
673
-
 674
674
-
 675
675
-
 676
676
-
 677
677
-
 678
678
-
 679
679
-
 680
680
-
 681
681
-
 682
682
-
 683
683
-
 684
684
-
 685
685
-
 686
686
-
 687
687
-
 688
688
-
 689
689
-
 690
690
-
 691
691
-
 692
692
-
 693
693
-
 694
694
-
 695
695
-
 696
696
-
 697
697
-
 698
698
-
 699
699
-
 700
700
-
 701
701
-
 702
702
-
 703
703
-
 704
704
-
 705
705
-
 706
706
-
 707
707
-
 708
708
-
 709
709
-
 710
710
-
 711
711
-
 712
712


Samsung WF1124XAC Kasutusjuhend
- Kategooria
- Pesumasinad
- Tüüp
- Kasutusjuhend
teistes keeltes
- čeština: Samsung WF1124XAC Uživatelský manuál
- slovenčina: Samsung WF1124XAC Používateľská príručka
- English: Samsung WF1124XAC User manual
- русский: Samsung WF1124XAC Руководство пользователя
- română: Samsung WF1124XAC Manual de utilizare