Deutsch
Deutsch
12
7. Die Anzeige leuchtet wieder auf. Backen Sie etwa 3–8 Minuten bis zur Goldfärbung oder nachdem die
Anzeige wieder erlischt. Die Backzeit hängt von den verwendeten Zutaten und Ihrem persönlichen
Geschmack ab.
8. Sobald die Speise fertig ist, heben Sie den Deckel des Paninimakers mit Hilfe des Gries hoch. Benutzen
Sie zum Herausnehmen eine Holzspatel.
Hinweis: Benutze Sie keine Utensilien aus Metall oder scharfe Küchengegenstände. Sie könnten die
antihaftbeschichtete Oberäche der Backächen beschädigen.
9. Paninimaker nach dem Gebrauch vom Stromnetz trennen.
Bemerkung: Beim Braten leuchtet und erlischt abwechselnd die grüne Betriebsbereitschaftsanzeige, und
zwar in Abhängigkeit von der Temperatur der Backächen. Die richtige Temperatur wird durch
das Löschen des Anzeigelichtes indiziert.
GRILLEN
Verwendung als Kontaktgrill
1. Bereiten Sie Hamburger, knochenlose oder dünne Fleischstücke oder andere Lebensmittel nach Rezept zu
und legen Sie sie auf die untere Grillplatte.
2. Schließen Sie die obere Backäche. Die Platte hat ein schwimmendes Scharnier, damit die Platte das
zubereitete Gericht gleichmäßig zudeckt. Die obere Platte muss locker anliegen, damit das zubereitete
Gericht richtig gegrillt wird.
3. Sobald die Speise fertig ist, heben Sie den Deckel des Paninimakers mit Hilfe des Gries hoch. Benutzen
Sie zum Herausnehmen eine Holzspatel. Benutzen Sie niemals matallische Zangen oder Messser, da diese
die Antihaft-Oberäche der Kochplatten beschädigen könnten.
4. Verwenden Sie den Panini-Maker als Kontaktgrill für die Zubereitung von Burgern, knochenlosen oder
dünnen Fleischstücken und Gemüse.
5. Verwenden Sie den Panini-Maker als Kontaktgrill für die schnelle Zubereitung von Speisen oder wenn
Sie eine gesunde Art zu grillen suchen. Beim Garen auf einem Kontaktgrill ist das Grillgut schnell fertig,
da Sie beide Seiten des Grillguts gleichzeitig grillen. Die Rielung der Grillplatten lässt das Fett und den
Bratensaft auf natürliche Weise durch die Rille in die Tropfschale ablaufen.
Offener Grill
1. Der Panini Maker kann auch als oener Grill verwendet werden.
Legen Sie diesen auf eine saubere und gerade Oberäche.
2. Die obere Kochplatte ist in der geöneten Position bündig mit
der unteren Kochplatte. Die obere und untere Platte sind so
angeordnet, dass sie zwei Grillächen bilden. Der Panini-Maker
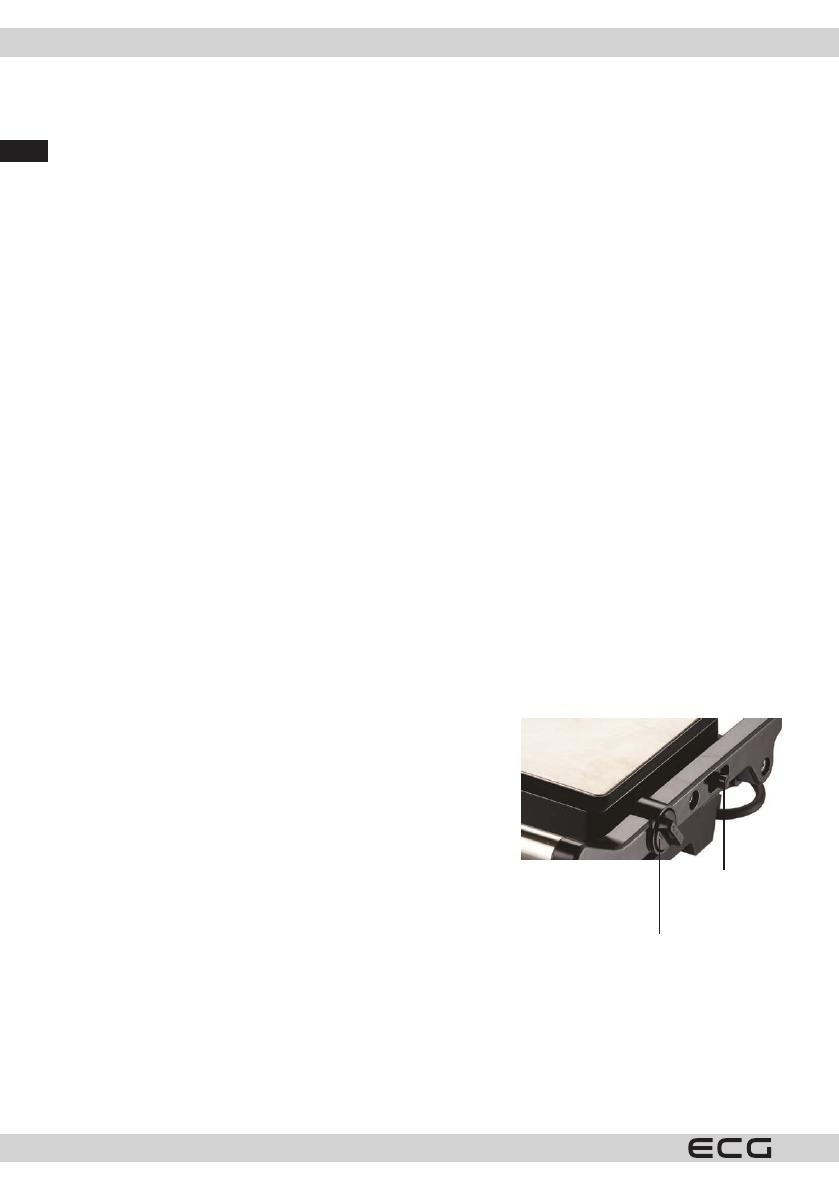
kann in diese Position geönet werden, indem der Deckel
durch Schieben des Schiebers (5) auf der rechten Seite des Grills
entriegelt wird.
3. Schieben Sie den Schieber mit der rechten Hand zu sich hin und
halten Sie ihn fest; fassen Sie mit der linken Hand den Gri der
Geräteoberseite und schieben Sie den Gri von sich weg, bis die
Oberseite auf dem Tisch liegt. Jetzt können Sie wie auf einem
oenen Grill grillen. Sobald Sie den Deckel wieder schließen,
sichert der Verschluss den Deckel und Sie können den Panini-
Maker wieder als Kontaktgrill verwenden.
Bemerkung: Seien Sie vorsichtig, wenn Sie mit dem Grill manipulieren (Önen / Schließen / Einstellen
der Position); die Backächen könnten heiß sein.
4. Verwenden Sie den Panini-Maker als oenen Grill für die Zubereitung von Burgern, Steaks, Geügel ohne
Knochen (wir empfehlen nicht, Hähnchen mit Knochen zuzubereiten, da es nicht gleichmäßig gart), Fisch
und Gemüse.
Schieberegler
Grillschloss


