Samsung LE22B350F2W Kasutusjuhend

Kategooria
LCD-telerid
Tüüp
Kasutusjuhend
BN68-02163N-00
Contact SAMSUNG WORLDWIDE
If you have any questions or comments relating to Samsung products, please contact the SAMSUNG customer care centre.
Country Customer Care Centre Web Site
AUSTRIA 0810 - SAMSUNG (7267864, € 0.07/min) www.samsung.com/at
BELGIUM
02 201 2418 www.samsung.com/be
www.samsung.com/be_fr
CZECH REPUBLIC
800 - SAMSUNG (800-726786) www.samsung.com/cz
Distributor pro Českou republiku:
Samsung Zrt., česká organizační složka, Oasis Florenc, Sokolovská394/17, 180 00, Praha 8
DENMARK 8 - SAMSUNG (7267864) www.samsung.com/dk
EIRE 0818 717 100 www.samsung.com/ie
FINLAND 30 - 6227 515 www.samsung.com/
FRANCE 01 4863 0000 www.samsung.com/fr
GERMANY 01805 - SAMSUNG (7267864, € 0.14/Min) www.samsung.de
HUNGARY 06 - 80 - SAMSUNG (7267864) www.samsung.com/hu
ITALIA 800 - SAMSUNG (7267864) www.samsung.com/it
LUXEMBURG 02 261 03 710 www.samsung.com/lu
NETHERLANDS 0900-SAMSUNG (0900-7267864) (€ 0,10/Min) www.samsung.com/nl
NORWAY 3 - SAMSUNG (7267864) www.samsung.com/no
POLAND
0 801 1SAMSUNG(172678)
022 - 607 - 93 - 33
www.samsung.com/pl
PORTUGAL 808 20 - SAMSUNG (7267864) www.samsung.com/pt
SLOVAKIA 0800 - SAMSUNG (7267864) www.samsung.com/sk
SPAIN 902 - 1 - SAMSUNG (902 172 678) www.samsung.com/es
SWEDEN 075 - SAMSUNG (726 78 64) www.samsung.com/se
SWITZERLAND 0848 - SAMSUNG (7267864, CHF 0.08/min) www.samsung.com/ch
U.K 0845 SAMSUNG (7267864) www.samsung.com/uk
TURKEY 444 77 11 www.samsung.com/tr
ESTONIA 800-7267 www.samsung.com/ee
LATVIA 8000-7267 www.samsung.com/lv
LITHUANIA 8-800-77777 www.samsung.com/lt
KAZAHSTAN 8-10-800-500-55-500 www.samsung.com/kz_ru
KYRGYZSTAN 00-800-500-55-500 -
RUSSIA 8-800-555-55-55 www.samsung.ru
TADJIKISTAN 8-10-800-500-55-500 -
UKRAINE 8-800-502-0000 www.samsung.ua
UZBEKISTAN 8-10-800-500-55-500 www.samsung.com/kz_ru
LCD TV
user manual
imagine the possibilities
Thank you for purchasing this Samsung product.
To receive more complete service, please register
your product at
www.samsung.com/register
Model Serial No.
BN68-02163N-Cover.indd 1 2009-04-13 �� 9:56:48
Digital TV Notice
1. Functionalities related to Digital TV(DVB) are only available in countries/areas where DVB-T (MPEG2 and MPEG4 AVC) digital
terrestrial signals are broadcasted or where you are able to access to a compatible DVB-C(MPEG2 and MPEG4 AAC) cable-
TV service. Please check with your local dealer the possibility to receive DVB-T or DVB-C signal.
2.
DVB-T is the DVB European consortium standard for the broadcast transmission of digital terrestrial television and DVBC
is that for the broadcast transmission of digital TV over cable. However, some differentiated features like EPG (Electric
Programme Guide), VOD (Video on Demand) and so on, are not included in this specication. So, they cannot be workable at
this moment.
3.
Although this TV set meets the latest DVB-T and DVB-C standards, as of [August, 2008], the compatibility with future DVB-T
digital terrestrial and DVB-C digital cable broadcasts cannot be guaranteed.
4.
Depending on the countries/areas where this TV set is used some cable-TV providers may charge an additional fee for such a
service and you may be required to agree to terms and conditions of their business.
5.
Some Digital TV functions might be unavailable in some countries or regions and DVB-C might not work correctly with some
cable service providers.
6.
For more information, please contact your local Samsung customer care centre.
Precautions When Displaying a Still Image
A still image may cause permanent damage to the TV screen
Do not display a still image and partially still on the LCD panel for more than 2 hours as it can cause screen image retention.
This image retention is also known as “screen burn”. To avoid such image retention, reduce the degree of brightness and
contrast of the screen when displaying a still image.
Watching the LCD TV in 4:3 format for a long period of time may leave traces of borders displayed on the
left, right and centre of the screen caused by the difference of light emission on the screen. Playing a DVD or
a game console may cause a similar effect to the screen. Damages caused by the above effect are not
covered by the Warranty.
Displaying still images from Video games and PC for longer than a certain period of time may produce partial after-images. To
prevent this effect, reduce the ‘brightness’ and ‘contrast’ when displaying still images.
© 2009 Samsung Electronics Co., Ltd. All rights reserved.
BN68-02163N-Eng.indd 1 2009-04-13 �� 9:54:11
English - 1
GENERAL INFORMATION
Viewing the Control Panel ................................................................. 2
Accessories ....................................................................................... 3
Viewing the Connection Panel ........................................................... 4
Remote Control ................................................................................. 6
Installing Batteries in the Remote Control ......................................... 6
OPERATION
Viewing the menus ............................................................................ 7
Placing Your Television in Standby Mode .......................................... 8
Plug & Play Feature ........................................................................... 8
CHANNEL CONTROL
Conguring the Channel Menu .......................................................... 9
Managing Channels .........................................................................11
PICTURE CONTROL
Conguring the Picture Menu .......................................................... 13
Using Your TV as a Computer (PC) Display .................................... 15
Setting up the TV with your PC........................................................ 16
SOUND CONTROL
Conguring the Sound Menu ........................................................... 17
Selecting the Sound Mode .............................................................. 18
SETUP
Conguring the Setup Menu ............................................................ 19
INPUT / SUPPORT
Conguring the Input Menu ............................................................. 21
Conguring the Support Menu ......................................................... 22
RECOMMENDATIONS FOR USE
Teletext Feature ............................................................................... 23
Installing the Stand .......................................................................... 24
Disconnecting the Stand .................................................................. 24
Using the Anti-Theft Kensington Lock ............................................. 25
Securing the Installation Space ....................................................... 25
Securing the TV to the Wall ............................................................. 26
Troubleshooting: Before Contacting Service Personnel .................. 27
Specications .................................................................................. 27
CONTENTS
License
TruSurround HD, SRS and symbol are trademarks of SRS Labs, Inc. TruSurround HD technology is
incorporated under license from SRS Labs, Inc.
Manufactured under license from Dolby Laboratories. Dolby and the double-D symbol are trademarks of
Dolby Laboratories.
Symbol
N O T
Note One-Touch Button TOOL Button
English
BN68-02163N-Eng.indd 1 2009-04-13 �� 9:54:11
English - 2
GENERAL INFORMATION
Figures and illustrations in this User Manual are provided for reference only and may differ from actual product appearance.
Product design and specications may be changed without notice in order to enhance product performance.
Viewing the Control Panel
The product colour and shape may vary depending on the model.
The front panel buttons can be activated by touching them with your nger.
1
REMOTE CONTROL SENSOR: Aim the remote control towards this spot on the TV.
2
SOURCE
E
: Toggles between all the available input sources. In the on-screen menu, use this button as you would use the
ENTER
E
button on the remote control.
3
Y
: Press to increase or decrease the volume.
In the on-screen menu, use the
Y
buttons as you would use the ◄ and ► buttons on the remote control.
4
P
(POWER): Press to turn the TV on and off.
5
POWER INDICATOR: Blinks and turns off when the power is on and lights up in stand-by mode.
6
z
: Press to change channels. In the on-screen menu, use the
z
buttons as you would use the ▼ and ▲
buttons on the remote control.
7
MENU: Press to see an on-screen menu of your TV’s features.
8
SPEAKERS
N
¦
N
N
21 73 645
8
8
BN68-02163N-Eng.indd 2 2009-04-13 �� 9:54:12
English - 3
Accessories
Remote Control & Batteries (AAA x 2) Power Cord
Cleaning Cloth
(M4 X L16)
Warranty Card / Safety Guide Stand Screw X 2 Owners Instructions
Please make sure the following items are included with your LCD TV. If any items are missing, contact your dealer.
Warranty card / Safety Guide (Not available in all locations)
The items colour and shape may vary depending on the model.
¦
N
N
N
BN68-02163N-Eng.indd 3 2009-04-13 �� 9:54:12
English - 4
Viewing the Connection Panel
The product colour and shape may vary depending on the model.
Whenever you connect an external device to your TV, make sure that power on the unit is turned off.
When connecting an external device, match the colour of the connection terminal to the cable.
1
HDMI/PC IN [HDMI(DVI)]
Connects to the HDMI jack of a device with an HDMI output.
No additional Audio connection is needed for an HDMI to HDMI connection.
What is HDMI?
‘High Denition Multimedia interface’ allows the transmission of high denition digital video data and multiple channels of
digital audio.
The difference between HDMI and DVI is that the HDMI device is smaller in size and has the HDCP (High Bandwidth
Digital Copy Protection) coding feature installed.
Use the HDMI/PC IN [HDMI(DVI)] jack for DVI connection to an external device. Use a DVI to HDMI cable or DVI-HDMI
adapter (DVI to HDMI) for video connection and the HDMI/PC IN [AUDIO] jacks for audio. When using an HDMI / DVI
cable connection, you must use the HDMI/PC IN [HDMI(DVI)] jack.
HDMI/PC IN [AUDIO]
Connect to the audio output jack on your PC.
DVI audio outputs for external devices.
HDMI/PC IN [PC]
Connect to the video output jack on your PC.
If your PC supports an HDMI connection, you can connect this to the HDMI/PC IN [HDMI(DVI)] terminal.
If your PC supports a DVI connection, you can connect this to the HDMI/PC IN [HDMI(DVI)] / [AUDIO] terminal.
2
DIGITAL AUDIO OUT (OPTICAL)
Connects to a Digital Audio component such as a Home theatre receiver.
When the HDMI IN jacks are connected, the DIGITAL AUDIO OUT (OPTICAL) jack on the TV outputs 2 channel audio
only. If you want to hear 5.1 channel audio, connect the Optical jack on the DVD / Blu-ray player or Cable / Satellite Box
directly to an Amplier or Home Theatre, not the TV.
¦
N
N
N
N
N
N
N
N
N
1 2 3
7 68
4
5
[TV Rear Panel]
Power Input
BN68-02163N-Eng.indd 4 2009-04-13 �� 9:54:13
English - 5
3
ANT IN
Connects to an antenna or cable TV system.
4
COMMON INTERFACE Slot
When not inserting ‘CI CARD’ in some channels, ‘Scrambled Signal’ is displayed on the screen.
The pairing information containing a telephone number, CI CARD ID, Host ID and other information will be displayed in
about 2~3 minutes. If an error message is displayed, please contact your service provider.
When the channel information conguration has nished, the message ‘Updating Completed’ is displayed, indicating that
the channel list is now updated.
You must obtain a CI CARD from a local cable service provider. Remove the CI CARD by carefully pulling it out with your
hands since dropping the CI CARD may cause damage to it.
Insert the CI-Card in the direction marked on it.
The place of the COMMON INTERFACE Slot may be different depending on its model.
CAM is not supported in some countries and regions, check with your authorized dealer.
5
KENSINGTON LOCK (depending on the model)
The Kensington Lock (optional) is a device used to physically x the system when used in a public place. If you want to
use a locking device, contact the dealer where you purchased the TV.
The location of the Kensington Lock may be different depending on its model.
6
Headphones jack
Headphone may be connected to the headphone output on your set. While the head phone is connected, the sound from
the built-in speakers will be disabled.
Using the sound function is restricted when connecting headphones to the TV.
Prolonged use of headphones at a high volume may damage your hearing.
You will not hear sound from the speakers when you connect headphones to the TV.
The headphone volume and TV volume are adjusted separately.
7
COMPONENT IN / AV IN
Connect component video cables (optional) to component connector (PR, PB, Y) on the rear of your set and the other ends
to corresponding component video out connectors on the DTV or DVD.
If you wish to connect both the Set-Top Box and DTV (or DVD), you should connect the Set-Top Box to the DTV (or DVD)
and connect the DTV (or DVD) to component connector (PR, PB, Y) on your set.
The PR, PB and Y connectors on your component devices (DTV or DVD) are sometimes labeled Y, B-Y and R-Y or Y, Cb
and Cr.
Connect RCA audio cables (optional) to [R-AUDIO-L] on the rear of your set and the other ends to corresponding audio
out connectors on the DTV or DVD.
The COMPONENT IN jack is also used as the AV IN jack.
Connect the video cable to the COMPONENT IN [Y/VIDEO] jack and the audio cable to the COMPONENT IN [R-AUDIO-
L] jacks.
8
EXT
Connector
Input Output
Video Audio (L / R) RGB Video + Audio (L / R)
EXT O O O Only TV or DTV output is available.
Inputs or outputs for external devices, such as VCR, DVD, video game device or video disc players.
N
N
N
N
N
N
N
N
N
N
BN68-02163N-Eng.indd 5 2009-04-13 �� 9:54:13
English - 6
Remote Control
You can use the remote control up to a distance of about 23 feet from the TV.
The performance of the remote control may be affected by bright light.
The product colour and shape may vary depending on the model.
1
POWER : Television Standby
button.
2
NUMERIC BUTTONS : Press to
change the channel.
3
E
: Performs the same function
as the ENTER
E
key of the
directional keys. When switching
channels with the numeric
buttons, and you press the
channel number and then the
ENTER
E
key, the channel is
immediately switched.
4
Y
: Press to increase or
decrease the volume.
5
SOURCE: Press to display
and select the available video
sources.
6
CH LIST: Displays the Channel
List on screen
7
TOOLS: Use to quickly select
frequently used functions.
8
INFO: Press to display
information on the TV screen.
9
COLOURS BUTTONS: Use
these buttons in the Channel list
menus etc.
!
TV: Selects the TV mode directly.
@
PRE-CH: Enables you to return
to the previous channel you were
watching.
#
MUTE
M
: Press to temporarily
cut off the sound.
$
P
<
/P
>
: Press to change
channels.
%
MENU: Displays the main on-
screen menu
^
FAV.CH: Used to display
Favourites channel Lists on the
screen.
&
RETURN: Returns to the
previous menu
*
UP▲/DOWN▼/LEFT◄/
RIGHT►/ENTER
E
: Use to
select on-screen menu items and
change menu values.
(
EXIT: Press to exit the menu.
)
SUBT.: Digital subtitle display
a
GUIDE: Electronic Programme
Guide (EPG) display
Teletext Functions
5
0
: Teletext mode selection
(LIST / FLOF)
6
8
: Teletext store
7
4
: Teletext size selection
8
5
: Teletext reveal
9
Fastext topic selection
0
/
: Alternately select
Teletext, Double, or Mix.
!
:
: Exit from the teletext display
@
1
: Teletext sub page
$
2
: Teletext next page
3
: Teletext previous page
%
6
: Teletext index
&
9
: Teletext hold
(
7
: Teletext cancel
Installing Batteries in the Remote Control
1. Lift the cover at the back of the remote control upward as shown in the gure.
2.
Install two AAA size batteries.
Make sure to match the ‘+’ and ‘–’ ends of the batteries with the diagram inside the
compartment.
3.
Replace the cover.
Remove the batteries and store them in a cool, dry place if you won’t be using the
remote control for a long time.
If the remote control doesn’t work, check the following:
Is the TV power on?
Are the plus and minus ends of the batteries reversed?
Are the batteries drained?
Is there a power outage or is the power cord unplugged?
Is there a special uorescent light or neon sign nearby?
¦
N
N
N
¦
N
N
N
1
2
3
4
5
6
7
8
9
0
!
@
#
$
&
*
(
)
a
%
^
BN68-02163N-Eng.indd 6 2009-04-13 �� 9:54:13
English - 7
OPERATION
Viewing the menus
Before using the TV, follow the steps below to learn how to navigate the menu in order to select
and adjust different functions.
1.
Press the MENU button.
The main menu is displayed on the screen. Its left side has icons: Picture, Sound,
Channel , Setup, Input, Support.
2.
Press the ▲ or ▼ button to select one of the icons.
Press the ◄ or ► button to access the icon’s sub-menu.
3.
Press the ▲ or ▼ button to move to items in the menu.
Press the ENTER
E
button to enter items in the menu.
4.
Press the ▲/▼/◄/► button to change the selected items.
Press the RETURN button to return to the previous menu.
5.
Press the EXIT button to exit from the menu.
Using the remote control buttons
Button Operations Button Operations
MENU
Display the main on-screen menu.
▲/▼/◄/►/
ENTER
E
Move the cursor and select an item.
Select the currently selected item.
Conrm the setting.
RETURN
R
Return to the previous menu.
EXIT
e
Exit the on-screen menu.
Example: Setting the TV’s Brightness in the Picture Menu
Adjusting the Brightness to 80
1.
Press the MENU button to display the menu.
2.
Press the ENTER
E
button to select Picture.
3.
Press the ▲ or ▼ button to select Brightness.
4.
Press the ENTER
E
button.
5.
Press the ◄ or ► button until the brightness becomes 80.
6.
Press the ENTER
E
button.
Press the EXIT button to exit from the menu.
¦
N
N
Mode :Standard
Backlight : 8
Contrast : 95
Brightness : 45
Sharpness : 50
Colour : 50
Tint (G / R) : G50 / R50
Picture
Mode :Standard
Backlight : 8
Contrast : 95
Brightness : 45
Sharpness : 50
Color : 50
Tint (G/R) : G50/R50
Picture
Backlight : 8
Contrast : 95
Brightness :45
Sharpness : 50
Color : 50
Tint (G/R) : G50/R50
Advanced Settings
Picture Options
Picture Reset
Picture
Mode : Standard
Backlight : 8
Contrast : 95
Brightness : 45
Sharpness : 50
Color : 50
Tint (G/R) : G50/R50
Picture
Brightness 45
U
Move
L
Adjust
E
Enter
R
Return
Brightness 80
U
Move
L
Adjust
E
Enter
R
Return
BN68-02163N-Eng.indd 7 2009-04-13 �� 9:54:14
English - 8
Placing Your Television in Standby Mode
Your set can be placed in standby mode in order to reduce the power consumption. The standby mode can be useful when you
wish to interrupt viewing temporarily (during a meal, for example).
1.
Press the POWER
P
button on the remote control.
The screen is turned off and a red standby indicator appears on your set.
2.
To switch your set back on, simply press the POWER
P
button again.
Do not leave your set in standby mode for long periods of time (when you are away on holiday, for example). It is best to
unplug the set from the mains and aerial.
Plug & Play Feature
When the TV is initially powered on, basic settings proceed automatically and subsequently.
1.
Press the POWER button on the remote control. The message You can set the menu
language. is displayed.
2.
Select the appropriate language by pressing the ▲ or ▼ button. Press the ENTER
E
button to conrm your choice.
3.
Press the ◄ or ► button to select Store Demo or Home Use, then the ENTER
E
button.
We recommend setting the TV to Home Use mode for the best picture in your home environment.
Store Demo mode is only intended for use in retail environments.
If the unit is accidentally set to Store Demo mode and you want to return to Home Use (Standard): Press the Volume
button on the TV. When the volume OSD is displayed, press and hold the MENU button on the TV for 5 seconds.
4.
Press the ENTER
E
button. Select the appropriate country by pressing the ▲ or ▼ button. Press the ENTER
E
button to
conrm your choice.
5.
Press the ▲ or ▼ button to select Air or Cable, then press the ENTER
E
button.
Air: Air antenna signal.
Cable: Cable antenna signal.
6.
Press the ▲ or ▼ button to select the channel source to memorize. Press the ENTER
E
button to select Start.
Digital & Analogue: Digital and Analogue channels.
Digital: Digital channels.
Analogue: Analogue channels.
When setting the antenna source to Cable, a step appears allowing you to set a value for the digital channel search. For
more information, refer to ChannelAuto Store.
The channel search will start and end automatically.
Press the ENTER
E
button at any time to interrupt the memorization process.
After all the available channels are stored, the message Set the Clock Mode. is displayed.
7.
Press the ENTER
E
button. Press the ▲ or ▼ button to select Auto, then Press the ENTER
E
button.
If you select Manual, Set current date and time is displayed.
If you have received a digital signal, the time will be set automatically. If not, select Manual to set the clock. (refer to page
19)
8.
The connection method to provide the best quality HD is offered. After conrming the method, press the ENTER
E
button.
9.
The message Enjoy your TV. is displayed. When you have nished, press the ENTER
E
button.
If you want to reset this feature...
1.
Press the MENU button to display the menu. Press the ▲ or ▼ button to select Setup, then press the ENTER
E
button.
2.
Press the ENTER
E
button again to select Plug & Play.
3.
Enter your 4 digit PIN number. The default PIN number of a new TV set is ‘0-0-0-0’. (refer to page 20)
If you want to change PIN number, use the Change PIN function.
The Plug & Play feature is only available in the TV mode.
¦
N
N
¦
N
N
N
N
N
N
N
N
N
N
N
N
N
Plug & Play
You can set the menu language.
Menu Language : English
E
Enter
BN68-02163N-Eng.indd 8 2009-04-13 �� 9:54:14
English - 9
CHANNEL CONTROL
ConguringtheChannelMenu
Country
The PIN number input screen appears. Enter your 4 digit PIN number.
Analogue Channel
You can change the country for analogue channels.
Digital Channel
You can change the country for digital channels.
Auto Store
You can scan for the frequency ranges available to you (and availability depends on your
country). Automatically allocated programme numbers may not correspond to actual or desired
programme numbers.
If a channel is locked using the Child Lock function, the PIN input window appears.
Air / Cable
Antenna source to memorize
Digital & Analogue: Digital and Analogue channels.
Digital: Digital channels.
Analogue: Analogue channels.
When selecting Cable→Digital&Analogue or Cable→Digital
Provide a value to scan for cable channels.
SearchMode→Full/Network/Quick
Quick
Network ID: Displays the network identication code.
Frequency: Displays the frequency for the channel. (Differs in each country)
Modulation: Displays available modulation values.
Symbol Rate: Displays available symbol rates.
Scans for all channels with active broadcast stations and stores them in the TV’s memory.
If you want to stop Auto Store, press the
ENTER
E
button. The Stop Auto Store? message will be displayed.
Select Yes by pressing the ◄ or ► button, then press the
ENTER
E
button.
Manual Store
Scans for a channel manually and stores it in the TV’s memory.
If a channel is locked using the Child Lock function, the PIN input window appears.
Digital Channel
Manual store for digital channels.
Digital Channel is only available in DTV mode.
Channel: Set the Channel number using the ▲, ▼ or number (0~9) buttons.
Frequency: Set the frequency using the number buttons.
Bandwidth: Set the bandwidth using the ▲, ▼ or number (0~9) buttons.
When it has nished, channels are updated in the channel list.
¦
N
N
N
N
N
N
N
N
N
Country 
Auto Store
Manual Store
Cable Search Option
Now & Next Guide
Full Guide
Default Guide : Full Guide
Channel
BN68-02163N-Eng.indd 9 2009-04-13 �� 9:54:14
English - 10
Analogue Channel
Manual store for analogue channel.
Programme (Programme number to be assigned to a channel): Sets the programme number using the ▲, ▼ or number (0~9)
buttons.
Colour SystemAuto / PAL / SECAM / NTSC4.43: Sets the colour system value using the ▲ or ▼ button.
Sound SystemBG / DK / I / L: Sets the sound system value using the ▲ or ▼ button.
Channel (When you know the number of the channel to be stored): Press the ▲ or ▼ button to select C (Air channel) or S
(Cable channel). Press the ► button, then press the ▲, ▼ or number (0~9) buttons to select the required number.
You can also select the channel number directly by pressing the number (0~9) buttons.
If there is abnormal sound or no sound, reselect the sound standard required.
Search (When you do not know the channel numbers): Press the ▲ or ▼ button to start the search. The tuner scans the
frequency range until the rst channel or the channel that you selected is received on the screen.
Store (When you store the channel and associated programme number): Set to OK by pressing the
ENTER
E
button.
Channel mode
P (Programme mode): When completing tuning, the broadcasting stations in your area have been assigned to position
numbers from P00 to P99. You can select a channel by entering the position number in this mode.
C (Air channel mode): You can select a channel by entering the assigned number to each air broadcasting station in this
mode.
S (Cable channel mode): You can select a channel by entering the assigned number for each cable channel in this mode.
Cable Search Option (depending on the country)
Sets additional search options such as the frequency and symbol rate for cable network searches.
Frequency (Start ~ Stop): Displays the frequency for the channel.
Modulation: Displays available modulation values.
Symbol Rate: Displays available symbol rates.
Now & Next Guide / Full Guide
The EPG (Electronic Programme Guide) information is provided by the broadcasters. Programme entries may appear blank or out
of date as a result of the information broadcast on a given channel. The display will dynamically update as soon as new information
becomes available.
For detailed procedures on using Now & Next Guide and Full Guide, refer to the descriptions on page 11.
You can also display the guide menu simply by pressing the GUIDE button. (To congure the Default Guide, refer to the
descriptions.)
Now & Next Guide
For the six channels indicated in the left-hand column, displays the Current programme and the Next programme information.
Full Guide
Displays the programme information as time ordered One hour segments. Two hours of programme information is displayed which
may be scrolled forwards or backwards in time.
DefaultGuide→Now&NextGuide/FullGuide
You can decide whether to display either the Now & Next Guide or the Full Guide when the GUIDE button on the remote control
is pressed.
Channel List
For detailed procedures on using the Channel List,refer to the ‘Managing Channels’ instructions.
You can select these options by simply pressing the CH LIST button on the remote control.
Channel Mode
When press the P
>
/
<
button, Channels will be switched within the selected channel list.
Added Ch.
Channels will be switched within the memorized channel list.
Favourite Ch.
Channels will be switched within the favourite channel list.
Fine Tune
If the reception is clear, you do not have to ne tune the channel, as this is done automatically during the search and store
operation. If the signal is weak or distorted, you may have to ne tune the channel manually.
Fine tuned channels that have been saved are marked with an asterisk “*” on the right-hand side of the channel number in the
channel banner.
To reset the ne-tuning, select Reset by pressing the ▲ or ▼ button and then press the ENTER
E
button.
Only Analogue TV channels can be ne tuned.
N
N
N
N
O
O
N
N
N
BN68-02163N-Eng.indd 10 2009-04-13 �� 9:54:14
English - 11
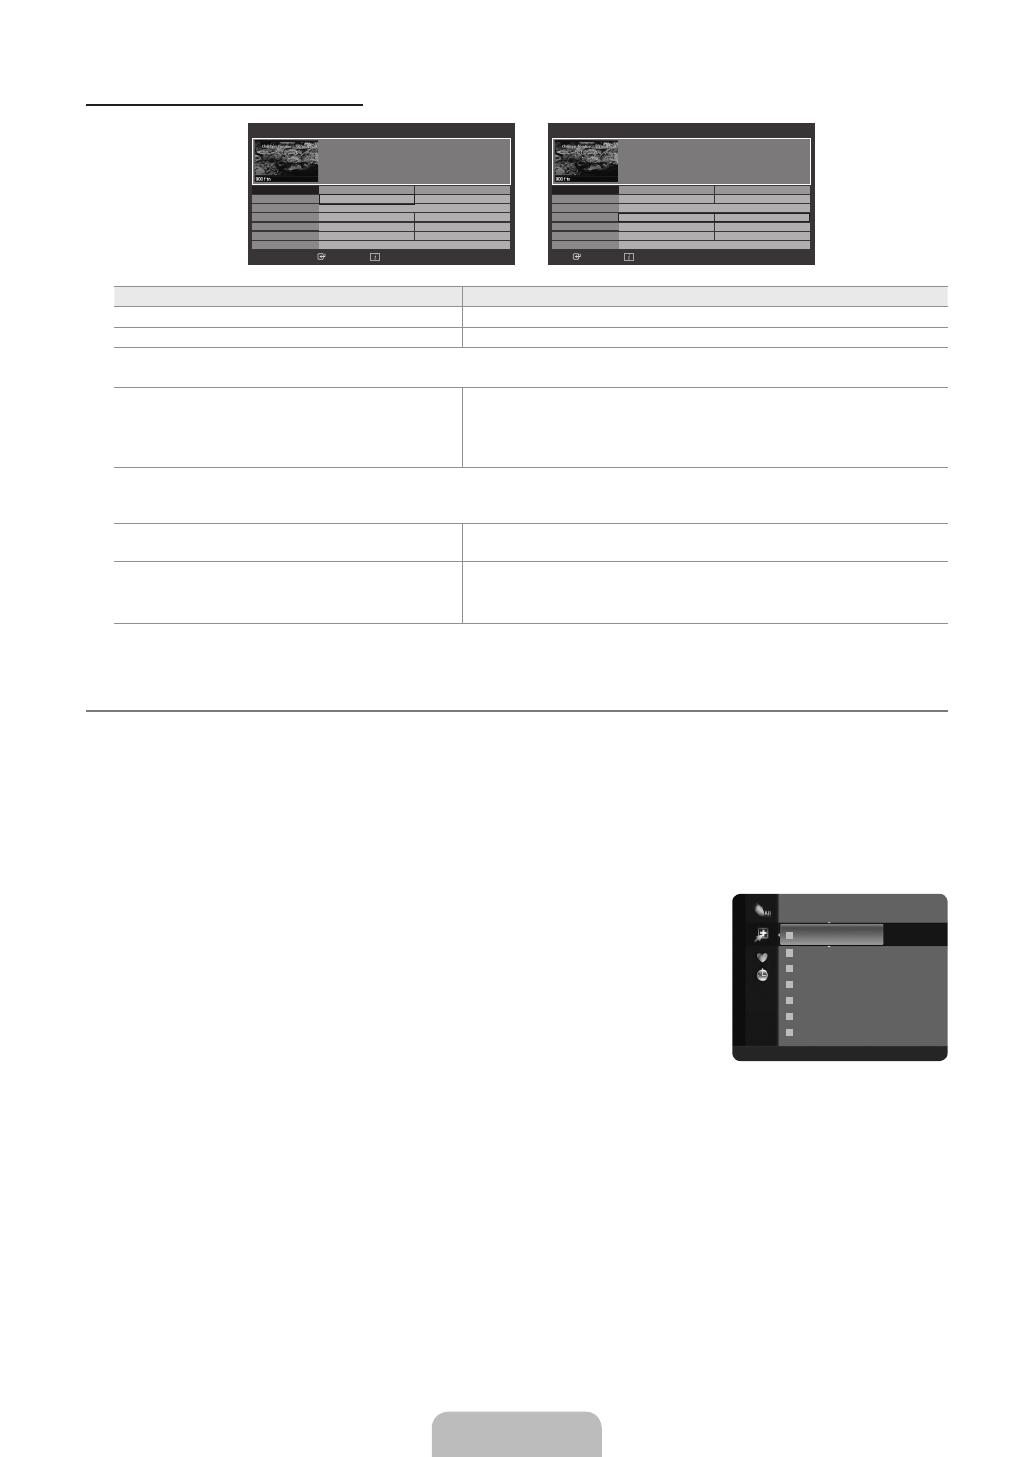
Using the Now & Next Guide / Full Guide
To... Then...
Watch a programme in the EPG list Select a programme by pressing the ▲, ▼, ◄, ► button.
Exit the guide Press the blue button
If the next programme is selected, it is scheduled with the clock icon displayed. If the ENTER
E
button is pressed again, press
the ◄, ► button to select Cancel Schedules, the scheduling is cancelled with the clock icon gone.
View programme information Select a programme of your choice by pressing the ▲, ▼, ◄, ► button.
Then press the INFO button when the programme of your choice is
highlighted.
The programme title is on the upper part of the screen centre.
Please click on INFO button for detailed information. Channel Number, Running Time, Status Bar, Parental Level, Video Quality
Information (HD / SD), Sound Modes, Subtitle or Teletext, languages of Subtitle or Teletext and brief summary of the highlighted
programme are included on the detailed information. “...” will be appeared if the summary is long.
Toggle between the Now & Next Guide and Full
Guide
Press the red button repeatedly.
In Full Guide
Scrolls backwards quickly (24 hours).
Scrolls forwards quickly (24 hours).
Press the green button repeatedly.
Press the yellow button repeatedly.
Managing Channels
Using this menu, you can Add / Delete or set Favourite channels and use the programme guide for digital broadcasts.
All Channels
Shows all currently available channels.
Added Channels
Shows all added channels.
Favourites
Shows all favourite channels.
To select the Favourites channels you have set up, press the FAV.CH button on the remote
control.
Programmed
Shows all current reserved programmes.
Select a channel in the All Channels, Added Channels or Favourites screen by pressing
the ▲ / ▼ buttons, and pressing the ENTER
E
button. Then you can watch the selected
channel.
Using the Colour buttons with the Channel List
Red (Channel Type): Toggle between your TV, Radio, Data / Other and All.
Green (Zoom): Enlarges or shrinks a channel number.
Yellow (Select): Selects multiple channel lists. You can perform the add / delete, add to Favourites / delete from
Favourites, or lock / unlock function for multiple channels at the same time. Select the required channels and press the
yellow button to set all the selected channels at the same time. The
c
mark appears to the left of the selected channels.
TOOLS (Tools): Displays the Delete (or Add), Add to Favourite (or Delete from Favourite), Lock (or Unlock), Timer
Viewing, Edit Channel Name, Sort, Edit Channel Number, Select All (or Deselect All), Auto Store menu. (The
Options menus may differ depending on the situation.)
¦
O
N
N
824 UKTV Gold
825 UKTV style
A
1 C --
A
2 C --
A
3 ♥ C --
A
4 C --
A
5 C --
A
6 C --
A
7 C --
Added Channels
All Channel Type Zoom Select T Tools
Now & Next Guide
DTV Cable 900 f tn 2:10 Tue 1 Jun
Freshmen On Campus
2:00 - 2:30
No Detailed Information
Now Next
Mint Extra
Loaded
Fresh 40 with Dynamite MC
The Distillery
Smash Hits! Sunday
1 f tn
2 ITV Play
3 Kerrang!
4 Kiss
5 oneword
6 Smash Hits!
Street Hypn..
Kisstory
No Information
No Information
No Information
Freshmen O..
Watch Information ■Full Guide■ Exit
Full Guide
DTV Cable 900 f tn 2:10 Tue 1 Jun
Freshmen On Campus
2:00 - 2:30
No Detailed Information
Today 16:00 - 17:00 17:00 - 18:00
Mint Extra
Loaded
Fresh 40 with Dynamite MC
The Distillery
Smash Hits! Sunday
1 f tn
2 ITV Play
3 Kerrang!
4 Kiss
5 oneword
6 Smash Hits!
Street Hypn..
Kisstory
No Information
No Information
No Information
Freshmen O..
Watch Information ■Now / Next■ +24 Hours■ Exit
BN68-02163N-Eng.indd 11 2009-04-13 �� 9:54:14
English - 12
Channel Status Display Icons
A
: An analogue channel.
c
: A channel selected by pressing the yellow button.
*
: A channel set as a Favourite.
(
: A programme currently being broadcast.
\
: A locked channel.
)
: A reserved programme
Channel List Option Menu (in All Channels / Added Channels / Favourites)
Press the TOOLS button to use the option menu.
Option menu items may differ depending on the channel status.
Add / Delete
You can delete or add a channel to display the channels you want.
All deleted channels will be shown on All Channels menu.
A gray-coloured channel indicates the channel has been deleted.
The Add menu only appears for deleted channels.
You can also delete a channel from the Added Channels or Favourite menu in the same
manner.
Add to Favourite / Delete from Favourite
You can set channels you watch frequently as favourites.
Press the TOOLS button to display the Tools menu. You can also set the Add to Favourite
by selecting ToolsAdd to Favourite.
The ‘
*
symbol will be displayed and the channel will be set as a favourite.
All favourite channels will be shown on Favourite menu.
Timer Viewing
If you reserve a programme you want to watch, the channel is automatically switched to the reserved channel in the Channel List;
even when you are watching another channel. To reserve a programme, set the current time rst. (See page 19.)
Only memorized channels can be reserved.
You can set the channel, day, month, year, hour and minute directly by pressing the number buttons on the remote control.
Reserving a programme will be shown in the Programmed menu.
Digital Programme Guide and Viewing Reservation
When a digital channel is selected, and you press the ► button, the Programme Guide for the channel appears. You can
reserve a programme according to the procedures described above.
Edit Channel Name (analogue channels only)
Channels can labelled so that their call letters appear whenever the channel is selected.
The names of digital broadcasting channels are automatically assigned and cannot be labelled.
Edit Channel Number (digital channels only)
You can also edit the channel number by pressing the number buttons on the remote control.
Sort (analogue channels only)
This operation allows you to change the programme numbers of the stored channels. This operation may be necessary after using
the auto store.
Lock / Unlock
You can lock a channel so that the channel cannot be selected and viewed. This function is available only when the Child Lock is
set to On. (see page 20)
The PIN number input screen appears. Enter your 4 digit PIN number.
The default PIN number of a new TV set is “0-0-0-0”. You can change the PIN, by selecting Change PIN from the menu.
The ‘
\
symbol will be displayed and the channel will be locked.
Select All / Deselect All
Select All: You can select all the channels in the channel list.
Deselect All: You can deselect all the selected channels.
You can only select Deselect All when there is a selected channel.
Auto Store
For further details on setting up options, refer to page 9.
If a channel is locked using the Child Lock function, the PIN input window appears.
N
N
N
N
N
N
N
T
N
N
N
N
N
N
N
N
N
N
N
N
N
824 UKTV Gold
825 UKTV style
A
1 C --
A
2 C --
A
3 ♥ C --
A
4 C --
A
5 C --
A
6 C --
A
7 C --
Added Channels
All Channel Type Zoom Select
T
Tools
Delete
Add to Favourite
Timer Viewing
Edit Channel Name
Sort
Lock
BN68-02163N-Eng.indd 12 2009-04-13 �� 9:54:14
English - 13
Channel List Option Menu (in Programmed )
You can view, modify or delete a reservation.
Press the TOOLS button to use the option menu.
Change Info
Select to change a viewing reservation.
Cancel Schedules
Select to cancel a viewing reservation.
Information
Select to view a viewing reservation. (You can also change the reservation information.)
Select All
Select all reserved programmes.
N
PICTURE CONTROL
ConguringthePictureMenu
Mode
You can select the type of picture which best corresponds to your viewing requirements.
Press the TOOLS button to display the Tools menu. You can also set the picture mode by
selecting Tools Picture Mode.
Dynamic
Selects the picture for high-denition in a bright room.
Standard
Selects the picture for the optimum display in a normal environment.
Movie
Selects the picture for viewing movies in a dark room.
Backlight / Contrast / Brightness / Sharpness / Colour / Tint(G/R)
Your television has several setting options that allow you to control the picture quality.
Backlight: Adjusts the brightness of LCD back light.
Contrast: Adjusts the contrast level of the picture.
Brightness: Adjusts the brightness level of the picture
Sharpness: Adjusts the edge denition of the picture.
Colour: Adjusts colour saturation of the picture.
Tint(G/R): Adjusts the colour tint of the picture.
Select a picture mode to be adjusted rst. The adjusted values are saved for each picture mode.
When you make changes to Backlight, Contrast, Brightness, Sharpness, Colour or Tint(G/R), the OSD will be adjusted
accordingly.
In analogue TV, Ext., AV modes of the PAL system, you cannot use the Tint(G/R) Function.
In PC mode, you can only make changes to Backlight, Contrast and Brightness.
Settings can be adjusted and stored for each external device you have connected to an input of the TV.
The energy consumed during use can be signicantly reduced if the brightness level of the picture is reduced, which will
reduce the overall running cost.
Advanced Settings
Samsung’s new TVs allow you to make even more precise picture settings than previous
models. See below to adjust detailed picture settings.
Advanced Settings is available in Standard or Movie mode.
In PC mode, you can only make changes to Gamma and White Balance from among the
Advanced Settings items.
BlackTone→Off/Dark/Darker/Darkest
You can select the black level on the screen to adjust the screen depth.
¦
T
N
N
N
N
N
N
N
N
1 / 1 / 2009
13:59 5 TV1
Quincy, M.E
18:59 2 TV3
The Equalizer
20:59 2 TV3
McMillan & Wife
Programmed
All Zoom■Select
T
Tools
E
Information
Change Info
Cancel Schedules
Information
Select All
Mode :Standard
Backlight : 7
Contrast : 95
Brightness : 45
Sharpness : 50
Colour : 50
Tint (G / R) : G50 / R50
Picture
Colour : 50
Tint (G / R) : G50 / R50
AdvancedSettings
Picture Options
Picture Reset
Picture
BN68-02163N-Eng.indd 13 2009-04-13 �� 9:54:15
English - 14
Dynamic Contrast→Off / Low / Medium / High
You can adjust the screen contrast so that the optimal contrast is provided.
Gamma
You can adjust the Primary Colour (Red, Green, Blue) Intensity.
Colour Space
Colour Space is a colour matrix composed of red, green and blue colours. Select your favourite Colour Space to experience the
most natural colour.
Native: Native Colour Space offers deep and rich colour tone.
Auto: Auto Colour Space automatically adjusts to the most natural colour tone based on programme sources.
White Balance
You can adjust the colour temperature for more natural picture colours.
R-Offset / G-Offset / B-Offset / R-Gain / G-Gain / B-Gain: You can adjust the Colour ‘temperature’ in the light areas by
changing the values of R, G, B. Recommended for advanced users only.
Reset: The previously adjusted white balance will be reset to the factory defaults.
Flesh Tone
You can emphasize the pink ‘esh tone’ in the picture.
Changing the adjustment value will refresh the adjusted screen.
EdgeEnhancement→Off/On
You can emphasize object boundaries in the picture.
Picture Options
In PC mode, you can only make changes to the Colour Tone and Size from among the items in Picture Options.
ColourTone→Cool/Normal/Warm1/Warm2
You can select the most comfortable colour tone to your eyes.
Settings can be adjusted and stored for each external device you have connected to an input of the TV.
Warm1 or Warm2 is only activated when the picture mode is Movie.
Size
You can select the picture size which best corresponds to your viewing requirements.
Press the TOOLS button to display the Tools menu. You can also set the size by selecting Tools→PictureSize.
Auto Wide: Automatically adjusts the picture size to the 16:9 aspect ratio.
16:9: Adjusts the picture size to 16:9 appropriate for DVDs or wide broadcasting.
Wide Zoom: Magnify the size of the picture more than 4:3.
Zoom: Magnies the 16:9 wide picture (in the vertical direction) to t the screen size.
4:3: This is the default setting for a video movie or normal broadcasting.
Screen Fit: Use the function to see the full image without any cut-off when HDMI (720p / 1080i) or Component (1080i) signals
are input.
Depending on the input source, the picture size options may vary.
The items available may differ depending on the selected mode.
In PC Mode, only 16:9 and 4:3 mode can be adjusted.
Settings can be adjusted and stored for each external device you have connected to an input of the TV.
Temporary image retention may occur when viewing a static image on the set for more than two hours.
Wide Zoom: Press the ► button to Select Position, then press the ENTER
E
button. Press the ▲ or ▼ button to move the
picture up / down. Then press the ENTER
E
button.
Zoom: Press the ► button to Select Position, then press the ENTER
E
button. Press the ▲ or ▼ button to move the picture
up and down. Then press the ENTER
E
button. Press the ► button to Select Size, then press the ENTER
E
button. Press
the ▲ or ▼ button to magnify or reduce the picture size in the vertical direction. Then press the ENTER
E
button.
After selecting Screen Fit in HDMI (1080i) or Component (1080i) mode: Select Position by pressing the ◄ or ►button. Use
the ▲, ▼, ◄ or ► button to move the picture.
Reset: Press the ◄ or ► button to select Reset, then press the ENTER
E
button. You can initialize the setting.
If you use the Screen Fit function with HDMI 720p input, 1 line will be cut at the top, bottom, left and right as in the Overscan
function.
N
N
N
N
T
N
N
N
N
N
N
N
N
N
BN68-02163N-Eng.indd 14 2009-04-13 �� 9:54:15
English - 15
ScreenMode→16:9/WideZoom/Zoom/4:3
When setting the picture size to Auto Wide in a 16:9 wide TV, you can determine the picture size you want to see the 4:3 WSS
(Wide Screen Service) image or nothing. Each individual European country requires different picture size so this function is
intended for users to select it.
16:9: Sets the picture to 16:9 wide mode.
Wide Zoom: Magnify the size of the picture more than 4:3.
Zoom: Magnify the size of the picture vertically on screen.
4:3: Sets the picture to 4:3 normal mode.
This function is available in Auto Wide mode.
This function is not available in PC, Component or HDMI mode.
DigitalNR→Off/Low/Medium/High/Auto
If the broadcast signal received by your TV is weak, you can activate the Digital Noise Reduction feature to help reduce any static
and ghosting that may appear on the screen.
When the signal is weak, select one of the other options until the best picture is displayed.
HDMIBlackLevel→Normal/Low
You can directly select the black level on the screen to adjust the screen depth.
This function is active only when the external input connects to HDMI (RGB signals).
FilmMode→Off/Auto
The TV can be set to automatically sense and process lm signals from all sources and adjust the picture for optimum quality.
Film Mode is supported in TV, AV, COMPONENT (480i / 1080i) and HDMI (480i / 1080i).
Picture Reset→Reset Picture Mode / Cancel
Resets all picture settings to the default values.
Select a picture mode to be reset. The reset is performed for each picture mode.
Reset Picture Mode: Current picture values return to default settings.
Using Your TV as a Computer (PC) Display
Setting Up Your PC Software (Based on Windows XP)
The Windows display-settings for a typical computer are shown below. The actual screens on your PC will probably be different,
depending upon your particular version of Windows and your particular video card. However, even if your actual screens look
different, the same basic set-up information will apply in almost all cases. (If not, contact your computer manufacturer or Samsung
Dealer.)
1.
First, click on ‘Control Panel’ on the Windows start menu.
2.
When the control panel window appears, click on ‘Appearance and Themes’ and a display dialog-box will appear.
3.
When the control panel window appears, click on ‘Display’ and a display dialogbox will appear.
4.
Navigate to the ‘Settings’ tab on the display dialog-box.
The correct size setting (resolution): Optimum-1360 X 768 pixels
If a vertical-frequency option exists on your display settings dialog box, the correct value is ‘60’ or ‘60 Hz’. Otherwise, just click
‘OK’ and exit the dialog box.
N
N
N
N
N
N
¦
BN68-02163N-Eng.indd 15 2009-04-13 �� 9:54:15
English - 16
Display Modes
Both screen position and size will vary depending on the type of PC monitor and its resolution. The resolutions in the table are
recommended.
D-Sub and HDMI/DVI Input
Mode Resolution
Horizontal Frequency
(KHz)
Vertical Frequency
(Hz)
Pixel Clock Frequency
(MHz)
Sync Polarity
(H / V)
IBM 640 x 350 31.469 70.086 25.175 +/-
720 x 400 31.469 70.087 28.322 -/+
MAC 640 x 480 35.000 66.667 30.240 -/-
832 x 624 49.726 74.551 57.284 -/-
VESA CVT 720 x 576 35.910 59.950 32.750 -/+
1280 x 720 44.772 59.855 74.500 -/+
1280 x 720 56.456 74.777 95.750 -/+
VESA DMT 640 x 480 31.469 59.940 25.175 -/-
640 x 480 37.500 75.000 31.500 -/-
640 x 480 37.861 72.809 31.500 -/-
800 x 600 37.879 60.317 40.000 +/+
800 x 600 46.875 75.000 49.500 +/+
800 x 600 48.077 72.188 50.000 +/+
1024 x 768 48.363 60.004 65.000 -/-
1024 x 768 56.476 70.069 75.000 -/-
1024 x 768 60.023 75.029 78.750 +/+
1360 x 768 47.712 60.015 85.500 +/+
VESA GTF 1280 x 720 52.500 70.000 89.040 -/+
When using an HDMI / DVI cable connection, you must use the HDMI (DVI) jack.
The interlace mode is not supported.
The set might operate abnormally if a non-standard video format is selected.
Separate and Composite modes are supported. SOG is not supported.
Setting up the TV with your PC
Preset: Press the SOURCE button to select PC mode.
Auto Adjustment
Auto Adjustment allows the PC screen of set to self-adjust to the incoming PC video signal. The
values of ne, coarse and position are adjusted automatically.
This function does not work in DVI-HDMI mode.
Press the TOOLS button to display the Tools menu. You can also set the Auto Adjustment
by selecting ToolsAuto Adjustment.
Screen
Coarse / Fine
The purpose of picture quality adjustment is to remove or reduce picture noise. If the noise is not removed by Fine-tuning alone,
then adjust the frequency as best as possible (Coarse) and Fine-tune again. After the noise has been reduced, readjust the picture
so that it is aligned on the centre of screen.
PC Position
Adjust the PC’s screen positioning if it does not t the TV screen. Press the ▲ or ▼ button to adjusting the Vertical-Position. Press
the ◄ or ► button to adjust the Horizontal-Position.
Image Reset
You can replace all image settings with the factory default values.
N
N
N
N
¦
N
N
T
Brightness : 45
Sharpness : 50
AutoAdjustment
Screen
Advanced Settings
Picture Options
Picture Reset
Picture
BN68-02163N-Eng.indd 16 2009-04-13 �� 9:54:15
English - 17
SOUND CONTROL
ConguringtheSoundMenu
Mode→Standard/Music/Movie/ClearVoice/Custom
You can select a sound mode to suit your personal preferences.
Press the TOOLS button to display the Tools menu. You can also congure the sound
mode by selecting Tools→SoundMode.
Standard
Selects the normal sound mode.
Music
Emphasizes music over voices.
Movie
Provides the best sound for movies.
Clear Voice
Emphasizes voice over other sounds.
Custom
Recalls your customized sound settings.
Equalizer
The sound settings can be adjusted to suit your personal preferences.
Mode
You can select a sound mode to suit your personal preferences.
Balance
Controls the balance between the right and left speakers.
100Hz / 300Hz / 1KHz / 3KHz / 10KHz (Bandwidth Adjustment)
To adjust the level of different bandwidth frequencies
Reset
Resets the equalizer settings to the default values.
SRSTruSurroundHD→Off/On
SRS TruSurround HD is a patented SRS technology that solves the problem of playing 5.1 multichannel content over two
speakers. TruSurround delivers a compelling, virtual surround sound experience through any two-speaker playback system,
including internal television speakers. It is fully compatible with all multichannel formats.
Press the TOOLS button to display the Tools menu. You can also set the SRS TruSurround HD by selecting Tools→SRSTS
HD.
Audio Language (digital channels only)
You can change the default value for audio languages. Displays the language information for the incoming stream.
You can only select the language among the actual languages being broadcast.
AudioFormat→MPEG/DolbyDigital(digital channels only)
When sound is emitted from both the main speaker and the audio receiver, a sound echo may occur due to the decoding speed
difference between the main speaker and the audio receiver. In this case, use the TV Speaker function.
The Audio Format appears according to the broadcasting signal.
¦
T
T
N
N
Mode :Custom
Equalizer
SRS TruSurround HD : Off
Audio Language : - - -
Audio Format : - - -
Audio Description
Auto Volume : Off
Sound
BN68-02163N-Eng.indd 17 2009-04-13 �� 9:54:15
English - 18
Audio Description (digital channels only)
This is an auxiliary audio function that provides an additional audio track for visually challenged persons. This function handles the
Audio Stream for the AD (Audio Description), when it is sent along with the Main audio from the broadcaster. Users can turn the
Audio Description On or Off and control the volume.
AudioDescription→Off/On
Turn the audio description function on or off.
Volume
You can adjust the audio description volume.
Volume is active when Audio Description is set to On.
AutoVolume→Off/On
Each broadcasting station has its own signal conditions, and so it is not easy to adjust the volume every time the channel is
changed. This feature lets you automatically adjust the volume of the desired channel by lowering the sound output when the
modulation signal is high or by raising the sound output when the modulation signal is low.
SpeakerSelect→ExternalSpeaker/TVSpeaker
If you want to hear the sound through separate speakers, cancel the internal amplier.
The volume and MUTE buttons do not operate when the Speaker Select is set to External Speaker.
If you select External Speaker in the Speaker Select menu, the sound settings will be limited.
SoundReset→ResetAll/ResetSoundMode/Cancel
You can restore the Sound settings to the factory defaults.
Selecting the Sound Mode
You can set the sound mode in the Tools menu. When you set to Dual l ll, the current sound mode is displayed on the screen.
Audio Type Dual 1 / 2 Default
A2 Stereo
Mono MONO
Automatic change
Stereo STEREO↔MONO
Dual DUAL1↔DUAL2 DUAL 1
NICAM
Stereo
Mono MONO
Automatic change
Stereo MONO↔STEREO
Dual
MONO↔DUAL1
DUAL 2
DUAL 1
If the stereo signal is weak and an automatic switching occurs, then switch to the mono.
This function is only activated in stereo sound signal. It is deactivated in mono sound signal.
This function is only available in TV mode.
N
N
N
¦
N
N
N
BN68-02163N-Eng.indd 18 2009-04-13 �� 9:54:15
1 / 1

Samsung LE22B350F2W Kasutusjuhend

Kategooria
LCD-telerid
Tüüp
Kasutusjuhend

teistes keeltes